 A toilet refilling shouldn’t make unusual noises. What I commonly see is as a toilet is refilling with water the problem is with the float at the fill valve.
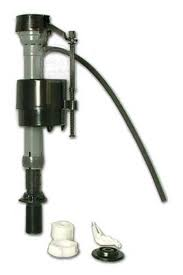
The old ballcock style is famous for these types of noises. As the tank fills, the float will rise to the point that it shuts off, but it never quite shuts off. Instead it will repeatedly stop and start the water making a “bang bang bang” sound. It’s really more of a loud stuttering sound. You can try to bend the arm downward (toward the water) to get it to shut off earlier, but generally when they start behaving like that, it’s time to replace them.
A fluidmaster is a better design (and takes less space), but the noisemaking can also happen with it. It seems once they get old they get to the point where they just don’t quite shut off and you get the noises.
I would recommend replacing the fill valve with a fluidmaster. While you are at it, also replace the flapper. You can buy these items separately, but they are cheaper if you buy them in a kit, plus it will only take you 15 minutes to replace them.
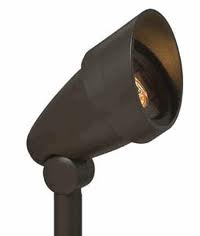 A cable for your landscape lights supplies the power to illuminate the individual fixtures. When this cable gets severed or otherwise damaged, the lights obviously won’t work because there is no power getting to them. You can certainly run a new line of cable, but it is easier and cheaper to splice the severed pieces.
You can buy a cable splice at any home center and it takes only a few minutes to repair. The splice is a hard plastic with grooves for the cable and sharp teeth that penetrate the cable and touch the electrical wires inside the cable. The two halves of the splice clamp down and grip the cable so that there won’t be any movement.
Open the two halves of the splice and lay each side of the severed cable into the appropriate side (you may want to cut away any ripped or torn insulation from the wires so you have a smooth cut). Push the top of the splice down upon the bottom. You will feel some slight resistance as the teeth push into the cable. Tighten the screws that hold the two halves together and then go manually turn on the transformer. Your light fixtures should light up.
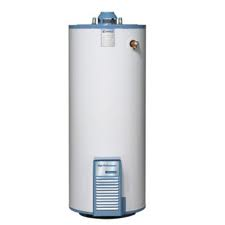 There are certainly ways you can save energy on your water heater. Many of the methods deal with the design of the system, from the length of the piping runs and how they run, to the pressure of the system. That’s fine for new construction, but what about those of us who aren’t building a new house?
There are simple common sense ways, like fixing all leaks to minimize the wasting of hot water. A small leak on the hot side will cause hot water to leave the tank, only to be replaced with cold water, and eventually the burner will have to fire up.
Some easy ways to lower energy consumption from your water heater are also common sense.
Reduce the Tank’s Temperature
If you lower the temperature of the water in the tank, the water heater won’t have to heat the water as much or as long.
Use Heat Traps
Heat traps prevent hot water from leaving the tank due to convection of hot water in the piping above the water heater.
Insulation Blanket
A water heater blanket makes sense for cold climates, but in the west, many water heaters are placed in the insulated garage, and so the savings are likely negligible.
Low-Flow Shower Head
A low flow shower head (and faucet aerators) can save plenty of energy because they cut the amount of hot water leaving the tank. In other words, you use less hot water.
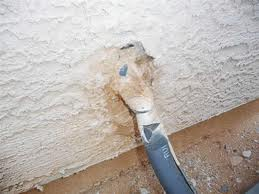 Save yourself some energy and ask your handyman to insulate your air conditioner lines. It’s probably been at least since last summer since you looked at your a/c insulation, but I’ll bet it needs attention.
You have several lines coming from the wall leading to the a/c unit on the ground. The large diameter line needs to be insulated. It is the cold line as the unit is running. The insulation around it needs to be free from damage and properly secured. The foam insulation needs to be the correct size with the entire length contacting the pipe. You don’t want any gaps between the pipe and the insulation. Measure the diameter of the pipe for a good fit and get the correct size.
Slide the insulation over the pipe. Peel off the self-sticking tape on either side of the cut along the insulation’s edges (the slit allows you to slide the insulation over the pipe. Cut the insulation to length and start at one end and push the sticky surfaces together to close the insulation. You may need to add some tape along this area if you think it may come apart.
Finally, it is a good idea to use some spray foam in the metal shrouds that lead into the wall. This will add another level of insulation, as well as seal out any air leaks that would rise into the wall cavity.
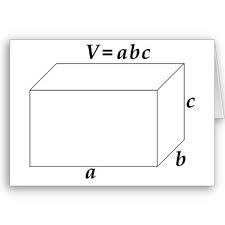 Why would a handyman need to find the volume of a house? I’m sure there are many reasons, but a few come to mind. Sizing swamp cooler cubic feet per minute (cfm) requires a volume of a home, as does running a blower door test for energy efficiency. You need volume figures to ultimately determine proper ventilation requirements.
Determining the volume of a house can be tricky. If all houses were perfect rectangles, the job would be easy, but add in vaulted ceilings and interesting architecture, and the job gets more challenging.
I try to break up the house into basic shapes. It’s much easier to do the calculations that way. As you walk through the house, sketch the floor plan as if it were made of simple shapes. Take the volume of these shapes and add them together for the volume. Most of your shapes will be boxes of various dimensions. For vaulted ceilings you will need to calculate the volume of a triangle. For a box, be it a cube or rectangular box, the formula is: length x width x height. For a vaulted ceiling (in the shape of a triangle), the formula is length x width x height/2.
When you have all of your volumes from the various parts of the house, add them up for a cubic foot total.
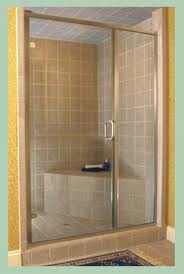 A shower door has closing problems just like any door. Sometimes they don’t close very well, whether from abuse or time. Swinging shower doors will occasionally need to be adjusted.
Open the shower door and lift it upward slightly. See if you can determine if there is any “play” in the door and if so, where the cause of it is. Usually, swinging shower doors are connected to a channel that gets screwed onto the shower enclosure from the inside of the shower. It may be that the door and channel are loose at a screw. If that is the case, Lift the door to its normal position and tighten the screws that hold the channel in place.
It may also be that the vertical support that the channel is attached to is loose. Check at the top of this hinge to see if there is any movement in these pieces. There shouldn’t be, but if there is you may have to get creative.
Also check the shower sweep at the bottom of the door. In a lot of cases, the sweep will become warped and/or loose and fall down somewhat. When it drops, the door won’t close without some effort. I would replace the sweep if that is the cause.
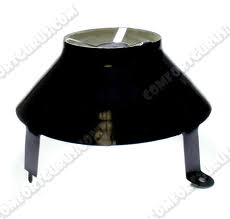 A water heater draft hood plays an important role in the operation of a gas-fired water heater, as well as maintaining a safe environment for the homes occupants. The hood sits on legs at the top of the water heater where the combustion gases exit the tank. It connects to the vent that carries the exhaust out of the house.
The openings under the draft hood allow ambient air to be drawn into the vent to relieve pressure at the burner. As the hot gases rise out of the middle of the tank, the gas mixes with air and it is all carried up through the vent and out of the home. It also prevents a strong down-draft from extinguishing the burner or pilot.
Draft hoods have small tabs on their legs that slide into grooves at the top of the water heater. It’s common that one of the legs will have a screw hole to hold the legs of the diverter in place. Where the top of the diverter connects to the vent, it must be connected with a minimum of three screws. There really isn’t any maintenance on a draft hood, unless you have had some roofing work done around the vent. Then it might be a good idea to check the vent and draft hood to make sure there are no separations.
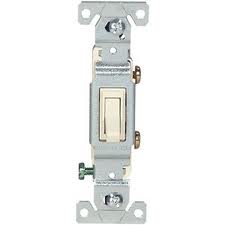 A common handyman task is to diagnose electrical switches and light fixtures. Although it seems nearly impossible, there are times when all the bulbs will go out, especially when you are not there to replace them. Sometimes people get lax and let one burned out bulb go, then another, until finally there is only one working bulb left in a fixture of eight. Naturally, you wouldn’t consider that possibility, but you could have taken a working bulb from another fixture, or even stuck a tester into the socket to check for power before you went to the trouble of replacing the switch.
An essential tool for testing switches is a continuity tester. You can also use a multi-tester by turning the dial to read “continuity”.
Light switches are plastic but have metal parts to conduct electricity. A continuity tester checks if these petal parts are worn or broken, and it will light up if the switch is good, while a multi-tester has a needle or meter that will spring to life. You can test a continuity or multi-tester by touching the probes together and checking for the light or moving needle.
Before you start removing switches from the wall, make sure you turn off the power at the main panel.
To test a standard wall switch, touch one of the probes to each of the screw terminals. When the light switch is in the off position, the tester should not show continuity. But when the switch is on, the light should glow. If the switch fails to do this, then replace it.
For a three-way switch, touch one of the probes to the dark common terminal and the other probe to one of the traveler screw terminals (there are two). Flip the switch off and on. The light should illuminate in one of the positions but not both.
Now touch the other traveler terminal and flip the switch. The light should illuminate in the opposite position from the first traveler terminal. If it doesn’t, replace the switch.
You might also find timer and time-delay switches. These have dials on them and they are tested in the same manner as other manual switches. A timer switch can be tested by touching a probe to the red wire and the other probe to the black wire. Rotate the timer until it passes the “on” tab and the tester should glow. Rotate it again until it passes the “off” tab and it should turn off.
A time-delay switch is one that could be found to turn on a heat lamp in that you have to rotate the dial past a certain point. Then, it counts down on its own and shuts itself off. To test this one, touch a probe to each wire and turn the dial. The tester should glow until the switch turns itself off.
Electronic switches, like programmable or motion sensor switches, are also tested the same way. Each of these will have two wire leads coming out of them. It’s the same deal: Touch one probe to each wire and flip the manual lever from “off” to “on”. The tester should glow in the “on” position, but not the “off” position.
You can see the commonality with testing switches. Before you go through the hassle of testing the switch, try just replacing a bulb. Your weekend will thank you.
 I had a friend call asking for advice on a plumbing issue. He was relocating a washing machine and he needed to secure the piping to a masonry wall.
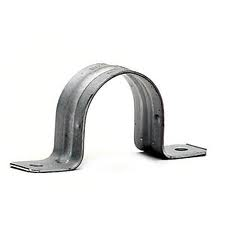
The easiest way is to use pipe straps or hangers. These are small clamp-like mechanisms that come in various sizes to match the diameter of the pipe being secured. They will come with one or two holes and you simply place the strap over the pipe and screw it into the wall. With wood or drywall surfaces it is easy, but masonry makes for a more time-consuming job. You will need to place the strap where you want it, mark the hole location(s) and pre-drill a hole. You can use masonry screws or tapcon bolts. Basically, you will use the appropriate sized drill bit, drill the hole, and then place the strap back over the hole location and install a screw there.
You will want to place enough straps so that the piping is held securely to the wall. Washing machines can produce water hammer via the electric valves quickly closing shut. You want to minimize the potential by strapping the piping any time the pipe changes direction and along the length of the run.
 Finding the right plumbing parts can be like playing a game of hide and seek. You have to go look for the right ones. Home Depot and Lowes will carry most of the popular fast-turning items, but for many parts, you will need to go to a plumbing supply store.
If you know the part you are looking for, certainly a call is in order. You may be able to tell the clerk over the phone the brand and part you need, and he can tell you if he has it.
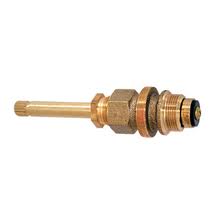
Some parts, however, will be unidentifiable. For that you will need to bring the part with you (always a good practice anyway), and go to the counter. This happens frequently with faucet stems and seats. You may have a 25 year old part that has no distinguishing markings or features…that part needs to go with you to make sure you get the right one.
You can find plumbing supply stores in the yellow pages. Some plumbing companies will also stock parts and sell them to the public. These will be some of the most expensive parts you can buy. However, when you are in a pinch, sometimes you don’t have much of a choice.