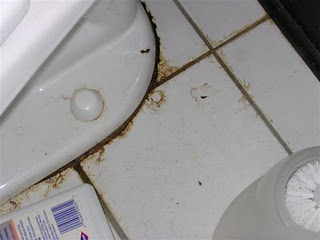
 If you see water coming from the base of your toilet, you have a problem. Although many people think that simply caulking around the toilet will fix it, it won’t.
Water (a nice way to say waste) around the base of your toilet where it sits on the floor is an indication that the connection from the toilet to the drain is not secure. In most cases the wax ring has been breached by movement and is no longer molded to the horn of the toilet.
Beginners will just think that they just have to stuff some caulking in between the floor and bottom of the toilet. If it lasts, it’s just going to trap the waste around the perimeter of the toilet’s base. The chances are good though that the waste will continue to seep out.
You will need to replace the wax ring and floor bolts that hold the toilet to the floor. This involves lifting the toilet and scraping up the old ring. Here is an article on replacing a wax ring and toilet bolts.
When you reset the toilet back down, I like to use plaster of paris instead of caulking. Check to make sure that it is allowed, but it has a good open time to work with and when you set the toilet base into it, it fills all of the voids. A wet sponge or rag will wipe away the excess and make for a perfect finish.
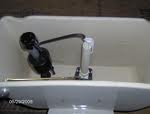
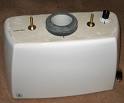 Water leaking off of the toilet tank bolts suggests a couple of things. Maybe a tank bolt has corroded and broken, or maybe the tank is cracked. It’s interesting how a tank cracks. Sometimes, someone will over-tighten the nuts which will crack it, and other times people will push back against the tank while they are seated on the toilet. I mean…it’s not a recliner right? Regardless, you will need to check for a cracked tank before you replace the bolts.
If the tank has a crack, replace it. Otherwise, you will just be replacing the tank bolts, washers, and nuts.
There is not a lot of science to this. Hold the nut on the bottom and unscrew the bolt with a screwdriver (drain the tank first and turn off the water so it doesn’t refill).
On the new bolt place a metal washer next to the head and then a rubber washer to stop water from escaping. On the underside of the bowl, you are going to place a washer and a nut and tighten snugly…but don’t over-tighten!
Most tanks have 2 bolts, but some have 3. Tighten them uniformly. In other words, don’t fully tighten one and then move to the next. Rather, tighten one a little, and then the other…gradually tighten each one until snug. How tight to tighten the nuts is a matter of blind faith. You want them tight enough to stop any leaks and movement of the tank, but not so tight that they crack the tank.
 If you have a running toilet, the first things people do is to replace the toilet flapper and the fill valve. I would try the flapper first, but you might as well replace the fill valve as it is likely to go bad soon too, if it hasn’t already.
The toilet flapper seals water from leaking out of the toilet tank and into the bowl. When enough water has leaked out of the tank, the fill valve will turn the water on to refill the tank. So the flapper is the first choice.
If you have replaced the flapper and the water still leaks out of the tank (assuming there is not crack in the tank), you may have a bad flush valve. The flush valve is what the flapper sits on. The flush valve assembly sits in the hole in the bottom of the tank. Before you replace this part, however, you might inspect the seat that the flapper is sitting on.
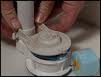
These parts spend their entire lives in water. Over time, scale and deposits can form on various parts. This might play a role in your tank losing water. Lift up the flapper and check the rim of the seat where the flapper sits. You are looking for tiny bumps in this area. These bumps will allow a small amount of water to pass and eventually when enough water passes, the fill valve turns on and refills your toilet’s tank. Try using your fingernail and scrape off the bumps. You can also try a flusher fixer which has a gel ring that sits on top of any bumps or deformities at the seat.
 Toilet leaks can have many causes. Its pretty common that there will all of a sudden be water on the floor around the toilet. What caused it? That is for you to find out. I would start out looking at the valve on the wall and follow it up to the tank. Look carefully as water can leak very slowly. Grab some toilet paper and touch the parts with it. Toilet paper will turn wet with the slightest amount of water and so it is a good test to find the leak.
If everything appears dry at the valve and supply line, move to where the tank connects to the bowl. This is a leak prone area where either the tank bolts corrode and break, or someone leans back on the toilet and cracks the tank. Flush the toilet and check for leaks. It may be that you need to remove the toilet tank and replace the spud and bolts and washers.
If all of this appears to be water tight, you probably have to replace the wax ring and bolts. The wax ring is found underneath the toilet bowl and so you need to disconnect the water supply and physically remove the toilet from the floor. Here is an article on how to replace a toilet wax ring and bolts.
 If you suspect a toilet leak but really can't pinpoint it, all you have to do is head towards the kitchen pantry. I know what you're thinking. Why head to the kitchen pantry when the toilet is in the bathroom? Because that is where the food coloring is.
There are kits you can buy to tell if you have a toilet leak from the tank to the bowl, but they are basically a means to color the water in the tank to see if you get some bleed through into the bowl. You can certainly buy one of those kits, but food coloring will accomplish the same thing, and you probably have some in your pantry.
Here's how you do it...after you flush the toilet and the flapper drops back down to start refilling the tank, add some drops of food coloring to the tank (you will have to remove the tank's lid for this). Add enough drops to color the water. Darker colors are easier to see. After you wait 10 minutes, look into the bowl to see if you have any colored water in the bowl. If you do, you have water escaping from the tank into the bowl when it shouldn't be.
To fix the problem, you might want to start with replacing the flapper and fill valve and repeat the test. If you still get colored water in the bowl, try replacing the flush valve.
So how many times do you look in your toilet tank? Probably not much. Well I had occasion to once I noticed a puddle of rusty water on the floor. I got on my knees and looked at the rear of the toilet and there was a stream of rusty water from the tank, slowly running down the bowl to the floor. I lifted off the tank lid and saw the culprit: balls of rust the size of a golf ball that had corroded the bolts holding the toilet tank to the bowl.
Usually you can unscrew the bolts from inside the tank, but the rust prohibited that. Sometimes you have to get creative. After shutting the water off to the toilet and flushing it to remove the water in the tank, you can remove the water supply line to the fill valve.
I removed a hacksaw blade from a hacksaw and cut the bolts off in between the tank and the bowl. The bolts are brass and were fairly easy to cut through. The other option is to try to drill out the bolts, but if you have a lot of corrosion built up on the bolts, I would go straight for the hacksaw. Be careful as the toilet is vitreous china and will crack if you try to manhandle it.
With the tank off, you can remove the corroded bolts and replace them with new ones. Use a new spud washer and place it over the flush valve opening (it gets sandwiched between the tank and bowl). Place the washers on the bolts and install them through the tank holes and finally the holes in the bowl. Make sure the holes line up or when you tighten the bolts it may crack the tank. You want an even distribution of pressure from the bolts, so make sure the holes are aligned before tightening.
Once you reconnect the water supply line to the fill valve, turn the water back on and flush the toilet several times. Check for leaks under the toilet, and particularly on the ends of the tank bolts.
 That tiny trickle from a toilet can be frustrating for a handyman or a homeowner. It wastes water just as a bigger leak does, and can interrupt your sleep when the toilet starts to fill for no apparent reason. That's a dead giveaway that water is leaking from the tank.
There are many possible explanations for the leak, but let's start with the easy ones. Begin by making sure the float is set at a level that won't allow water to run into the overflow pipe. If the water in the tank is running into this pipe (it's the one in the center of the tank about the diameter of a quarter), then simply adjust the float level downward so that the water shuts off earlier.
The problem is usually with the flapper or flush valve assembly. The flush valve (a.k.a. Douglas valve) is what the flapper sits on. It is located in the center of the tank and has the overflow pipe rising out of it. Stick you arm into the tank (don't worry, the water is clean) and push down on the flapper. If the water stops trickling into the bowl, you have found your problem.
Even though you replaced the flapper, it may not fit correctly, or there may be damage to the rim sealed by the flapper. Try feeling around the rim of the flush valve for divots, cracks or deposits. You can either replace the flush valve, or you can try a product called a "flush fixer".
If pushing down on the flapper doesn't help, you probably need to replace the flush valve or you may have a cracked tank.
The flush fixer is a hinged flapper/seat assembly that sits on top of the flush valve, exactly where the old flapper went. What makes this work is that on the bottom of the unit is a jelly-like substance that seals against the damaged seat of the flush valve. So, the jelly will fill in the areas and prevent leakage at the points where water got between the flapper and the damaged seat.
Replacing the flush valve is a chore, as it involves removing the tank from the bowl. So, you will need to turn off the water to the toilet, disconnect the supply line to the fill valve, and drain the water from the tank. Remove the tank from the bowl by unbolting it from underneath (you may have to hold a screwdriver on the bolt to keep it from turning as you remove the nut). Gently lift the tank and set it on its side.
Next, remove the spongy-looking spud gasket buy pulling it off, and then use either water pump pliers or a spud wrench to remove the lock nut (this holds the flush valve in place). If you pull the refill tube from the overflow pipe, the flush valve will lift out.
To install the new flush valve, push the tapered washer onto the end of the threads and seat it so that the tapered end faces the threaded end. Shove the new valve into the hole and screw on the new locknut one-quarter turn past hand tight. Push the new spud gasket on and you are ready to re-install the tank.
Before you do, however, check the bolts that hold the tank to the bowl. While you have the tank off, it's a good idea to replace these bolts. In most cases, removing the tank will disturb them enough to get them to leak. It's a simple matter of pushing a washer on the end and tightening it to the tank.
Pick up the tank and gently set it back onto the bowl so that all of the holes line up. Install a brass washer and a nut onto the end of each bolt and tighten them. Be very careful here-if you overtighten these bolts, it will crack the toilet. Once the tank is secured to the bowl, reconnect the refill tube to the top of the overflow pipe and then hook up the water supply back to the fill valve. This should give you years of leak-free operation.
We went to see a customer who called about a leaking toilet tank. There was a leak in between the tank and the bowl, and the customer said he had removed the tank to see if he could find the problem. When he couldn't find anything obviously wrong, he reinstalled the tank and it leaked worse. That's when he called this Las Vegas handyman.
When we looked at the tank, the problem was fairly obvious. The toilet tank had a crack from one bolt to the other. Although this may not have been the cause of the original leak, it appeared he over-tightened the bolts and cracked the tank. This caused the more predominant leak.
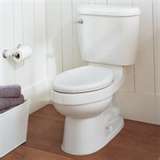
I'm guessing that the flush valve was initially leaking but now the bigger problem is that the tank needs to be replaced. Some decisions need to be made here. If the toilet is inefficient, it's probably a good idea to buy a complete toilet and make up your expense in water savings. If you opt just to replace the tank, you might find a match, or you may have to buy a generic tank of the same color. The important thing here is to get the same hole pattern in the new tank. Some have a 2-hole pattern and some have a 3-hole pattern in a triangle shape, so measure the distance from the holes before you buy. While you are at it, replace the flush valve, fill valve, and the flapper. Just don't overtighten the tank bolts.
You can see why it might make sense to buy a new toilet, especially if you can get rid of an old inefficient model in exchange for a water saving model.
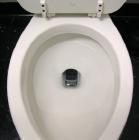 I had a customer call the other day about a toilet problem. He has a rental unit that hasn't been occupied in a few months. He went by it the other day and found that there was no water in the toilet bowl. That is strange...usually you will find a little water in the bowl. The customer was thinking that since there hasn't been anyone in the unit, maybe the water evaporated. I guess that is possible, but I can't ever remember seeing that occur.
When there is no water in the toilet bowl, there is nothing to seal out the sewer smell from entering your living space. The sewer gas is kept out of your living space because the water creates a seal in the trap of the toilet. He poured some water back into the toilet bowl and re-checked it the following day. Sure enough the water was gone.
I told him there could really be only one explanation...that he had a cracked toilet bowl. Although there was no evidence of water on the floor of the bathroom, there had to be a crack in the trap of the bowl. The water was slowly draining out of the trap and into the drain in the floor. We could have just installed a new toilet bowl, which would have solved his problem, but the homeowner decided to upgrade to a more efficient toilet.
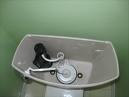 Have you ever heard the sound of water leaking in your toilet tank? A customer called on her toilet leak today. So I removed the toilet tank lid and water was running down the pipe in the center of the tank. This pipe is part of the flush valve (not to be confused with the fill valve). The toilet's flapper is also part of the flush valve. This was a simple fix of adjusting the float in the toilet tank.
The flush valve works like this: when you press the handle of the toilet, the flapper lifts off the flush valve allowing water to rush into the bowl. This creates a siphoning effect and pushes the waste down the toilet and out to the sewer. Then the flapper drops back down stopping any more water from entering the bowl. As water starts to refill the tank for the next flush, there is a little tube that runs from the fill valve in the corner, to the flush valve pipe in the center of the tank. This supplies water to refill and rinse the bowl. When the level of water in the tank reaches a certain level, the water shuts off. The fill valve will either have a hollow ball attached to a metal rod, or what looks like a doughnut that rides along the shaft of the fill valve. The ball/doughnut are hollow and as the water rises in the tank, they float on the water and shut it off at the appropriate level.
The customer today simply needed this level to be adjusted downward to shut off the water earlier and prevent it from running down the pipe. To adjust the rod/ball type, just bend the rod slightly downward. To adjust the "doughnut" style, you can simply twist the plastic adjusting screw or extend the distance from the fill valve arm. This repair should take under 2 minutes to troubleshoot and repair the problem...just perfect for a handyman in Las Vegas.