 If you have a kitchen sink strainer that moves, you will need to tighten it from underneath the kitchen sink. This isn't a difficult job, but you may need to remove it first. Plus, the strainer will tend to spin as you tighten the nut underneath it.
I would try to just tighten it from below first, and then run some water to see if it leaks. To stop the strainer from spinning, take a pair of pliers and turn them so that the handles of the pliers will fit down into the holes of the strainer. Then you can place a screwdriver or pipe in the jaws of the pliers to hold it still. This will allow you to hold onto the pliers from above the sink as you tighten the nut from below.
If after running water you find a leak, I would remove the strainer completely and reinstall some plumbers putty under the lip of the strainer then reinstall it. A lot of times if a strainer becomes loose, it will lose the seal created by the putty. So you may have to install new putty and retighten.
Scoop out some plumbers putty and roll it between your hands until the "snake" is about the diameter of a pencil. Push this under the lip of the strainer and retighten. You should see the putty squeeze out from under the entire lip of the strainer as you tighten.
 If you are replacing a sink that has rounded-over ceramic tiles sitting on top of it, you have some choices to make. These sinks look like an undermount sink due to the round-over tiles that sit along the perimeter of the sink. Although it isn’t truly an undermount sink, you have to remove the small roundover tiles to get the old sink out.
So your choices are to get a sink that will use the same quarter-round tiles and reinstall it, or get a stainless sink with a large lip on it to cover the damaged area where you will be breaking out the tiles.
The issue you may find with using a similar style sink, is that you will need to match the existing tiles. This may be easy to do, but if you can’t find the exact color, you may consider installing a contrasting color or a complementary color. Realize though, that this will be a dead giveaway that the sink was replaced and you couldn’t find matching tiles.
The other option is to replace the sink with a stainless that has a wide lip. In this way, you can mortar in the corner pieces to lift and support the sink. The new sink will sit on top of these, and you can caulk around the perimeter to complete the installation.
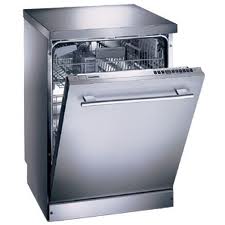 If your sink leaks when your dishwasher runs, I wouldn’t blame the dishwasher. The leak could be coming from several possible locations. Most likely the leak is happening when the dishwasher drains, and so start looking closely at the drain line forward. It may be a split in the drain line, but the best way to find the problem is to run the dishwasher and look for the leak.
The drain line will connect to the air gap on top of the sink, and this is a likely culprit. From the air gap, the hose runs into the side of the disposal. So if you see a leak only when the dishwasher is running, you know it is isolated to the dishwasher. If the leak is at the disposal, it would leak whenever water ran down the disposal, regardless of whether it was the dishwasher emptying into it or the kitchen faucet. Check the connection where the air gap hose connects to the disposal; this hose has a rubber boot that connects to a nipple at the disposal and it may be torn or damaged. The most likely area of the leak is from the air gap to the disposal. Check these hoses and fittings.
Once the dishwasher goes into the drain mode, the leak should be very obvious.
 Stainless steel kitchen sinks are beautiful and appear to be resistant to virtually anything. I like stainless sinks, but they do get scratched. Just think about how often people throw silverware in them, not to mention a heavy griddle. It really doesn’t take much for the sink to get a very visible scratch. Fortunately, the scratch can be removed.
You can buy mild abrasives that will buff the scratch out, but there is a sequence to follow. First off, clean the sink. Use soapy water and a sponge and get rid of any greasy nastiness. Rinse out the sink and dry it with paper towels. Turn on the lights in the kitchen so you can see the scratch and any other blemishes. If you don’t have a light directly over the sink, use a desk lamp or other portable light. You want to light up the area.
Use a commercial product designed for stainless steel sinks along with a 3M Fine Scotch Brite pad. You can try Franke’s or Bar Keepers Friend, but there are several that will work. I know some people that use a mild cleaner and a sponge who like the results. The important thing is to lightly rub with the grain of the sink. If you look closely, you will see which way the finish of the sink runs. Follow this direction or you will have an ugly rub spot that looks like the surface was worn down.
Once you are happy with the appearance, you can wash and dry the sink again.
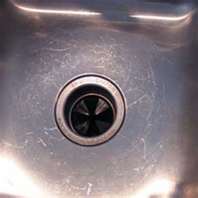
 Maybe your kitchen sink is leaking or maybe you just want to replace the strainer. Removing it can be a real chore. Disconnecting the piping isn’t a horrible job, but then you are left looking at the belly of the beast. You will need to use a large wrench or even water pump pliers and try to loosen the nut that holds everything to the sink. Easier said than done.
The nut under the sink is fairly large, the problem is that when you go to loosen it, the entire assembly will twist with it. What do you do?
There are a couple things you could do, but I think the easiest is to hold the strainer still while you unscrew the nut. You could also cut through the nut or strainer, but that is much more work.
So how do you hold the strainer still? Grab a pair of pliers and turn them upside down. Stick the legs of the pliers into the holes of the strainer at the top of the sink. So what you have is a pair of pliers sticking out of the strainer. Now grab a screwdriver (or a short piece of pipe) and place it in the jaws of the pliers. You have effectively created a handle to hold the strainer still while you remove the nut from below.
 Plumbing leaks can be fixed with the right tools and the right parts. A kitchen sink leak has many culprits. We came across a leak the other day that was coming from the garbage disposal. The disposal itself wasn’t leaking, but the connection from the air gap hose was leaking.
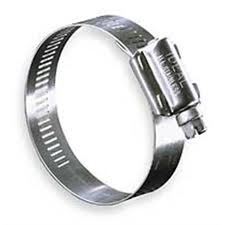
The dishwasher drain goes up to the air gap, and then flows down to the garbage disposal. These are all places where a leak can develop. This particular leak happened because the hose from the air gap was connected by a zip tie. That was strange, as a zip tie doesn’t really have the strength to secure a hose to a fitting. The best way is a hose clamp.
A hose clamp is a circular band that tightens around the hose and the fitting it is attached to. It applies pressure all around the circumference of the hose. These clamps should be used where the dishwasher drain connects to the air gap inlet, where the air gap outlet connects to the discharge hose, and where the discharge hose connects to the disposal.
Hose clamps come in a variety of sizes for the job. You will need to slip the clamp over the hose and then push the hose onto the nipple or fitting that it is attaching to. Then tighten the clamp until snug.
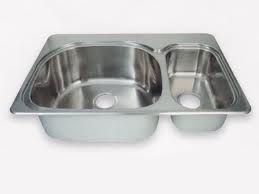 If you are replacing your drop-in kitchen sink, there are a couple of methods to secure them into the countertop. Lightweight sinks like stainless steel, pressed steel or porcelain typically have clips along the bottom of the sink. Heavy sinks like cast iron sometimes can use fasteners and adhesive. The trick with cast iron is to have enough manpower to lift these behemoths into place without damaging anything.
For lightweight sinks, there is a rail underneath the sink along the perimeter. Once the sink is placed into the hole there are clips that install into this rail that extend to the countertop base. Turning the screws in these clips increases the tension on the clips and they hold the sink in place. It’s probably a good idea to run a bead of caulking or silicone under the sink to keep water from entering the sink cabinet (check with your countertop manufacturer to see which material is suitable for your countertop).
If your countertop is ceramic tile or other thick material, the clips won’t be long enough to reach the deep countertop sub base as these are thick. You first have wood (usually ¾ inch), then backer board, then finally mortar and tile. You can buy extensions for the clips or you could chop out a little of the wood sub base where the clips will mount, or even use adhesive caulking.
Once the sink is firmly in place you can connect the drain piping and finish the installation.
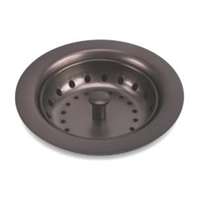
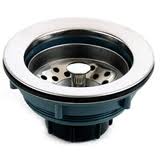
 If you have ever replaced a kitchen sink, or even a strainer, you know that they can be very difficult. These basket strainers stay locked onto the sink for years until someone decides that it is time for them to go. I always recommend using a new sink strainer when replacing the kitchen sink, but if you are doing a repair or just want to upgrade the strainer, it can be challenging to remove.
When working under the sink, you will need to remove the piping leading from the strainer. When you try to unscrew the basket nut, typically the entire strainer will move along with the nut, so you won’t be able to remove the strainer. Here is a trick: grab a pair of pliers. From above the sink, turn the pliers upside down so that the jaws are facing up and the handles are facing down. Place the ends of the handles through two of the holes in the strainer. You will have to slightly open the jaws for this. Once the pliers are inserted into the basket you can place a large screwdriver horizontally into the jaws of the pliers. You have just created a handle to hold onto to prevent the basket from turning as you unscrew the basket nut.
You can use this trick when you re-install the new strainer too. Just use a bead of plumbers putty under the lip of the strainer and push it into the hole. You can hold the strainer still as you install the friction washer, the rubber washer and the basket nut.
 Installing an undermount kitchen sink can be tricky. If you are getting new countertops, such as granite, the installers will often cut the sub-top so that it supports the weight of the sink, and then the granite lays on top of the sink for a nice installation. However, if you are replacing an undermount sink or repairing one that has come loose from the counter, there is a trick that works very well.
An undermount sink is typically held to the underside of the counter with adhesive, and some mounting clips. The adhesive is typically a two-part epoxy to hold the clips and sink in place. Silicone caulking also goes around the perimeter of the sink
The trick is to get the sink to pull tightly to the underside of the new countertop. If your countertop is granite, make sure you clean the underside of the counter as dust will often cause the epoxy to fail. When the installer cuts and polishes the opening for your sink, this creates a slurry of dust that will often find a home under your counter...right where your new sink mounts.
Getting your sink to mate to the underside of the countertop is not difficult, but will take some creativity. Use a 2 x 4 stud and lay it across the counter to span the opening. At this point you have a choice. You can use some adjustable bar clamps and place one end through each drain hole in the sink and the other end over the 2 x 4 and cinch them snuggly so that the sink mates perfectly with the hole in your countertop. If you don't have bar clamps, you can use rope instead. You will make a loop out of the rope and you will need another short piece of a 2 x 4. The shorter 2 x 4 will go through the drain hole in the sink and the rope loop will go over both 2 x 4's so that you are left with the rope going around the 2 x 4's and suspending the sink in the air through the drain(s). Then you can use another piece of scrap lumber and insert it above the 2 x 4 laying across the opening in the countertop but below the rope. Twist this scrap piece of lumber repeatedly and the rope will twist causing the sink to rise up until it meets the underside of the countertop. Then you can clamp the scrap lumber until everything is dry and secure, usually 24 hours.
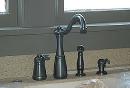 I was at a customer's house yesterday and she asked about a kitchen sink remodel. I figured she just wanted to replace her kitchen sink. No, she specifically wanted her existing kitchen sink remodeled. Okay...I'll play along, so I asked her what she meant. Well, her husband had removed the reverse osmosis water system which left a hole on the top of the sink next to the faucet. She wanted to cover the hole with something.
I suggested a couple of things. First, and least expensive, was a cover to match the sink's surface. You can buy these in a variety of colors and they just pop right into the hole. It does stand out however, and she didn't like this idea.
Next I suggested an instant hot water unit. This is a little machine that fits under the sink and produces hot water. This is perfect for tea or instant soup. She didn't like this either as she just went through the water leaks with her old reverse osmosis unit.
Finally, I suggested a soap dispenser and her eyes lit up. This was the perfect solution. It is inexpensive, functional, attractive, and easy to install. The container is hidden underneath the sink, so that the only thing visible is the dispenser. This Las Vegas handyman made a customer for life.