 A bad shower door sweep can cause plenty of problems with water getting outside of the shower. This can lead to water damage that can be stopped by a good shower sweep.
There are many styles to choose from, and just because you have one style now, doesn’t necessarily mean you have to stay with that style.
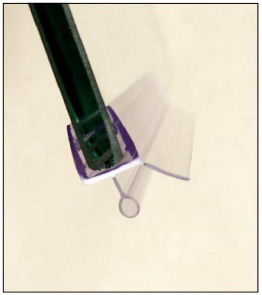
Sweeps are typically screwed onto the frame, caulked into place, or slid into a track. There are also shower sweeps that slide along the entire length of the shower door.
If you have a particular type of sweep, such as the screwed-in style, it’s probably easiest to buy a replacement for it. If you choose not to stay with the screws, I would opt for the style that slides along the bottom of the door. These are basically plastic and they are formed in a way that allows them to grip the bottom of the door. The opening is smaller than the width of the sweep, so you have to spread the opening apart slightly before pushing along the bottom of the door.
If you are going the screw the new sweep into the frame, you may have to drill some holes. The new sweep should have some holes or grooves already in it, but they may not line up with the old ones in the frame. If you have to drill new ones, drill very shallow as you don’t want to drill a hole all the way through the door frame.
Many of the complaints I hear about leaking shower doors are that they leak from underneath the door.
I would like to add a complaint. Like many people, I have a glass shower door with a sweep on the bottom of it. The sweep attaches to the inside bottom of the door and has a drip edge to direct water back into the shower, and a rubber sweep on the bottom of the door to keep water from splashing out.
Now, my wife is a cleaning fanatic who goes ballistic if there is even a drop of water on the glass, so she bought a squeegee. Well, I got a little lax on squeegeeing the glass after a shower so she bought some chemicals to spray on the glass to leave a streak-free surface. Gravity pulled the chemicals down to the drip edge.
You know how when you open the door from the inside of the shower you sometimes have to push a little harder than normal? That extra effort pushed all those chemicals on the carpet, leaving a rainbow arc of discoloration. The nice thing though is that the chemicals permanently stained the carpet.
The sweep typically rubs against the bottom track of the shower. Often, the friction from opening and closing the door will cause the shower sweep to recede up into the drip edge, leaving a gap for water to splash through. The sweep can be adjusted or replaced to eliminate this gap.
The drip edge and sweep are usually held in place with a couple of screws, but I have seen them held in place with silicone caulk or even double-sided tape.
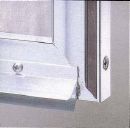
Inspect the condition of the sweep. It will probably be a little wavy but that's OK. If your drip edge is held in place with screws, this job is easy.
To adjust the sweep, loosen the screws (don't remove them), and pull the sweep down evenly so that it just touches the bottom track of the shower (the screw holes are oblong for this). Then tighten the screws.
If the sweep needs to be replaced, buy a new one at a home improvement or plumbing supply store and sandwich it in between the door and drip edge (you may have to trim it). Then screw the drip edge into the door.
Some types of drip edges have a groove that the sweep slides into. These sweeps are likely to be held in place with silicone caulk. I don't particularly like sweeps that are secured with caulk only, because they seem to work themselves loose quickly.
If you have this type of drip edge, apply a bead of clear silicone caulk to the back lip of the drip edge and push it back into place. Apply a second small bead of caulk at the top of the drip edge where it meets the door and smooth it with a wet finger. As a back up, you may want to install three small self-tapping water-resistant screws (like galvanized or brass) through the drip edge into the door.
Finally, some drip edges have a stop built in at the swinging side of the door. If yours does not have this feature, you can put a dab of caulk at the end to stop a spray of water (or chemicals) from arcing across your floor.