 Sink piping sloped in such a way that keeps drain water in it can lead to a smelly sink drain. This can happen when a combination of situations occur.
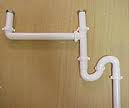
Lots of homeowners have a garbage disposal, but there are folks that either don’t use it or don’t have one. So they are left to let debris run down the sink strainer. The strainer allows only small food particles to pass through and run down the drain. This is fine as long as the slope of the drain is correct and allows the water and debris to flow as it is designed. However, I have seen cases where the sink piping will elbow over to the main pipe, but the vertical drain pipe from the strainer (the tailpiece) is left slightly too long. This can cause an uphill rise in the horizontal pipe which will cause water and food debris to remain in the pipe…to rot and spoil.
The fix is to cut the tailpiece slightly shorter to the point that the rise in the horizontal section of drain is removed. In this way there is no pocket for the drain water to sit and “ferment” and smell up the room. The drain should be gravity fed and not have any uphill rises in the piping.
 Removing a pedestal sink is normally pretty easy…unless someone has used construction adhesive or adhesive caulking to make sure it doesn’t move. Then it becomes challenging. This is one of those cases where you hope for the best, but expect the worst.
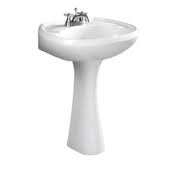
A pedestal sink sits on a base. Under the sink you will see a couple of holes that allow the installer to secure fasteners into the wall. In most cases, the sink is held to the wall at these locations and then caulked around the perimeter.
When someone has used adhesive, the sink is very difficult to remove without damaging the drywall. So expect it. You can try using a long blade to cut through the adhesive around the perimeter. What you will find is that the adhesive will be extremely hard and difficult to cut through. If you are lucky enough to be able to cut through it, cut the bottom of the sink first and then cut through the top as you support the weight of the sink. You want to avoid having the sink pull the paper from the drywall and peel away the texture. Even if you are able to cut through the adhesive, you will have a hard bead of adhesive still stuck to the wall. You can use a sharp putty knife to remove most of it from the wall, but you will be faced with either repairing the drywall or using a larger sink to cover the damage.
In some cases, I have hit the sink to break it apart…I don’t recommend it, but as a last resort you may be faced with it. Regardless of how the sink comes off of the wall, be prepared for some drywall repair.
 If you’ve noticed that either your sink stopper won’t stay up anymore, or that you have a leak under your bathroom sink, you likely have an issue with your sink stopper. If you have a stopper that won’t stay up, you can typically tighten the nut slightly at the rear of the drain assembly, and the extra pressure will help the stopper to stay in place.
In some cases though, the nut (actually it is a cap) will corrode and crack, break, or generally leak and cause problems. If you get to that point, it is probably time to replace the entire drain assembly, because chances are good that there is other unseen damage as well. You won’t really be able to tell what failed until you get a good look at the threads on the assembly and the cap.
You can try to clean up the threads on either part, but generally it is easier to clean up the male threads on the assembly than it is the female threads on the cap nut. I don’t think you will have much luck finding just a cap nut to buy, as you typically have to buy more parts than is necessary. You can certainly buy an entire drain assembly, which includes the cap nut, but if you are going to buy all those parts, you may as well install the entire assembly.
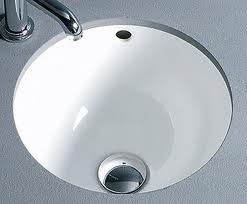
 Have you noticed that whenever you fill your bathroom sink a leak develops under the sink onto the cabinet floor? You probably need to be looking at your overflow.
On some bathroom sinks the overflow is integral to the sink, but on most sinks, you will find that the overflow drain is basically not part of the basin, rather it attaches to the underside of the sink and finally to the drain assembly. In many cases the overflow is just a molded piece of plastic that attaches to the bowl. When water enters the overflow hole near the rim of the sink, it is guided down this piece of plastic and to the drain assembly.
Since it isn’t often (or shouldn’t be that often) that water enters the overflow, you probably wouldn’t have the need to be concerned, but these plastic parts traditionally don’t seal very well to the underside of the sink. In fact, you may be able to see gaps along the underside of the sink where it connects.
You can try to fill in any gaps with silicone caulking, but don’t expect much. It may work well enough since the water should be infrequent. If you find that the problem continues, you probably will need to replace the sink.
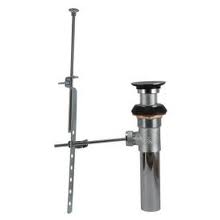 If your bathroom sink stopper won’t lift back up, there are a couple possibilities to check out. You will need to open the cabinet and look around. The simplest reason is that the clip that holds the lift rod (the thing you grab and pull) to the pivot rod (think of a teeter-totter that pushes the stopper up and down) has slipped off. If this has happened, look on the floor of the cabinet for a “V” shaped piece of metal with some holes in it. It may also still be attached to the lift rod and just barely hanging on.
To reinstall the clip, slide one leg back on to the lift rod, thread the lift rod through a hole in the pivot rod, and then squeeze the legs of the clip together and slide it back on to the lift rod. This holds the pivot rod in place on the lift rod and doesn’t allow it to move.
The other likely reason the pop up won’t move is that the end of the pivot rod has broken. This end threads into the base of the pop up stopper and moves it. Over time this end will corrode and break off and will be unable to move the stopper. You can unscrew the nut at the back of the pivot rod and pull the rod out. Replace it by threading it back into the stopper, tightening the nut that holds it in place, and then reattaching it to the lift rod.
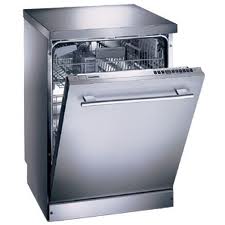 If your sink leaks when your dishwasher runs, I wouldn’t blame the dishwasher. The leak could be coming from several possible locations. Most likely the leak is happening when the dishwasher drains, and so start looking closely at the drain line forward. It may be a split in the drain line, but the best way to find the problem is to run the dishwasher and look for the leak.
The drain line will connect to the air gap on top of the sink, and this is a likely culprit. From the air gap, the hose runs into the side of the disposal. So if you see a leak only when the dishwasher is running, you know it is isolated to the dishwasher. If the leak is at the disposal, it would leak whenever water ran down the disposal, regardless of whether it was the dishwasher emptying into it or the kitchen faucet. Check the connection where the air gap hose connects to the disposal; this hose has a rubber boot that connects to a nipple at the disposal and it may be torn or damaged. The most likely area of the leak is from the air gap to the disposal. Check these hoses and fittings.
Once the dishwasher goes into the drain mode, the leak should be very obvious.
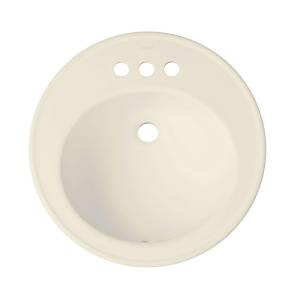 Removing a bathroom sink is pretty easy, especially if it is a drop-in sink. A drop-in sink drops into a hole in the countertop, rather than mounting to the countertop from underneath the counter (called an undermount sink).
Start by turning off the water to the faucet via the angle valves under the sink. Open the faucet to relieve the pressure and remove the water lines from the faucet. A basin wrench helps if the space is small, but you can use any wrench that removes the nuts from the faucet.
Next, disconnect the drain. You can either remove the sink from the tailpiece (the vertical section of drain coming from the sink) or you can disassemble the trap and remove it that way. Either way you do it, you want to be able to pull the sink out without it getting hung up on the drain.
The sink will be held to the countertop with either clips from under the sink, or by adhesive. If you have clips, they will unscrew from below and free the sink. If you have adhesive, you will have to be careful not to damage the countertop. Adhesive will pull up ceramic tiles or laminate, so make sure you cut through it with a blade before you start lifting. Once everything is free, you can use the faucet as a handle and gently lift the sink from the hole.
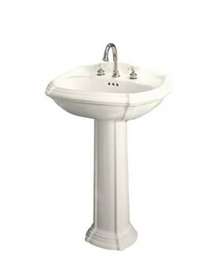 Installing a pedestal sink takes some precautions. They usually come in two pieces, one is the actual sink, and the other is the support base. They have small holes under the sink where you can hold the sink to the lumber in the wall by using screws or bolts and washers. It is recommended that you open the wall and install a piece of lumber as backing. The lumber is secured to the wall studs and covered with a drywall patch. When you push the pedestal sink against the wall, you can screw it to the lumber behind the drywall.
Although it isn’t the preferred way of securing the sink to the wall, you can use adhesive caulking as well. I had a house where the builder used adhesive caulk and it was very solid. The key is to get the sink balanced on the base and against the wall. You can apply a liberal bead of adhesive caulking at the back perimeter of the sink and push it against the wall. You could also use some wall anchors underneath the sink for additional holding power. Also add some adhesive to the area where the sink meets the base. The concern obviously is since the sink juts out from the wall, if someone hit it or if a child decided to do pull-ups on it, it may fall down. That’s why securing the sink into lumber is a safe bet. But truthfully, I’ve had to remove some pedestal sinks from the wall and they are so secure that sometimes the choice is to either pull the drywall off of the wall, or break the sink into pieces.
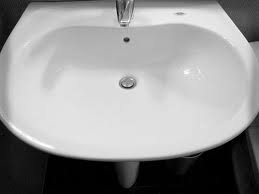
 If you look at your bathroom sink near the top you will see a hole. This is the overflow and it prevents the water from rising up and spilling onto the top of your counter. When the water level gets high enough in the sink it goes into overflow hole and down to the drain. Nicer sinks have an integral overflow trough built into them that leads to the drain. These last and generally don’t leak. However, the inexpensive builder-grade sinks are different. Many of these sinks have a plastic trough stuck to the bottom of them that leads to the drain. This style does tend to leak over time.
You generally don’t have an issue with the cheap sinks though, since the overflow is not needed very often. You will only notice a leak when the water enters the overflow. The plastic trough really isn’t made to be repaired, but you can try to make it more water tight. Try caulking the perimeter of the trough, then take your finger and push the caulking into the area where the trough meets the underside of the sink. Then cross your fingers. With any luck this will hold the next time you leave the water running and the sink stopper in. The other remedy is replacing the sink, but for as often as the overflow is used, most people try to just “band-aid” the sink.