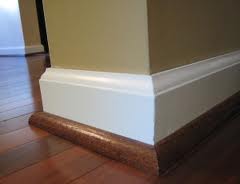
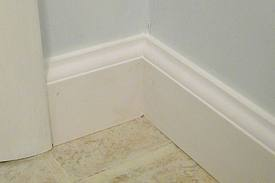
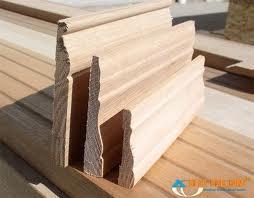
 If you are installing a laminate floor and you aren’t going to remove the baseboard, you will need to span the gap with molding. The gap will be small but unsightly so you need to cover it. Quarter-round molding is small and is the customary molding to use, but really , any molding you like will work, so long as it covers the gap. Quarter round is simply a 90-degree angle with a rounded surface connecting the points (think of a circle cut into quadrants and that is the profile).
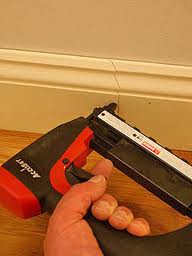
Installing the molding goes quickly with a nail gun and a power miter saw. I would start on a long wall and start installing the trim. It’s easy to mark the wood studs with a stud sensor, and then place a piece of painters tape at that location. So when you go to nail the trim, you know exactly where the studs are and you don’t have to waste any time. When you come to a corner, miter the corners and place a nail in close proximity to the corner on each piece. Press the nail gun into the corner on the trim to hold it in its final place and then squeeze the trigger.
When you are done, you will have the original baseboard with a small ¾” piece of quarter round trim along the bottom of it all around the perimeter.
 Installing baseboard is an easy job that gives you a lot of bang for the buck. You can go from boring to breathtaking in an afternoon.
To change the baseboards and door casings, first remove the old ones without damaging the walls. You can do this by placing a scrap block behind a hammer or pry bar and slowly pry off the old baseboards and casings. Before you pry off the old stuff though, score the top of the baseboards (or side of the casings) with a utility knife, where they met the wall. This will prevent tear-out of the texture and paint where caulking is used to fill the gap.
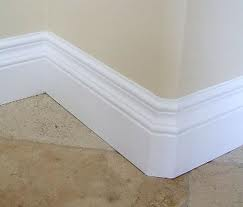
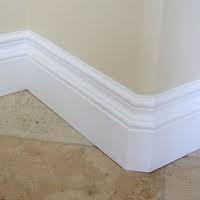
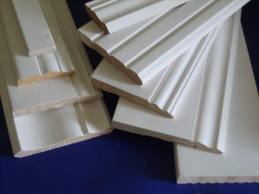
The cost for new baseboard and door molding varies depending upon type and style. Most trim is made of MDF (medium density fiberboard) covered with a thin veneer. You can also buy trim made from various types of plastic, but I personally don’t like the appearance.
Trim is sold by the linear foot and varies from around .50 cents for the cheap stuff past $6.00 per linear foot for solid wood. You can use a combination of moldings (base shoe, baseboard, base cap) to get custom profiles, but this is up to your taste and budget.
Installing the door casing comes first. Take a pencil and combination square and draw a light line 3/16 of an inch from the edge of the doorjamb. This will be the reveal line, with which the front edge of the trim is aligned. Measure the lengths of the pieces you will need to surround the door and add a little for the mitered corners.
By the way, I would highly recommend that you finish (stain, varnish or paint) the casing and baseboard before you nail it to the wall. It is much easier to stain wood while standing up in your garage that it is to do lying down on your floor.
Once the finish is dry, you will need to miter the corners (cut the corners at 45 degrees). You can cut scrap wood pieces and hold them up to the corners. Although the corners should be a perfect 90 degrees, they often are not. Adjust the saw and cut both pieces at the correct angle.
After the pieces are cut, secure them to the jamb using 4d nails. If you are using hardwood trim, make sure you predrill the holes for the nails. If not, your trim will split and your vocabulary will grow. Sink the head of the nail below the surface of the trim with a nail set and fill the holes with wood putty. You will have to touch up the finish wherever you filled in a nail hole.
Start the baseboards by cutting the length for the longest wall first. If your baseboard won’t completely cover the entire length of the wall, you can splice two pieces together by cutting the adjoining pieces at a 45 degree angle and sliding them together.
There are two ways to get a great looking inside corner. You can miter the corner (as you did with the door casing), or you can cope the inside corner. Coping is cutting the profile of the baseboard into the end of the piece that intersects it.
To cope an inside corner, cut one end at a 45-degree angle, as if you were cutting an inside miter. Then, use a coping saw to cut along the profile left by the miter. You can make a flawless fit by using a wood file to smooth out any rough spots. Continue mitering and/or coping around the room, pre-drill, and nail it up using 6d nails.
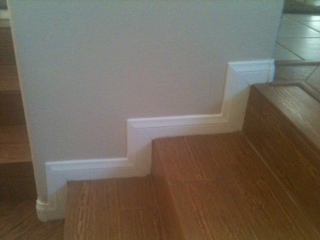 Installing baseboard around stairs certainly gives you the opportunity to use the miter saw. It takes much longer to install baseboard around stairs rather than walls, simply due to the number of cuts and the short pieces you will be using. With a wall, you may be able to do 20 feet in a matter of minutes. With stairs it may take you a few hours.
Installing baseboard on walls, the miter cuts are in a vertical position. With stairs, the miter cuts are as the baseboard is laid on the wall so that the entire piece changes direction to follow the stairs. Most pieces will have two miter cuts with the exception of the very top piece and the very bottom piece. These pieces lay in a horizontal position and either begin or end the directional change.
The cuts will be at 45-degrees and will mate with the corresponding 45-degree cut to make a 90-degree corner. You will need to map out which direction the cuts are to be made and for this I would recommend making some templates out of scrap material. That way you can place two cuts together and make sure they are correct before you use your nice stock. You can start out using a measuring tape, but you will likely have to nibble away with a saw during the installation.
I would start at the top, cut the first piece, and nail it in place with a nail gun. Then move to the second piece and nail it, and so on. I would not cut all the pieces at one time and try to install them as there will be some variation.
 Baseboards get dinged up and gouged as part of their everyday lives. Repairing them can be done with a variety of materials.
Baseboards with various curves in its profile can be more difficult to repair. Basically you are looking to fill in the gouge or chip so that you can’t tell it ever happened. Certainly wood putty can be used. It is applied with a putty knife by pushing the putty into the damaged area. Run the putty knife over the area to smooth it out somewhat. The putty will dry with a course surface and so it will need to be sanded. Once it is sanded smooth, you can paint it to match, although it is easier to just paint the entire piece of baseboard.
You can also try drywall compound. If you use 5-minute mud, you can follow the same steps outlined above, but work quickly. When the packaging says 5 minutes, it means it. You can remove most of the high spots with the putty knife and then sand it if you need to.
If the damaged area is in an area where it is likely to be damaged again, you might want to stick with the wood putty as it will tend to stand up to a beating a little better than the compound.
 Installing long runs of baseboard saves time. You can buy lengths of baseboard 20 feet long, and you will fewer cuts. However, there is the problem of getting them to your house…either you have to have them delivered or you have to cut them just to get them into a manageable length.
On long walls, the chances are good that you will need two pieces of baseboard to span the distance. You certainly want the area where these pieces meet to be as inconspicuous as possible. If you use a butt joint, you will see it. A butt joint is when you cut two pieces square and just butt them together. You will see a vertical line in the baseboard.
Instead of a butt joint, you can miter the mating ends at a 45-degree angle and lay one piece over the other. It is called a scarf joint and it isn’t a perfect joint, but it isn’t as noticeable as a butt joint. You will cut the pieces on the miter saw at the same angle so that the finished piece basically lays over the raw end of the baseboard. You can use a nail gun and, while pushing the joint closes, nail at an angle to close the joint and hold it in place. It is a good idea to hit a few nails into the surrounding baseboard to prevent any movement.
 Installing baseboard that you plan on painting lacks the detail work. When you are installing natural wood that you plan on staining and varnishing, the installation really needs to be detailed so that you can’t see any flaws. For painting though, it is a different story…it’s much easier.
The reason it is easier is that you can cover the flaws and gaps with caulking. Caulking is like the duct tape of the baseboard installer’s world. It fills gaps and voids, and covers small errors you wish you hadn’t committed. These gaps occur at corners and really anywhere two pieces of baseboard meet. A very noticeable gap will occur along the top of the baseboard down the length of the wall. This area won’t be the installer’s fault, rather that is just the way the ball bounces. The wall can be wavy, and what you will find is that in between the studs will be gaps.
The easiest way to fix the gaps is to insert a small bead of caulking. Use a caulking gun and load a tube into it. Cut the tip of the tube at an angle, poke a long nail through the skin of the caulking and gently squeeze the trigger. You want to lay down a bead of consistent size along the length of the board. After that, wet your finger and smooth out the bead with the top of the baseboard. Let everything dry and it is ready for paint.
 Swollen baseboard means only one thing; at some point water got to it and caused it to swell up. It may be from an old leak or a current leak, but you need to do some investigating to determine the cause and to see if the leak is active.
I see this a lot behind toilets. Water will drip and eventually be absorbed into the baseboard. Builder-grade baseboard is made of medium density fiberboard and bloats when water even gets near it. There really isn’t a good repair for this due to the baseboard being so distorted. Once you’ve figured out the cause and repair of the leak, remove the damaged piece of baseboard. You will need to get a replacement and it’s best to take a sample with you to match up the profile. You can cut a sample from the piece that you removed since you will be replacing it anyway. Buy a length longer than you need.
You will likely need to miter the ends (unless you have corner molding pieces) so measure correctly and dry-fit the piece until you have it at the right length and the angles are correct. Use finishing nails and nail it into the studs and then finish it off with a bead of caulking along the top edge and miters. Then just paint it.
 Removing the baseboard before a new floor gets installed is a personal choice, but there are some floors I would remove it prior to installation, and some I would not.
If you are getting new carpet, I would not remove it. The installers will use a knee kicker to stretch and tack the carpet down and the final appearance will look great.
For other flooring surfaces, it is a personal choice. Removing baseboard and reinstalling it almost always looks cleaner for surfaces like ceramic tile, wood, and laminate (vinyl is a little different in that you can cut it right up to the baseboard and add some caulking, all without removing the baseboard).
For wood and laminate flooring, if you choose to leave the baseboard in place, you will have gaps in between the end of the flooring and the baseboard. You cover this gap with quarter round molding. Some people don’t like the look of this extra molding. Personally, I would prefer not to have it, but you are adding a lot of work to remove and reinstall the baseboard.
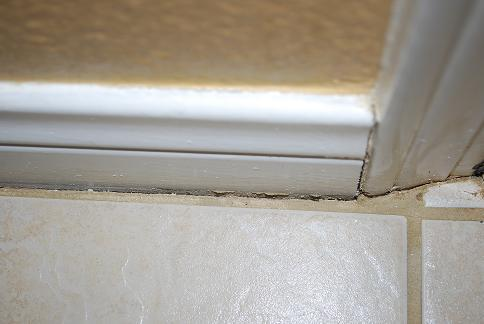
For ceramic tile, if you chose to leave the baseboard in place, you would have a grout line around the perimeter of the room. This may look fine so long as the width of the grout is consistent with the rest of the tiles.
 Painting baseboards is no fun. You risk spilling paint on the flooring and if you have carpet there, the fibers can pop up and imbed themselves in the paint. You also have to be on the mark with a cut-in line if you have a different color of paint on the wall. So given all of the extra work and risk, wouldn’t you rather do something else than repaint the baseboards?
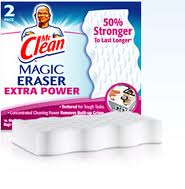
The cleaning aspect is easy if you have semi-gloss paint on the baseboards. You can even use a damp rag or sponge to wipe away the dirt. But I’ve found a product that has been around awhile that works great. Try using a “magic eraser” by Mr. Clean. You can get them at most grocery or department stores and they will save you a lot of time. Get the eraser damp and wring out as much water as you can. Then just wipe the surface you want clean.
You will need to put a little elbow grease in it, but it is pretty surprising how well they remove scuffs and dirt. I was really impressed with how well they remove scuffs that I thought had to be painted. There was just no way the scuffed up surface would look new again…but it did. You will find that the more you scrub a surface and the longer you use the eraser, it will begin to erode and shrink down to the point that you get a new one. This is a no-brainer alternative to painting…and it works on walls too. Just test an area first to make sure it doesn’t change the appearance.
 Installing baseboard or door trim is straightforward work. I love using a compressor and nail gun…it makes for fast and accurate work. However, most beginners don’t have these tools and stick with a hammer and nail set. This works great too. How do you hide the nail head after nailing the wood? It is actually pretty easy.
If you are going to paint the baseboard or door trim, countersink the nail just below the surface with a nailset. This is a stiff tool with a point on the end of it. Set the point onto the head of the nail and give it a tap to sink it. Then just fill in the divot with wood putty, sand it and paint.
The process gets a little trickier for baseboard and door trim that you are going to stain and finish. This means you will see the grain of the wood, which makes this method so attractive. The problem with using wood putty to fill in nail holes is that it accepts stain differently than the surrounding wood. This leaves you with a noticeable mark and it can be unsightly. The secret here is placement of the nail. Yes you want to hit the nail into the lumber behind the drywall. But the trick is to hit it into the grain.
Wood grain, especially open grained wood like oak, stains darker then the surrounding wood, just like wood putty. So, if you can locate a position that will both hit the grain and lumber behind the wall, that is the sweet spot. You may still notice the mark left by the wood putty, but since it is in the darker stained grain, most people won’t even notice it.