 Vinyl flooring is inexpensive and can last for many years. It is the first choice for homeowners on a budget because of its cost and durability. However, it can become damaged if you drop something on it or slide a heavy object on its surface.
This will usually result in a cut or scuff and it will stand out noticeably. If the damage is very small, for example a small flap has lifted, you may be able to get away with some adhesive and seam sealer and hope that it looks okay. If not, you may be looking at cutting a piece of vinyl off of a scrap and placing it in the damaged area.
The key here is to get a good match. In many cases, the installer will have some vinyl left over and will roll it up and put give it to you. Always take the extra for situations like this. Warm up the vinyl with a hair dryer and lay a piece over the damaged area. Match up the pattern, if there is one, and cut through both pieces simultaneously. It’s good to use a square for a guide. Once you have cut all four sides, lift the replacement patch. You will have cut an exact match for the damaged lower piece. Scrape up the damaged piece below and clean any adhesive from the underlayment.
Lay down some new adhesive and let it get tacky according to the manufacturers instructions. Once you lay the new piece of vinyl in place of the damaged piece, roll it down and after it dries use a seam sealer for the edges.
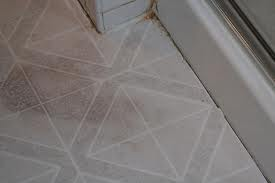 A typical handyman service sees plenty of curling or lifting vinyl flooring. Most often, it occurs at a transition point, for example where the vinyl meets carpeting, or along the bathtub or shower. If left alone, it will curl up and harden like a tax collector’s heart.
Repairing the edge of vinyl along a transition or a bathtub is similar. Getting the vinyl to lay back down can be challenging. First try to scrape up any old adhesive off of the floor where the vinyl has lifted, as well as the vinyl itself. Just be careful not to damage the vinyl. Then you can use a notched trowel (or make one out of a plastic scraper) and apply new adhesive.
For the transition area, you can always use a wider transition strip (or install one if it didn’t already have one). This will help hold the vinyl back down. Heat up the edge of the vinyl with a blow dryer to get it warm and pliable and then push it down into the adhesive. Immediately set some weight upon the edge to coerce it to stay down, and then secure the transition strip on top of it.
For the bathtub, use the same process, except instead of a transition strip, you can install a piece of baseboard along the edge, not only to keep the vinyl from lifting again, but to dress up the area as well.

I tried to be a Good Samaritan by moving a refrigerator into my sister's new home, which has a sheet vinyl floor. As I was trying to maneuver the fridge into its niche, one of the wheels ripped out a good chunk of the floor right in a high-traffic area. Needless to say, she wasn't very happy.
Patching vinyl flooring requires that you cut out the damaged area and replace it with a matching piece. The trick is to find a good matching piece.
In my sister's case, the house was new and it was easy to match since the builder left a little extra rolled up in the garage. If you can't find a match, you may have to cut out a piece from a less conspicuous area, such as the pantry floor, or under the refrigerator or oven.
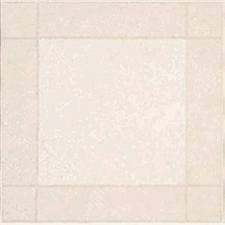
Consider yourself lucky if the sheet vinyl has a pattern, such as squares with a border. You will be able to blend in the repair so that it is virtually invisible. If the vinyl has a pattern with no borders, it will be more difficult to conceal the fix.
Use a carpenter's square and lay it along the border of the pattern. Use a sharp utility knife and cut out the damaged section. The carpenter's square will keep the cuts at 90 degrees. As you cut, keep lots of pressure on the square to keep it from moving. If the square moves you will have to repeat this step except you will have to cut a larger area.
A popular pattern of flooring re-creates the look of ceramic tile with grout lines. With this pattern, cut down the middle of the grout lines.
Remove the damaged piece. You will use this piece as a template to cut a replacement patch. You can tape the damaged piece exactly over the replacement vinyl. Use the square and knife and cut around the patch. When you cut, remove the tape from that side and then replace it after the cut is made.
If you have to use a patch from another area of the glued floor, remove it carefully. You want to keep the patch in the best condition possible. You may want to warm up the replacement patch with a hair dryer to coax it out.
Remove the old adhesive from the floor. Use a paint scraper or flat razor and get rid of the old stuff. Be very careful not to damage the edges of the surrounding vinyl.
Use vinyl floor adhesive and a notched V-trowel to spread the adhesive on the floor. You will have to wait before you will be able to place the patch, so read the manufacturer's instructions on the can (usually between 30 minutes and 2 hours).
Once the glue has set up, press the patch in place and flatten it. You can use books to weight the patch down until it dries. You can also use a rolling pin (if yours is like mine, blow the dust off of it first) to flatten it. Wipe up any glue that squeezes out with warm water and a rag.
Finally, you can treat the seams with a seam coating kit (about $12). This will protect the seams from dirt and wear, and it will help the seams blend in with the surrounding vinyl.
You will need to clean the seams, then apply the coating. The coating will flow into the seam and protect it. It comes in different finishes to match different levels of glossiness of the surrounding floor. Let it dry thoroughly before you wash it or walk on it.