 Replacing electric switches and outlets can really update the look of a home.
I see people spending money on improving their home, but they often miss the small details. One of our customers spent several thousand dollars on a custom-paint job with multiple colors and sheens. The paint scheme was beautiful, but then they put the same drab ivory-colored 20-year old light switches and covers back on the wall. The duty is in the detail.
Replacing the switches with rocker-style switches is easy and will make a dramatic change. In addition to the switches and cover plates, you must also replace the outlets to match. They come in various colors to blend in or contrast with your wall.
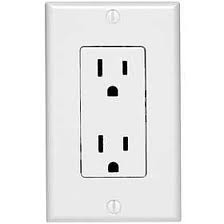
When you go to the home center, you will be inundated with choices, but the style will come down to either a standard outlet or a decorative outlet, also known as a decora. The decora outlet is rectangular and has a flat face, whereas the standard outlet has two octagonal faces.
Replacing the switches and outlet is really a wire-for-wire exchange. Make sure you turn off the power at the main panel before you start work and then unscrew the cover plate.
For most switches, you will have only two wires attached to the screws. You will also have three-way or four-way switches that will operate a single light fixture. These will be found in hallways or in larger rooms. These can be tricky, so make sure you draw a diagram or mark the wires with tape so that you replace the wires in the correct positions on the rocker switch.
You can take the switch with you to buy a replacement with the same configuration.
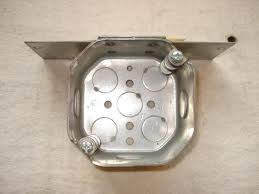
Replacing the outlets is just as easy. Some outlets will have only one cable entering the box and some will have two. It’s the same deal: replace with wires in the same location on the new outlet as you found them on the old. The black hot wires are secured to the brass screw terminal, the white neutral wires connect to the silver screw terminal, and the green or bare wires connect to the ground screw terminal.
You will likely run into an outlet that is upside down. This is a “half-hot” and unique to other outlets. It is the same type of outlet, but the top of the outlet will be controlled by a wall switch, while the bottom will be hot all the time.
Take note of how the wires run and you will notice that there is a breakaway tab on the back of the outlet. This tab (all outlets have this tab) extends power from the top plug to the bottom (and vice versa). On a half-hot outlet, this tab is removed between the top and bottom plugs so that each half operates independently of the other. You can just grab the tab with pliers and twist it out.
Once everything is back in place with cover plates on, turn the power back on and enjoy your updated look.
 Upgrading your electric light switches is a reasonably cheap way to make your interior look 20 years younger. At less than five minutes per switch, you can do the entire house in an afternoon.
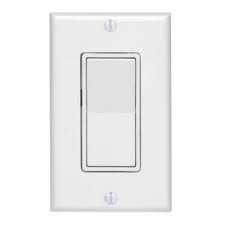
Back in the day, builders all used the small skinny light switches. They are cheap and are available anywhere. However for about $1.50 per switch, you can upgrade to a decora switch. Decora switches are modern. They are wide and flat and have a fulcrum that you toggle for on and off. You can get these switches for any switch needs, such as dimmer switches, two-way, three-way, and four-way switches, and you can buy some that even illuminate. Installing them is exactly like installing the old-fashioned switches. You will have to buy a new faceplate with each switch.
Turn the power off, remove the faceplate and loosen the screws that hold the old switch to the box. You are simply going to replace the wires in the same positions on the new switch that they were on the old switch. Loosen the terminal screws on the old switch, remove the wire and wrap it clockwise around the new switch’s terminal, and tighten snugly. Re-secure it to the box and install the new faceplate.
 A call for help about not having any power in a bathroom is one of the most common calls I get. In most cases, you won’t even need any tools to fix this one.
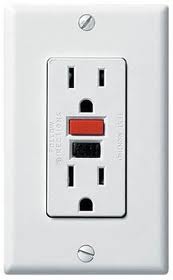
The very first thing to do is to look for a GFI outlet (aka GFCI Ground Fault Circuit Interrupter). This is an outlet with two buttons on it. One of the buttons says “test” and the other says “reset”. This outlet may have tripped after sensing a ground fault. For example, if you plug in a hair dryer or a cell phone charger that has a bad cord, the outlet will sense this and shut off the power. Try pressing the “reset” button and see if the power comes back on. If you don’t have this type of outlet in your bathroom, look throughout the house for one. Just because you don’t have a GFI outlet in that bathroom doesn’t mean the outlet is not GFI protected. You may find the outlet in another bathroom, in the kitchen, in the garage, or even outside. I have seen them in closets. I tell people to start in one room and walk the house looking for a GFI outlet that has tripped off. It’s probably a good troubleshooting idea to unplug items from that particular circuit so that it will reset.
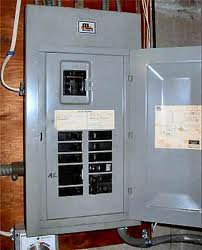
If all the GFI outlets are reset (not tripped), head to the main electrical panel. Look for a circuit breaker that has tripped off. Note that the breaker switch will not be in the off position, but rather somewhere between the “on” and “off” positions. You might have to look closely as when many breakers trip, the switch will trip just slightly. I should be pretty obvious, but you might have to look closely.
To reset the breaker, turn it all the way to “off” and then back to “on”.
 Electrical jobs require some unique tools. Fish tape is one of those types of tools. Fish tape is a stiff wire that allow you to pull cable through openings that you might not be able to access. It’s also good for pulling wire through conduit. For example, if you wanted to pull a piece of romex cable through a wall, fish tape would help you to do that without cutting tons of holes in the wall.
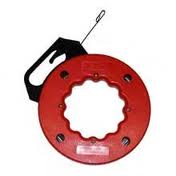
Fish tape comes loosely coiled in a plastic circular holder. It is loosely coiled, but it is very stiff. You can use it to push through wall insulation, or pull cable.
To use fish tape, you can either push it from the existing opening to the new opening or vise-versa. The trickiest part is actually finding the opening you are looking for. Two people helps this go faster. You can slightly manipulate the direction of the tape with the holder, but this takes a certain amount of luck.
When you have the end of the fish tape at the opening, you can connect the cable or wire to it. Most tapes have a hook on the end, or you can straighten or hook the end if it doesn’t. If you create a hook in the fish tape, you can wrap the cable around the hook and then use electrical tape to wrap the connection together. The last thing you want to do is to have the connection come apart inside the wall. They also make a lubricant you can apply to help things pull along easier. Once the new cable is at the correct location, you can cut or disassemble the connection and make your electrical connections to whatever it is you are installing.
 Running electric cables, such as romex, require you to follow certain rules for safety. I have seen several instances of scorched cables, and worn insulation that can cause problems.
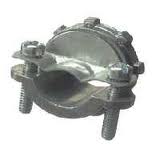
When you are running a cable to a junction box, the cable should be secured to the box. You want to restrict movement of the cable so that the edge of the box doesn’t wear through the insulation and ultimately damage the cable. Shorting and arcing can be the result of this type of damage. This is where a cable clamp comes into play.
The clamp’s nut unscrews to allow you to place the threads into the box then you screw the nut back onto the threads to hold the clamp in place. From there you place the cable through the clamp and into the box to connect to an outlet, switch, or to connect to other wiring. The clamp holds the cable in place using two screws. You may have to loosen the screws enough to allow the cable to pass through the clamp, but when enough of the cable has entered the box, gradually tighten the two screws so that the cable is firmly held. Don’t crunch down on the screws as the purpose here isn’t to damage the cable, but rather to firmly hold it in place.
 It is not normal that we are asked to repair an electric panel. However, in this day and age where there are so many vacant houses, vandals (or previous occupants) seem to steal just about anything that isn’t bolted down.
Problems in the breaker panel are often caught when there is a problem with the power, or when an inspector flags it as a condition of sale. Circuit breakers are removed, and sometimes the bank will want them replaced, and sometimes they just want the opening in the panel to be covered to avoid injury. For this you can buy knock-out plugs. These are available at most home centers, and are plastic covers that snap into the dead front of the panel. However, sometimes the dead front of the panel has also been removed.
The dead front is a metal cover that covers the wiring inside the panel. It usually held in place by some tabs on one side and a screw on the other. It has openings that fit the breakers perfectly and the dead front is not interchangeable with the manufacturer of another panel. If you have a missing dead front, it is probably easiest to buy a complete new box that is identical to your existing box and then remove the dead front from the new box and install it into your old one.
 There are times when you need to add an electrical outlet to the exterior wall. This is easiest when you have an outlet on the interior side of the wall and can branch off of it to supply power to the new outlet. You must use GFCI (ground fault circuit interrupter or GFI for short) protection.
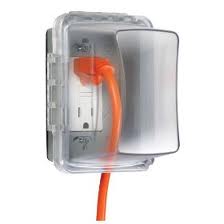
Outdoor elements can cause problems for unprotected outlets (think rainwater), so not only must the outlet be GFI protected, but you also should have a weatherproof box cover. These allow you to use the outlet yet protect it from the weather.
If you are cutting through stucco, a grinder makes quick work of the job. Mark out the lines and slowly cut the perimeter. Use a junction box and caulk around the perimeter. The weatherproof box will have gaskets to further seal out the weather.
After installing the GFCI outlet, install a box cover that uses a plastic dome to protect the outlet. This is hinged and opens to allow you to use the outlet, then swings closed to seal out rain. The other type of cover uses small doors on each individual plug, but once these small doors are opened, it exposes the outlet to rain and could potentially allow rainwater to come into contact with the electricity.
 If you are adding an electric outlet in you house, you will need to cut a hole in your drywall. The hole you cut has to be the correct size for the remodeling box you will install.
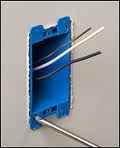
A remodeling box is a plastic junction box that sits at the wall surface while the box resides inside the wall. You don't need to secure it to a wall stud since the box has mechanical wings that clamp it to the drywall. However, the size of the hole you cut is very important. The hole has to be big enough to allow the box to sit in the wall, but not so big that the mechanical wings can't grip the drywall.
So the best thing to do is to place the rear of the box against the wall where you will install it. Mark around the rear of the box with a pencil. This will be the rough cut, and you will have to fine tune it later. Use a drywall saw and make a shallow cut. Pull the piece of drywall out and place the box in the wall. It won't go in all the way because the wings jut out in two areas. You will need to cut these areas out somewhat until the box fits.
Once the box will completely go into the wall up to it's front lip, you can push the cables into the box and push the box into the hole. Use a philips head screwdriver and twist the screws which cause the mechanical wings to pop out and clamp against the rear of the drywall.
 We get many calls to correct minor electric wiring issues. One of the most basic is either adding a junction box or even just the junction box cover.
I see it all the time. Go into an attic where a homeowner has added a light, a switch, or anything that would require him to cut into an electrical cable and you would see danger. Homeowners generally mean well, but there are some practices that are frightening.
Take for example the practice of taping wires together. I’m not talking about taping wires together inside of a junction box (which still isn’t safe), rather these wires are just taped together hanging freely inside of an attic. Wow.
When you make an electrical connection you need to place the cables inside of a junction box with a cover. At the point the cables enter the junction box, they are held in place with cable clamps. The cable sheathing extends past the clamps to protect the wires. Inside the box the sheathing is removed and the ends of the wires are stripped of the insulation. The wires are connected with the appropriate sized wire nut. The wires are carefully folded inside the box with no sharp bends, and the box cover is installed.
 Replacing an electric cord on a lamp is very straightforward. Cords get pinched by furniture and flooring and can get damaged. Don’t try to repair a cord as it’s safer to replace it.
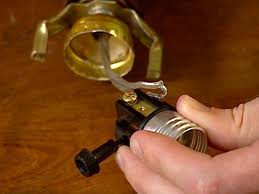
After unplugging the lamp, remove the shade, bulb, and socket. The socket should pop off, but you may need a screwdriver to goose it out of its base. The cord will be attached to 2 screws at the base of the socket. Remove the cord from the screws. Rather than pulling the old cord out of the bottom of the lamp, cut the plug from the old cord and tape the old cord to the new cord wires with electrical tape. Now you can pull the new cord into position using the old cord. This eliminates the aggravation of trying to fish the new cord up the body of the lamp.
With the new cord in place, strip ½ inch of insulation from the new cord. If you bought a polarized cord (and you should), the wider blade on the plug is the neutral. Follow this blade into the cord and you will see that the neutral wire of the cord will be ribbed or striped. You can separate the cord wires at the socket to allow you to tie a loose knot (called an underwriters knot) in the wires. This will prohibit the cord from being pulled out of the lamp, which will keep the wires connected to the socket’s terminals. After you connect the wires to the appropriate socket terminals, you can reassemble the lamp.