 A ceiling fan that wobbles when you turn it on is very frustrating. Most people will simply buy a balancing kit and attempt to balance the fan with small weights. This works great, so long as the ceiling fan has a solid foundation. In this case the foundation is the point where the fan connects to the ceiling.
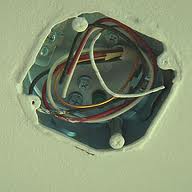
A loose junction box may be the culprit. If the box is not properly secured to the ceiling, you will never get the fan to be stable. Also, the box may be plastic and have too much flex in it to support the weight of a fan. If the junction box is metal, you may be able to drive a few screws into it to make it rigid. If that doesn’t work you can try a brace bar.
A brace bar will solve many problems, including a loose junction box. You will need to remove the old junction box first. If it is nailed in, it is easier to run a demolition blade between the box and the joist to cut it free…just make sure you clear the cable out of the way. Once the old box is out, you can slide the brace bar into the hole and run the cable through it.
 If you have a ceiling fan that operates using a remote, and it no longer operates, there are a few things to check.
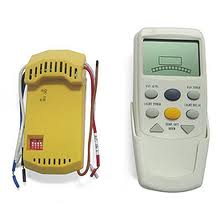
The very first thing to check would be the power. Make sure that a breaker hasn’t tripped off . Also make sure that someone hasn’t pulled the pull chains at the fan, essentially turning them off. This will happen if someone, who is not aware the fans operate by remote enters the room and assumes the chain will turn the fan on. Then check the battery in the remote. Some remotes are hand-held and some are mounted in the wall. Each style has a door that slides off to allow you access to the battery. The battery will be a 9-volt that just pulls out from the terminals.
If replacing the battery doesn’t work, it’s time to investigate the remote itself. It may be that the remote is broken and needs to be replaced, or that a wire has become disconnected. You will need to get access to the receiver at the top of the fan. Loosen the cover and slide it down. You will see the receiver inside the ceiling fan’s mounting bracket. Check to see if any wires are loose. If they are, reconnect them. Also check the dipswitches at both the receiver and the remote. The dipswitches must have the same positions at both the receiver and remote. It would be unusual if the positions didn’t match, particularly if the ceiling fan was working before, but it may be that someone was tinkering with the remote. You may end up replacing the remote and receiver.
 If you have a cathedral ceiling, or even a sloped ceiling that requires a longer ceiling fan downrod, you have a little extra work to do. You can buy longer downrods at most home centers, but you will also need to buy extension wires for this as well. You can buy them separately, but many retailers sell a kit that includes everything you will need. The wires will be 14 gauge stranded wires.
You will need to connect the extension wires to the same colors as the fan’s wiring. Connect the black fan wire to the black extension wire with a small wire nut and then wrap that with black electrical tape. Do the same for the white neutral wires, and connect the blue wire to the wire for the light kit (if applicable). Also make sure you connect the ground wire.
Thread these wires up through the extension downrod and secure the downrod to the fan. Most will screw in, but some have a retaining clip and a setscrew. You can trim the extra wire to fit your needs, generally an extra 12 inches will work well.
Once you have the unit assembled, you can install the ceiling fan. Here is an article on how to install a ceiling fan.
 One of life's little frustrations is having a wobbling ceiling fan. Whether it is a slight vibration or a large swinging motion, it's just something you have to take car of. Fortunately, its cheap and relatively quick.
A fan balancing kit costs a few dollars and includes a weighted clip and some adhesive-backed weights. Before you start balancing the blades though, make sure the fan is secure to the ceiling. In other words, before you spend some time adding weights and moving around blades, make sure all the screws are tight. You might also measure the distance from the ceiling to the tip of each blade to make sure they are the same distance from the ceiling. You may have a blade that is not in the same plane as the other blades, leading to a wobble. If you have this, you may be able to move the blades to different positions, you might have to replace the blade, or you may get away with adding a washer or even bending the blade holder to align the blade.
The ceiling fan will hang from a down rod from between 4" and several feet. The longer this down rod, generally the more out-of-balance the fan will be. Start by placing the weighted clip on the near the end of the leading edge of one of the blades, and turn the fan on high. Take notice if the balance of the fan has improved or worsened. You will do this to each blade of the fan, placing the clip at the same spot on each blade. Then you will focus on whichever blade (or blades) shows the most significant improvement.
Once you've chosen the suspicious blade (or blades) move the clip along the length of that blade, again on the leading edge. Try it near both ends and the middle to see where it makes the most improvement. Wherever it makes the most improvement, place a weight on top of the blade equidistant from the edges (it‘s a peel-and-stick weight). Remove the clip and run the fan on high. If it still wobbles, use the clip again to see if you need to place another weight on the same blade, or move to another blade to add a weight. On come occasions, you may need to swap positions of 2 blades on opposing sides of the motor to balance the fan. It's one of those jobs that is part art and science.
Occasionally, a homeowner who has a ceiling fan will call and want to add a light fixture to it. Most of time a homeowner will buy a light kit at the time they purchase the ceiling fan, but not always. One of the challenges to waiting, is finding a good match between the ceiling fan and the light kit. Some light kits have a wiring harness that mates with the ceiling fan harness, and some light kits have regular wires that you can secure with wire nuts.
If you are adding a lighting kit to your fan, there should be a small cover on the bottom of the fan, where the light kit will mount (assuming the ceiling fan can accomodate a light kit). Remove this cover and pull out the wires (make sure the power to the fan and light kit is off). Again, you will see a plastic wiring harness (a clip that wires run into with mating holes for the light kit harness), or loose wires that you will have to strip.
If you have a wiring harness, you can just plug the mating pieces together. They will snap and lock together. If you have wires, strip 3/8" inch of the insulation off of the end of the wires and wire nut them together, matching the colors.
After the wires are connected, screw the light fixture to the ceiling fan. Then you can install the bulbs and test it. Here are instructions on how to install a ceiling fan.
People will steal almost anything. We are in vacant houses everyday and it amazes me that a thief will steal something that isn't even worth the time to remove it. Case in point: medicine cabinets and ceiling fans in Las Vegas. You've got to be kidding me.
That people would go through the trouble of removing a recessed medicine cabinet tells me they just wanted to vandalize the property. It leaves a hole in the wall and really looks trashy. A recessed medicine cabinet costs about $20.00 and I'm sure they won't be gentle in removing it and transporting it. I'm pretty sure it will end up on Craigslist for $5.00. Maybe I'm in the minority, but $5.00 just isn't worth going to jail for.
Stealing a ceiling fan, by comparison, is a little more understandable. After all, they cost in the neighborhood of $50.00 and would probably fetch $15 on the open market. We did a job that required us to replace some stolen fans and you could see where the thieves turned a 5-gallon bucket over to stand on to disassemble the fan. It must have taken them a while because they smoked many cigarettes in the process.
The thieves doing this aren't owners in trouble (although in some cases they are). These houses are being burglarized after the bank takes the property back. If I can make a suggestion to asset managers, turn the water off to the house in the garage (if the home has a separate shut-off valve). This way, the water will still be on for the landscape but off inside the home. In many cases as a parting shot, thieves will plug up a drain and leave the water running to cause a flood. It will also prevent a flood in the event a pipe freezes and breaks.
Most people wouldn't consider using a ceiling fan in the wintertime since ceiling fans are only for keeping us cool in the summer right? Wrong! Most ceiling fans have a "reverse" switch on them to allow the blades to reverse their direction and circulate the warm air residing at the ceiling. Ceiling fan direction is important for maintaining comfort.
If you look at the blades, you will see that they are pitched. This allows the fan to push the air down to the floor in the summer or pull the air upwards in the winter. Since warm air rises, this updraft circulates the warmer air throughout the room.
Some manufacturers vary with their terms of forward and reverse. If you stand directly below the fan and turn it on, the blades should run counter-clockwise in the summer and clockwise in the winter. Also, you can run the ceiling fan on high. If you feel the flow of air blowing directly on you, that is good for the summertime as it creates somewhat of a wind-chill effect. For winter use, reverse the fan's direction and the blades will carry the air upwards along the ceiling and down the walls to recirculate the warmer air throughout the room. Ceiling fans are useful year round.
The days of summer bring with it lemonade, sweltering heat, and high power bills. A ceiling fan installation is easy, the fan is cheap to operate, and can certainly help you feel cooler.
Ceiling fans range in price from about $50 to several hundred dollars and take a little over an hour to install. Most of this time is spent assembling the fan after taking it out of the box.
If your home has been prewired for a ceiling fan, the builder should have installed a metal box with a brace bar between the ceiling joists to support the weight of the fan. If you were replacing a light fixture with a ceiling fan, which is heavier than a typical light fixture, you would need to install a brace bar so the fan won't fall.
Once you buy the fan, follow the manufacturer's assembly instructions. With some fans, you attach the blades to the motor housing and then hang the completed fan (in which case you have to be a contortionist), while with others, you secure the motor to the ceiling first and then attach the blades.
Either way, start by turning off the breaker in the main service panel, then test the wires to make sure the power is off.
All fans have a mounting bracket that attaches to the electrical box in the ceiling. Check that this bracket, which is secured with two screws, is tight to the box and the ceiling or else the fan will wobble when in use. The bracket should have a hook or a slot to support the weight of the fan while you make the electrical connections.
There should be two electrical switches on the wall for the fan. One controls the fan, while the other controls the light kit attached to it. The function of the switches depends on how you wire the fan.
With the fan supported by the mounting bracket, pull out the wires from the ceiling. You'll see a white wire (the neutral), a black wire and a red wire (the hot circuits), and a green or bare copper wire (the ground).
Separate the wires coming from the fan. There will be a black wire, a green wire, a white wire and a blue wire. Connect the green wire coming from the fan to the green or bare copper wire in the ceiling. Next, connect the white wires together, then the black wires. Finally, connect the red circuit wire to the blue fan wire (this connection runs the light kit). Use wire nuts (about $2 for a bag of 25) to make tight connections.
Now, you're ready to attach the fan to the ceiling. This can be tricky because you may have to support the fan with one hand while screwing the housing to the mounting bracket with the other.
Lastly, connect the light kit to the bottom of the fan. Remove the small cover from the bottom of the fan and pull out the connection, which is a plastic fitting with wires coming from it that simply pushes into the mating fitting in the light kit. If your fan has individual wires instead of this fitting, connect the individual wires from the fan to the wires in the light kit. Again, match the colors of the wires.
For homeowners who want to install a fan in place of a ceiling light, a brace bar will need to be installed to support the weight of the fan, as I previously mentioned. Unfortunately, there will be only one switch on the wall to control power to the fan. In the past, if you wanted to operate the fan and the light individually, you would have to use the pull chain on the fan or pay for running an additional switch down the wall.
Nowadays, you can install a remote switch, which costs about $25 and is battery operated. This unit hides inside the fan's mounting bracket (you'll never see it), and the switch can be fastened to the wall or stored like a TV remote. It takes just a few minutes to make the electrical connections, and instructions are included. The downside is that when the battery wears out, you'll have to remove the fan's cover to replace it.
Once the fan is wired and secured to the mounting bracket, turn the breaker back on and flip the wall switches.
If the fan still wobbles, the blades are out of balance. This can be fixed with a fan balancing kit (about $2), which includes a clip that you'll attach to the end of each blade. Turn on the fan after moving the clip from one blade to the next. After deciding which blade makes the greatest difference in minimizing the wobble, move the clip down the length of the blade to determine where to place the permanent weight. This weight sticks to the top of the blade and can't be seen. The kit includes additional weights in case more than one blade is out of balance.