 Our customer had rust coming out of her bathtub when she turned on the water. Certainly not a good sign with some expensive solutions.
There are several considerations here that will help lead to a diagnosis. The two most likely problems are either the water heater tank is corroded and rust is present. The second possibility is that a fitting used in the faucet is corroding. The more likely of the two is that the water heater will need replaced.
Is the rust coming out of just one faucet or many faucets? If rust is present at just one faucet, it may be that the installer of that faucet used an inferior fitting and that fitting is rusting, which would explain the rust in that one fixture. Another clue is that if rust is present when both the hot and cold water run separately. If the problem is actually the water heater, you should have rust when running only the hot water. If you have rust when running only the cold water, it might suggest the installer used inferior fittings on both the hot and cold sides, and therefore may not be the water heater.
It is a good idea to note the location of the fixture in relation to the water heater. For example, if the water heater is on the opposite side of the wall from the suspect fixture, it may just be that that fixture is closest to the water heater and will receive the brunt of the rust. So other fixtures farther away from the water heater may receive very little rust, and may suggest that the fixture is rusting when in fact the water heater is to blame. If the suspect fixture is in a bathroom with other hot water fixtures, let the water heater sit for a period of time so that the rust has time to accumulate in it. Then turn on the hot water in a different fixture to see if you get rust from it. If you get rust coming from a previously unaffected fixture, you might consider a water heater replacement.
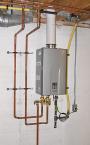 A customer called the other day asking about a problem he was having with his tankless water heater. He said it was just installed and he bought it new from a home center. His complaint was that when he ran a faucet everything was fine and he got hot water, but when he ran a shower or bathtub...no hot water!
I started asking questions and he sheepishly told me he paid someone he just met to install it. Apparently, he met the guy in the parking lot of the home center and he was believable enough to get the job. The reason he was calling me was that he couldn't get ahold of the guy he met in the parking lot. Hello? Are you serious? This customer paid $1,500.00 for a new tankless water heater and let some shark trolling the parking lot install it on the cheap. This guy made a bad decision and he knew it.
After speaking to the customer, it was pretty obvious the installer didn't know what he was doing. This was a gas tankless water heater, and although they will save energy on your monthly gas bill, they demand a lot of energy when they are actively heating water. Most of our homes have a ½" gas line which is fine for a typical tank-style water heater. For a tankless, the gas line needs to be upgraded to a ¾" gas line. That was one of the problems with this installation. The installer (and I use the term loosely), simply added a ¾" adapter onto the existing ½" gas line. Big mistake. Although the guy was able to connect the gas line to the water heater, it still was a ½" gas supply. A new ¾" line needed to be run to properly supply the water heater.
With a tankless, there are typically venting considerations also, due to the venting being much closer to the burner, and consequently burning much hotter. The point is, this probably isn't a job for someone inexperienced in installing a tankless water heater.
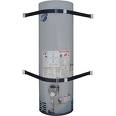 While repairing a water heater, I noticed that although the water heater was fairly new, it did not have earthquake straps on it. I remarked to the homeowner about this and he said he had replaced the old water heater with a new one. Since the old one didn't have straps, he didn't install them on his new water heater.
Water heater installations have changed over the years. One of the changes is the requirement of installing earthquake straps on water heaters, at least for Las Vegas water heaters. This job is easy but necessary. A 40 gallon water heater filled with water weighs over 400 pounds. If it is powered by natural gas, it is required to be elevated off of the floor. If an earthquake occurs, or a car bumps it, it could fall over and potentially cause serious damage or injury, not to mention filling the garage with natural gas. This can all be eliminated by installing earthquake straps.
The water heater should be strapped in 2 places. One strap should go around the tank in the top 1/3 of the tank, and the other strap needs to be secured in the lower 1/3 of the tank between two and four inches above the controls. You must install these straps into wall studs for holding power. The straps will come with lag bolts to secure them into the lumber. Use a stud finder to locate the studs and install the bolts into them.
Many water heaters are located in the corner of a room or garage, so shoot for the corner where there will be plenty of lumber.
 It's late at night and your water heater tank is leaking. You are mad not only because you have a mess on your hands, but because the water heater is only 3 years old. Shouldn't this be covered under warranty? Probably. You will have to do a little research first.
Generally, the minimum warranty on a water heater has been 6 years. However, builders have been known to install inexpensive units that have lesser warranties. Even homeowners can now buy a water heater at some home centers that carry only a 3 year warranty. They cost less, but I wouldn't want a flood in my garage every 3 years either.
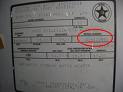
On the side of the water heater is a sticker with the model number and serial number of the unit. You will need this to verify a warranty. As for contacting the manufacturer, you may get lucky and see a phone number on the water heater to verify the warranty. Some manufacturers also can verify a warranty on their website. As a last resort, look in the yellow pages under "water heaters" and you can find companies that service various brands. They may help you out. Generally, you are forced to jump through a few hoops to get a free water heater under a warranty claim. I guess they don't want to make it too easy to stick them for a freebie. It sometimes isn't entirely free either. The distributor for the manufacturer will often charge a "re-stocking fee" or a "service fee" to cover their expenses. This fee usually ranges from $45.00-$85.00.
A distributor will generally have you peel off the sticker on the side of the tank that has the model and serial numbers, and bring that in. For brands that are carried by home centers, you often have to bring the entire water heater into the store.
The warranty will generally not pay for installation of the new water heater. You will have to install it yourself, or hire someone to do it for you.
 Installing a gas water heater requires a high level of attention to detail.
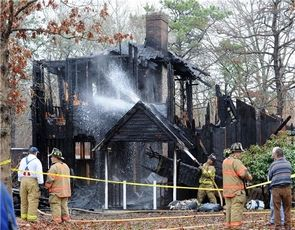
This morning in Cape Cod, MA a house completely burned and the tenant received 2nd degree burns, but is expected to live. Yesterday, a new gas water heater was installed at the property and the tenant noticed a gas smell soon after it was installed. The fire is still under investigation, but the fire department is "looking" at the water heater as the cause. You can read the story here.
As of now, there is no telling if the water heater was defective in some way, or if it was incorrectly installed. This is a good time to revisit the importance of testing the gas connections of the installation.
When you connect gas fittings, you should use yellow gas tape (as opposed to the white teflon tape) and tighten snugly. Test the fittings by applying either soapy water or a specific gas testing solution, which can be purchased at most home centers. It is a little thicker than the water and will allow you to see a slow leak.
You can read the specifics on installing a water heater here.
 It always happens at the worst time possible. There is no hot water and there is a constant stream of water coming from the bottom of the tank. A water heater Las Vegas always seems to last 1 day after the warranty expires.
Start by turning off the gas to the water heater. The valve is located near the wall, usually at the base of the water heater. Turn the knob a quarter of the way (the knob will be at a right angle to the pipe when the gas is off). Next, shut off the water to the unit. This valve is located on the water supply line, which comes out of the wall and goes into the top of the water heater. Turn the knob to stop any more water from entering the tank.
Grab a garden hose and attach it to the drain valve on the bottom of the water heater. Roll out the hose to the street and open the drain valve. Be careful, because this water is hot.
Disconnect the flexible gas line at the gas control valve (the metal box at the bottom front of the water heater that has a temperature dial on the front and a knob on top of the box that controls the gas).
Use a large open-end wrench or a pipe wrench to unscrew the flexible copper connectors at the nipples on top of the water heater. Finally, disconnect the vent pipe from the top of the water heater and push it aside.
Recruit a neighbor to help you lift the old empty water heater down from the stand. A gas water heater must be elevated at least 18 inches to prevent heavy low-lying fumes (gas) from contacting the flame in the water heater.
Water heaters feature a safety device called a temperature and pressure relief valve (TPR), which limits tank temperature and pressure and keeps it from exploding. When you purchase a new water heater, make sure it has the TPR valve in the same general location as your old unit. In other words, if your old water heater had the TPR valve on the side, buy one with the TPR on the side. In doing this, you won't have to extend any drain lines to accommodate the new location of the TPR valve.
Your new water heater will come with a TPR valve, but you may have to install it. Just wrap the threads three times with Teflon tape and screw it in tightly with a pipe wrench.
Buy two dialectric nipples, wrap the threads three times with Teflon tape on both sides, then crank them down snugly. Dialectric nipples are galvanized, but are lined with plastic to slow corrosion between two metals. With some water heaters, you may also have to install the fill tube, which is included in your purchase. Again, wrap the threads with Teflon tape and screw it snugly into the cold water supply hole. This tube pushes the incoming water down to the burner to get hot before it can leave the tank.
Call your neighbor back to help put the new water heater on the stand. Trust me, you'll pay him back when his unit dies.
All that's left is to reconnect the fittings to the cold water supply line, the outgoing hot water line, and the TPR valve. Use a large open-end wrench or pipe wrench to screw them down snugly.
Reconnect the flexible gas line to the gas control valve. Wrap the threads of the gas fitting with gas tape, which is similar to Teflon tape, but its yellow and much thicker. Securely tighten the line to the valve using two wrenches, one to keep the valve from twisting and one to tighten the line.
Check the manufacturer's directions for the proper vent size. Four inches in diameter is typical but it may vary depending upon the heat output of the water heater. Reattach the draft hood and the vent pipe to the top of the water heater. The draft hood will slide into slits and the vent pipe will attach to the draft hood with sheet metal screws (three-eighths inch).
Open the hot water faucet that is nearest to the water heater. Go back to the water heater and open the cold water supply valve at the top of the tank. As water fills the unit, it will push out the air through the faucet that you opened. The hissing sound coming from the faucet will stop when the tank is full and water comes from the faucet. Thoroughly check the fittings for leaks and tighten accordingly.
Turn the gas back on and test for leaks by brushing a 50-50 mixture of dishwashing soap and water over the connections. If you get bubbles, then you have a leak. Tighten or reconnect the leaking joints and retest them.
Light the pilot light according to the manufacturer's directions. Usually, you turn the gas control valve to "pilot" and hold the button down for a minute as you light it. After the pilot has been lit, turn the dial to "on" and then set the dial to the desired heat setting. You'll have hot water in about an hour.