 So the toilet is refilling every 20 minutes but nobody is flushing it. You are right to replace the flapper first. This is quick and easy. However, if that doesn’t work, then you need to troubleshoot it.
Lift the flapper and check the rim of the flush valve where the flapper sits. It should be smooth with no pits or divots in it. If the rim feels rough, this may be allowing water to pass from the tank to the bowl. If this is the problem, you can replace the entire flush valve (which is a bigger job), or buy a flusher-fixer. This is a new flapper assembly with a gel base that sits on the damaged rim. The gel fills any voids and stops water from draining into the bowl.
If everything looks good at this point, check for hairline cracks in the tank around the flush valve. If you have a crack in the tank, you should have water on the floor as well. A small crack around the flush valve may allow water to get by the flush valve and into the bowl.
If you see water on the floor and the toilet refills periodically, look for the source. Generally, you will find the problem at the tank bolts, the fill valve or supply line, or a cracked toilet tank.
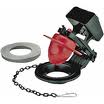
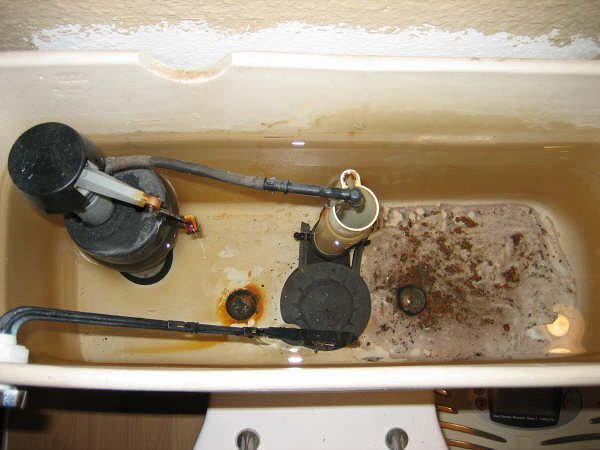 Rusting toilet tank bolts can be surprising. Either you didn’t realize it, or you noticed a drip which caused you to look at them. Sometimes during a quick adjustment, you lift the lid of the toilet tank and you see two giant balls of rust. Underneath all of that rust are the heads of the tank bolts. It’s a good idea to replace them even if they aren’t yet leaking.
You may find that when looking underneath the tank (there the bolts are held to the bowl with washers and nuts) that there is a large amount of rust and corrosion here too.
The first step is to remove the old rusted bolts. Usually, you would use a screwdriver and a wrench. The screwdriver is for the bolt head and the wrench for the nut underneath the tank. However, with all of the rust and corrosion, you won’t be able to get it to budge. Sure you can try, but you may even snap the bolt, which is fine.
Try a hacksaw and cut through the bolt. This will allow you to pull the tank off of the bowl but you will be left with the stubs of the bolts sticking out. Tap lightly on the stub and push the bolt head out. You will need to clean up the area where the old bolt head was or you may develop another leak if the new washer doesn’t sit right.
 You flush the toilet and it runs and runs until it finally shuts off. Assuming the flapper doesn’t get caught on something, I would check a few simple things first.
Refilling the toilet tank is about volume of water getting into the tank. Again, we are assuming the flapper is seated and not allowing any water to flow out of the tank as the tank refills. I would first check the angle stop. Follow the hose or tube that comes out of the bottom of the tank and goes to the wall. You want to make sure it is fully opened. Turn the handle counter-clockwise. If it doesn’t move, the valve is likely fully opened. If it does move, your problem is likely solved. By opening the valve, you will allow more water into the tank and it will fill faster and shut off earlier. Not that you are wasting water, but rather the water is simply filling the tank faster than before.
If the valve was already fully opened, turn the water off and remove the supply line from the bottom of the toilet tank. Point it in a bucket and turn the water back on. Do you have strong pressure? If you do, replace the toilet fill valve. If the pressure is weak, replace the angle stop as the valve may be defective.
 If you have a running toilet, the first things people do is to replace the toilet flapper and the fill valve. I would try the flapper first, but you might as well replace the fill valve as it is likely to go bad soon too, if it hasn’t already.
The toilet flapper seals water from leaking out of the toilet tank and into the bowl. When enough water has leaked out of the tank, the fill valve will turn the water on to refill the tank. So the flapper is the first choice.
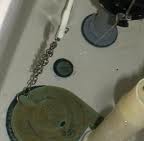
If you have replaced the flapper and the water still leaks out of the tank (assuming there is not crack in the tank), you may have a bad flush valve. The flush valve is what the flapper sits on. The flush valve assembly sits in the hole in the bottom of the tank. Before you replace this part, however, you might inspect the seat that the flapper is sitting on.
These parts spend their entire lives in water. Over time, scale and deposits can form on various parts. This might play a role in your tank losing water. Lift up the flapper and check the rim of the seat where the flapper sits. You are looking for tiny bumps in this area. These bumps will allow a small amount of water to pass and eventually when enough water passes, the fill valve turns on and refills your toilet’s tank. Try using your fingernail and scrape off the bumps. You can also try a flusher fixer which has a gel ring that sits on top of any bumps or deformities at the seat.
 I had the opportunity to install a new dual flush toilet flush kit recently. These are the kits that give you the handle with two halves. The top half is depressed for a partial flush for liquids, and the bottom half gives you a full flush for solids. The kit costs about $20.00 and claims is will save 15,000 gallons of water (assuming a family of 4 with the kit being installed on the most commonly used toilet).
The kit includes a handle replacement, but the magic is in the flapper replacement mechanism. It doesn't look anything like the flapper you have in there now. It looks more like a tower with a float mechanism built into it. Rotate it to separate it and place the lower half where your old flapper was. This part gets clamped onto the overflow pipe of your flush valve and held in place with a rubber ring and zip-tie. The top half gets placed onto it and is snapped together.
Running from the flapper tower is a cable that connects to the new handle. This is an easy replacement and the cable easily mounts to the handle.
Installing the entire kit will take just a few minutes but the trick is in tuning it up. I started with all settings on the most lean settings so that the least amount of water drains out of the tank (in this case both adjustments will be in the fully up position). The adjustments can be made for both the partial flush and full flush. For me the full flush worked fine in the most lean position. However the partial flush will take some getting used to.
For flushing liquids, you press the top button. This isn't so much of a partial flush as it is a rinse. The flapper lifts up for just a brief time to let a quick rinse of the sides of the bowl, but never really flushes the liquid. In the most lean position, the partial rinse basically mixes with the urine but doesn't flush it down the bowl. As you adjust the partial flush to use more water, the liquid will actually flush down the bowl. In the "full down" position, the partial flush will actually flush a small amount of paper along with it. It is a matter of fine-tuning the mechanism for your toilet.
 A common problem for a toilet is phantom filling…you know, all of a sudden the toilet water starts running. This can be from several causes, one of which is the flapper. One solution is to replace the flapper, but also check the seat that the flapper sits upon. If this seat is pitted or has buildup on it, even the new flapper won’t stop the water from draining out of the tank.
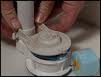
You can buy a flapper assembly called a “flush fixer” to remedy this problem. This product has a soft putty ring at the bottom that conforms to the pits and unevenness. It essentially creates a new seat and stops the water from draining out of the tank.
Dry the old seat and push the soft putty ring down upon it. The new flapper assembly simply pushes down onto the soft ring. You need to make sure that you orient the new flapper assembly in such a way that it doesn’t interfere with the other components of the toilet. The new assembly will have a cup that tips back and drains when then closes the flapper. You may have to play with the positioning of the flapper to make sure it operates smoothly and doesn’t hit any of the other parts.
This part will save you from taking the tank off of the bowl and replacing the flush valve assembly.
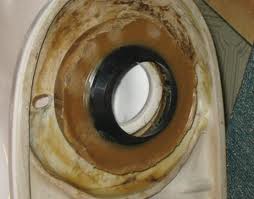 A toilet wax ring stops waste from leaking out from between the base of the toilet and the flange (although you may notice it on the floor). If your toilet bolts corrode and break, the toilet base will move and can cause a gap that allows waste to leak out. The toilet horn may move enough that the wax ring doesn’t direct the waste into the drain and now you get to replace it.
You may also get a leak if you have changed the flooring in the bathroom. I see this a lot when people will install a ceramic tile floor or other thick flooring material. If you previously had vinyl, and now have added ceramic tile, slate, stone, etc., the toilet base has been effectively raised farther away from the flange that it mounts to. So just installing one wax ring may not be enough. I’ve been on lots of calls where the homeowners have installed a new floor and used just one wax ring to reset the toilet. The leak they have can be fixed by stacking 2 wax rings, one on top of the other. Use the wax rings with the rubber diverter built in. They tend to maintain their shape well and will help in directing the waste down the drain.
Usually when someone tells me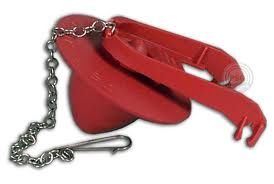 that his toilet handle is broken, it’s not really the toilet handle that is broken. It is usually the chain. Over time, the chain will either corrode and break or the chain will pull out of the rubber flapper. Either way, when you push down on the handle, you get little resistance. You can feel that the flapper is not being lifted to flush the toilet.
The solution here is to remove the toilet tank lid and see what has happened. If the flapper is torn and the chain is no longer attached to it, you will need a new flapper. The flapper will come with a chain and it needs to be attached to the handle and adjusted, and you are back in business.
If the chain is corroded and broken you will need a new chain, but since these come with a new flapper, buy a new one and install it. The old flapper will lift off of the ears on either side of the flush tube and the new one snaps right back down on it. You are going to have to play with the chain to get the length right. Hook the chain on the end of the toilet handle so that there is a little slack in it. Flush the toilet and see how well it works. If the flapper doesn’t lift all the way up, shorten the chain. If the chain is so taut that the flapper doesn’t completely stop the water from exiting the tank, lengthen the chain.
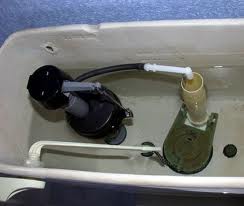
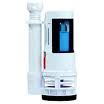
 A slow filling toilet tank is frustrating. You flush the toilet and five minutes later the water is still running to fill that tank. Assuming the float in the tank is set correctly, I would focus on either the water supply valve or the toilet fill valve. In my experience, the problem is usually with the fill valve. The fill valve is connected to the water supply line that exits the wall beneath the toilet tank.
The very first thing to do is to make sure that the water supply valve (aka angle stop) at the wall is opened fully. If it is opened only partially, this explains why you would get a low flow of water to the toilet. Turn it counter-clockwise until it stops. If it is already fully opened, you need to test it to make sure it is not clogged. Turn the valve off and disconnect it from the bottom of the tank (this is where it connects to the toilet fill valve). Point the hose into a bucket and open the angle stop you should get good water pressure spraying into the bucket. If not you can replace the angle stop to fix the problem. If you have good water pressure, I would replace the fill valve.
A fill valve can get choked up with scale and slow the flow of water. The next step to fix the problem is to replace the fill valve.
 Here is a job for most any homeowner. People get curious, and in this economy, lots of homeowners will attempt to at least understand what is broken and then give it the old college try to repair it themselves before calling for help.
People will remove the toilet tank lid to peek inside, especially if the tank is hissing or leaking water. This is when the lid gets damaged.
A toilet tank lid is glossy and can be slippery, especially if the toilet's fill valve is spraying water on it. It is common that they can slip and fall out of your hands and break. Equally as common is leaning the lid against the wall and it slides down the floor and cracks.
You can get a generic toilet tank lid at most home centers, usually only in white. If you have a tank that has an unusual shape it probably won't fit very well. The generic lids are a basic rectangular shape with rounded corners. It will fit most tanks, but may hang over the sides a little too much. Your only option at this point is to special-order a lid from a plumbing supply house, or replace the entire tank.