 If you have a cathedral ceiling, or even a sloped ceiling that requires a longer ceiling fan downrod, you have a little extra work to do. You can buy longer downrods at most home centers, but you will also need to buy extension wires for this as well. You can buy them separately, but many retailers sell a kit that includes everything you will need. The wires will be 14 gauge stranded wires.
You will need to connect the extension wires to the same colors as the fan’s wiring. Connect the black fan wire to the black extension wire with a small wire nut and then wrap that with black electrical tape. Do the same for the white neutral wires, and connect the blue wire to the wire for the light kit (if applicable). Also make sure you connect the ground wire.
Thread these wires up through the extension downrod and secure the downrod to the fan. Most will screw in, but some have a retaining clip and a setscrew. You can trim the extra wire to fit your needs, generally an extra 12 inches will work well.
Once you have the unit assembled, you can install the ceiling fan. Here is an article on how to install a ceiling fan.
 It's pretty common to want to replace a regular light fixture with a ceiling fan. The only issue is that a ceiling fan often weighs more than a builder-grade light fixture. The last thing you want to happen is for your new ceiling fan to fall out of the ceiling in the middle of the night. It's a good idea to install a brace bar.
A brace bar in placed in the ceiling and spans the opening by pinning itself into the sides of the ceiling joist. To install one, you have to remove the old junction box in the ceiling, after you make sure the power is off. The electrical cable (romex) will be held in the box by a cable clamp. After you free the cable, the box will need to be removed. It will be screwed or nailed in place, and sometimes the easiest way to remove it is to run a recuperating saw blade around the perimeter of the box to free it.
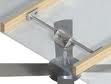
Use a stud finder to locate the direction of the ceiling joists and insert the bar into the hole in the ceiling. Once it's in the ceiling, turn it perpendicular to the joists and start turning the shaft. As you turn the shaft, the legs telescope out until they push into the side of the joists. They have little spikes that wedge into the wood. Just make sure that when you tighten it, the shaft is located directly over the hole in the ceiling.
Once the brace bar is installed, hook the "U" bolt over the bar and secure the junction box to it after you run the cable through the box. Then it is a simple matter of installing a ceiling fan to your brace bar.
 As it gets warmer outside people start to think about staying cooler inside. Many will buy ceiling fans to help feel cooler. But what size ceiling fan should you buy for a particular room? The answer is: it all depends.
Ceiling fans are sold in a variety of sizes for a variety of rooms. At home centers, you can find them in 32", 42", and 52", but specialty stores have them from under 30" to 60". Many retailers suggest the following:
Room Dimensions Fan Size
8' x 8' 32" Fan
12' x 12' 42" Fan
15' x 15' 52" Fan
Generally, people used to think that a small fan was for a small room and a large fan for a large room, but you need to take into consideration the volume of the room as well as where people spend time in the room.
Check the cubic feet per minute (cfm) of the fan. You should find this information on the box. The cfm will typically range from 2000cfm to 8000cfm. This cfm rating is the fan's maximum output. Next you want to calculate the volume of the room, and this is a change from the old school of thought. The volume takes into consideration the height of the ceilings. In a room with tall ceilings, the temperature at the ceiling can be 15 degrees warmer than at the floor. Multiply length x width x height for the volume of the room. For example, if your room is 12' x 12' with 10' ceilings, the volume would be 1,440 cubic feet. A fan rated at 2000 cfm or slightly higher should do the job. The cfm of the room would probably be served using the fan's medium setting.
Most people wouldn't consider using a ceiling fan in the wintertime since ceiling fans are only for keeping us cool in the summer right? Wrong! Most ceiling fans have a "reverse" switch on them to allow the blades to reverse their direction and circulate the warm air residing at the ceiling. Ceiling fan direction is important for maintaining comfort.
If you look at the blades, you will see that they are pitched. This allows the fan to push the air down to the floor in the summer or pull the air upwards in the winter. Since warm air rises, this updraft circulates the warmer air throughout the room.
Some manufacturers vary with their terms of forward and reverse. If you stand directly below the fan and turn it on, the blades should run counter-clockwise in the summer and clockwise in the winter. Also, you can run the ceiling fan on high. If you feel the flow of air blowing directly on you, that is good for the summertime as it creates somewhat of a wind-chill effect. For winter use, reverse the fan's direction and the blades will carry the air upwards along the ceiling and down the walls to recirculate the warmer air throughout the room. Ceiling fans are useful year round.
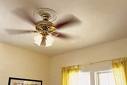
The days of summer bring with it lemonade, sweltering heat, and high power bills. A ceiling fan installation is easy, the fan is cheap to operate, and can certainly help you feel cooler.
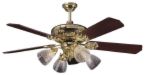
Ceiling fans range in price from about $50 to several hundred dollars and take a little over an hour to install. Most of this time is spent assembling the fan after taking it out of the box.
If your home has been prewired for a ceiling fan, the builder should have installed a metal box with a brace bar between the ceiling joists to support the weight of the fan. If you were replacing a light fixture with a ceiling fan, which is heavier than a typical light fixture, you would need to install a brace bar so the fan won't fall.
Once you buy the fan, follow the manufacturer's assembly instructions. With some fans, you attach the blades to the motor housing and then hang the completed fan (in which case you have to be a contortionist), while with others, you secure the motor to the ceiling first and then attach the blades.
Either way, start by turning off the breaker in the main service panel, then test the wires to make sure the power is off.
All fans have a mounting bracket that attaches to the electrical box in the ceiling. Check that this bracket, which is secured with two screws, is tight to the box and the ceiling or else the fan will wobble when in use. The bracket should have a hook or a slot to support the weight of the fan while you make the electrical connections.
There should be two electrical switches on the wall for the fan. One controls the fan, while the other controls the light kit attached to it. The function of the switches depends on how you wire the fan.
With the fan supported by the mounting bracket, pull out the wires from the ceiling. You'll see a white wire (the neutral), a black wire and a red wire (the hot circuits), and a green or bare copper wire (the ground).
Separate the wires coming from the fan. There will be a black wire, a green wire, a white wire and a blue wire. Connect the green wire coming from the fan to the green or bare copper wire in the ceiling. Next, connect the white wires together, then the black wires. Finally, connect the red circuit wire to the blue fan wire (this connection runs the light kit). Use wire nuts (about $2 for a bag of 25) to make tight connections.
Now, you're ready to attach the fan to the ceiling. This can be tricky because you may have to support the fan with one hand while screwing the housing to the mounting bracket with the other.
Lastly, connect the light kit to the bottom of the fan. Remove the small cover from the bottom of the fan and pull out the connection, which is a plastic fitting with wires coming from it that simply pushes into the mating fitting in the light kit. If your fan has individual wires instead of this fitting, connect the individual wires from the fan to the wires in the light kit. Again, match the colors of the wires.
For homeowners who want to install a fan in place of a ceiling light, a brace bar will need to be installed to support the weight of the fan, as I previously mentioned. Unfortunately, there will be only one switch on the wall to control power to the fan. In the past, if you wanted to operate the fan and the light individually, you would have to use the pull chain on the fan or pay for running an additional switch down the wall.
Nowadays, you can install a remote switch, which costs about $25 and is battery operated. This unit hides inside the fan's mounting bracket (you'll never see it), and the switch can be fastened to the wall or stored like a TV remote. It takes just a few minutes to make the electrical connections, and instructions are included. The downside is that when the battery wears out, you'll have to remove the fan's cover to replace it.
Once the fan is wired and secured to the mounting bracket, turn the breaker back on and flip the wall switches.
If the fan still wobbles, the blades are out of balance. This can be fixed with a fan balancing kit (about $2), which includes a clip that you'll attach to the end of each blade. Turn on the fan after moving the clip from one blade to the next. After deciding which blade makes the greatest difference in minimizing the wobble, move the clip down the length of the blade to determine where to place the permanent weight. This weight sticks to the top of the blade and can't be seen. The kit includes additional weights in case more than one blade is out of balance.