 Exterior caulking is good both in hot weather and cold. Weatherstripping your doors is a great idea. It will stop breezes, bugs and other outside nuisances from entering your house. You might venture outside and take a look at what you can do there as well. You should also take along a tube of caulking.
The type of caulking to use will depend on the application, but you will likely need exterior paintable caulking for doors and windows.
Read the manufacturer’s instructions to ensure it is used for its intended purpose.
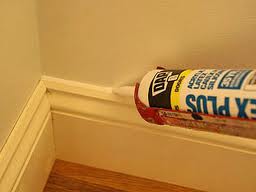
Caulking is a fix-all for all sorts of situations since it’s a great adhesive in a pinch, but is shines at filling gaps. You might even call it “weatherstripping in a tube.”
Walk around the house paying close attention to doors and windows. Around the doors, lay a bead of caulking around the perimeter of the door, in between the molding and the siding (or stucco).
Also, check at the threshold of the door and lay down a bead between the bottom of the threshold and the slab or deck. This will help keep bugs out. Plus, on doors that have no protection via an overhang, the bead of caulking will help keep rainwater from seeping under the threshold.
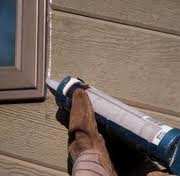
By the way, don’t buy the caulking that’s squeezed out by hand. Use a caulking gun and load a tube into it. Cut the tip at a 45-degree angle. The size of the opening can vary, but start out at about one-eighth of an inch. Use a long nail or piece of wire to punch through to the caulk. Squeeze the trigger and lay down the bead of caulking, and then run your finger over the bead to smoosh the caulk into the cracks.
Check out the windows in the same manner. The general rule: when in doubt, caulk it. Caulk around the perimeter of the window, being careful not to cover the weep holes in the window frame.
Water is a home’s nemesis, so seal around any points of entry, such as vents.
For sealing roof gaps, use a roof sealant (it also comes in a tube that can be loaded into your caulking gun). Now, working on the roof can obviously be dangerous and this is one area where you might consider hiring someone. Not only is working on your roof dangerous, but you can also damage your roof by walking on the tiles.
The idea is to keep the elements outside the house.
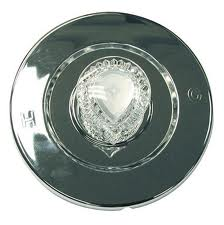 Caulking the shower means removing the old caulking and applying a new bead of caulking. This can also apply to the fixtures penetrating through the wall. Most of the time, the penetrations (the shower handles, shower arm, and tub spout diverter-if it is a tub/shower combination) have escutcheons around them.
The escutcheons should sit tight to the wall, but in many cases they don’t. This can leave room for water to enter the wall cavity. If this happens repeatedly, then you can have problems with water damage. As long as you are caulking the shower anyway, it’s probably a good idea to caulk around the perimeter of the escutcheons.
It’s your choice what color to use (either the color of the wall surface or clear), but make sure the caulking is for wet areas, like silicone. Make sure the shower is dry before you start and stays dry after you are done. A good rule of thumb is to not use the shower the day before and the day after you caulk it. Check the manufacturer’s recommendations…some say let it dry for 24 hours and others for 48 hours. The key to a good caulking job is preparation and then application.
 Painting is all about the details. Preparing the surface, caulking, and finally painting gives a needed change. When you are painting a wall one color, and baseboard a different color, caulking is crucial to getting a crisp line the separates the colors.
The mark of great forethought here is the area where the two different paint colors meet. It is here that people’s eyes are drawn to see the contrast. The line separating the two colors should be definite and straight with no overlap. Caulking is used to accomplish that.
The less caulking you use the better. At the top of the baseboard, lay down a thin bead of white paintable caulking. Do this before you begin painting either surface. Use a wet finger and lightly smooth out the caulking along where the top of the baseboard meets the wall. Use one continuous motion along the top without lifting your finger, or you will see this when the paint dries. Let the caulking dry.
I usually paint the baseboard first and let the paint overlap onto the bottom of the wall. You don’t need to be perfect here because the wall paint will cover it up. Once the baseboard paint dries, use blue painter’s tape and make sure the edge of the tape falls on the caulked surface. The tape will stand out horizontally which is why I like to paint the baseboard first.
You want to remove the tape before the paint on the wall dries, but after the paint sets up. In other words, if you pull the tape too soon, you may get wet paint that fouls your line. If you pull the tape too late, you may pull some of the dried paint off with it. Generally wait 15 minutes and test an area. If the tape comes up cleanly without pulling any paint off with it, keep removing it.
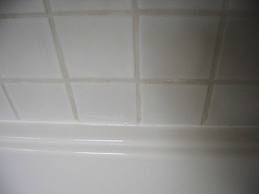 How many times have you seen caulking in a bathtub or shower start to peel up? Probably many times. With a some simple rules and a little attention to detail, this shouldn't ever happen again.
A big problem is that people don't use the right caulking. So, choose the right product. I like silicone caulking specifically for wet areas. Do you know how to determine if your product is good for wet areas? Read the back of the tube! The back of the tube of caulking has all types of important information regarding the application and use of the product...so read it.
The other issue is that people don't prepare the surfaces. Don't try to apply caulking on a wet surface. When someone calls me and asks us to caulk their bathtub or shower, I tell them that they can't use it 24 hours before we caulk it, or 24 hours after we caulk it. This way I know that that the area is dry when we arrive and will stay dry until the caulking gets firm enough to repel water.
The bigger issue is that if the caulking was peeling, water may have gotten behind the surface of the shower walls. This is something we all want to avoid and really the reason we use caulking. When you use the right product and apply it correctly, the caulking will prevent water from entering areas that it shouldn't be entering.
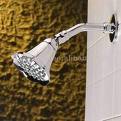 If you are caulking your shower, take a few extra minutes and take a look at the hardware coming out of your shower wall. You may have some gaps around these areas that could lead to water damage.
Any opening at your shower wall is a potential way for water to enter the wall, and that is something we want to avoid. These are areas like the shower handles, tub spout diverter, and the shower arm. Caulking is the answer.
If you have an uneven surface for your shower walls, such as stone or ceramic tile grout lines, where the escutcheon meets the grout lines there will by small openings. It’s also possible that a poor installation job of the shower valve has made the valve not in the same plane as the wall’s surface.
Pick a color that closely matches the wall. You could use clear silicone caulking but you will still see the gaps even though they are protected by the caulking. I prefer to use the minimum amount necessary to get the job done. It should be attractive as well as functional. You don’t want a big glob of caulking around the shower handles…its ugly and at some point you will have to re-caulk it and that will take a long time to remove.
Use a small amount of caulking around the perimeter of the escutcheon, wet your finger and slightly push it into the gaps. The final appearance should be uniform on all penetrations.
 If you are getting ready to do some painting, caulking will make your life easier and make your project look better. The benefits of caulking are apparent when you are changing colors at a transition.
Having multiple colors on a wall and trim has always been very popular. We’ve all seen model homes where the molding is white and the wall is, for example, coffee color. It looks great and caulking plays a role in the nice appearance.
When baseboard is installed, there will be a separation between the wall and the top of the baseboard. If the wall is textured (and most are) it will be nearly impossible to get a crisp clean line separating the two colors of paint. This is where caulking saves the day. Using paintable caulking, lay down a thin bead at this separation. Less is better. Use a caulking gun and cut the tip of the caulking tube at a 45-degree angle at the 1/8” line. Gently squeeze a small amount along the length of the top of the baseboard. Then go back, wet your finger, and smooth out the line by slightly pushing as you drag your finger along the edge. Do not lift your finger until you get to the corner or you will have a noticeable mark when you paint.
Let everything dry and then you can paint the area. Use painter’s tape to mark out the paint line. Place the edge of the tape on the caulking and when you lift the tape after painting you will have a perfect line.
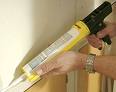 A caulking gun makes caulking a shower very easy, and gives excellent results. The gun gives you great control over where the caulk goes and how much of it squeezes out of the tube.
I don’t like applying caulking with a squeeze tube. Squeezing a tube with your hands while trying to accurately place the tip of the tube spells trouble, especially when the tube starts running low. You have to squeeze harder and the results will look poor.
A caulking gun holds the tube and squeezes out the caulking smoothly, effortlessly, and accurately. After you load the tube in the gun, cut the tip of the tube at an angle. You want the hole to be as small as is necessary. You don’t want a ¼” hole in the tube if you are covering a gap 1/8” wide. In this situation, when you smooth out the caulking, you will end up removing more caulking than you need to get a water tight joint. It will also look poor.
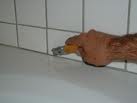
Another trick is to apply the bead of caulking in a continuous bead at a constant speed. The only stopping point should be a corner. You may need to twist the gun as you approach a turn, but keep the tip moving.
Once you have a uniform bead of caulking down, wet your finger and smooth out the bead. The idea here is to not only push the caulking into the joint, but give it a nice appearance.
 If your shower caulking is peeling up or lifting shortly after you have applied it, you may want to look at several possible causes.
First off, I wouldn’t re-caulk a shower unless it was completely dry. Applying caulking to a damp or wet surface is a sure way for the caulking to fail. Also, make sure you remove all of the old caulking. This can be as easy as pulling the length of it out of the joint, or as difficult as breaking up concrete.
Use a quality product. Don’t go cheap on the caulking here folks. I’ve followed up people that have used water soluble caulking and other products that have no business being in a shower. Use silicone caulking specifically designed for wet areas. Reading the label will pay dividends. Also, before you apply the new caulking, clean the surfaces that the caulking will be adhering to. You really can’t expect great results if the surfaces the caulking bonds to are covered in scale and deposits, right?
While you have the old caulking removed, its probably a good idea to inspect the joint for water damage issues and fix them now. The problem will grow and cost more over time.
Once you have applied the silicone caulking, don’t use the shower for 24 hours. You want to let the product set up and hold before you let the water attack it.
Caulking is the universal duct tape. It heals what ails you. Visiting a customers house and just keeping the old eyes open can yield plenty of maintenance that has been neglected. Case in point: walk outside and look around the perimeter of your windows and doors.
It is customary to caulk the area where trim meets the wall. For example, when you install a door, you will have brick molding or stucco molding that goes around the perimeter of the door. Where the brick or stucco mold meets the wall, you lay down a bead of caulk and work it into the area with a wet finger. This prevents water from entering the wall even though the stucco mold might have been installed right up to the molding. The same goes for windows. On older windows, you may have molding around the perimeter of the windows. A bead of caulking will go a long way in preventing water damage. Modern windows in newer houses typically don’t have this type of molding as the stucco will go right up to the window. However, it’s a good practice to caulk where the window frame meets the wall material.
Once the caulking dries, you can paint it to match the wall material and it will blend in. Once caulking starts pulling away from the surface, it needs to be completely removed and replaced to prevent water intrusion.
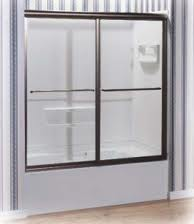 Whether you are installing a shower door for a walk-in shower or a set of bathtub doors for a surround, there is a small step that homeowners overlook. Caulking the shower door track will help prevent water from getting under the track and leaking.
This important step is done at the beginning of the installation and creates a seal between the bottom of the track and the top of the shower lip or bathtub.
After you measure the opening for the bottom track and cut the track to fit, you will trace a couple of lines with a pencil on either side of the track. Remove the track and then you will lay down a couple of thick beads of caulking inside the two pencil lines. Replace the track setting it down into the caulking so that it lies inside of the pencil lines and compresses into the caulk. This will make it so that water won’t be able to get under the track and leak outside of the enclosure.
Once the track is in position, use painter’s tape and tape the track in several different locations to hold it in place until the side pieces are mounted to firmly hold it in place. Without the tape to hold it in place, the track will tend to move around until the caulking firms up.