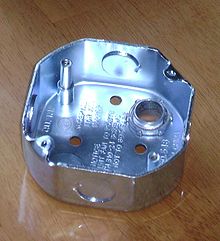
 Junction boxes are the safe way to connect electrical wires. They have clamps that hold the cables and then the wires are connected once the sheathing is stripped from them. The box provides room to make connections as well as providing protection from the connections being hit or pulled.
Home inspectors see this often. Up in an attic a homeowner may have done some work and it can be downright scary. There are no junction boxes or even wire nuts used to twist the ends of the wires together. Plenty of people rely on electrical tape to do the job of wire nuts and junction boxes. This is scary because without solid connections, you can get heat and possibly a fire.
A junction box is secured to the framing or wall and then the cables are secured to the junction box with either cable clamps, or integral clamps built into the box. This will prevent movement of the cable. Electrical tape does not offer this. People usually don’t go in the attic much, but when they do, they can disturb the cables by tripping over them or by moving insulation, etc. Junction boxes can withstand some stress placed on the cables, but electrical tape will typically give and allow the connections to weaken and possibly separate.
 A common handyman task is to diagnose electrical switches and light fixtures. Although it seems nearly impossible, there are times when all the bulbs will go out, especially when you are not there to replace them. Sometimes people get lax and let one burned out bulb go, then another, until finally there is only one working bulb left in a fixture of eight. Naturally, you wouldn’t consider that possibility, but you could have taken a working bulb from another fixture, or even stuck a tester into the socket to check for power before you went to the trouble of replacing the switch.
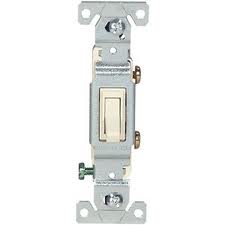
An essential tool for testing switches is a continuity tester. You can also use a multi-tester by turning the dial to read “continuity”.
Light switches are plastic but have metal parts to conduct electricity. A continuity tester checks if these petal parts are worn or broken, and it will light up if the switch is good, while a multi-tester has a needle or meter that will spring to life. You can test a continuity or multi-tester by touching the probes together and checking for the light or moving needle.
Before you start removing switches from the wall, make sure you turn off the power at the main panel.
To test a standard wall switch, touch one of the probes to each of the screw terminals. When the light switch is in the off position, the tester should not show continuity. But when the switch is on, the light should glow. If the switch fails to do this, then replace it.
For a three-way switch, touch one of the probes to the dark common terminal and the other probe to one of the traveler screw terminals (there are two). Flip the switch off and on. The light should illuminate in one of the positions but not both.
Now touch the other traveler terminal and flip the switch. The light should illuminate in the opposite position from the first traveler terminal. If it doesn’t, replace the switch.
You might also find timer and time-delay switches. These have dials on them and they are tested in the same manner as other manual switches. A timer switch can be tested by touching a probe to the red wire and the other probe to the black wire. Rotate the timer until it passes the “on” tab and the tester should glow. Rotate it again until it passes the “off” tab and it should turn off.
A time-delay switch is one that could be found to turn on a heat lamp in that you have to rotate the dial past a certain point. Then, it counts down on its own and shuts itself off. To test this one, touch a probe to each wire and turn the dial. The tester should glow until the switch turns itself off.
Electronic switches, like programmable or motion sensor switches, are also tested the same way. Each of these will have two wire leads coming out of them. It’s the same deal: Touch one probe to each wire and flip the manual lever from “off” to “on”. The tester should glow in the “on” position, but not the “off” position.
You can see the commonality with testing switches. Before you go through the hassle of testing the switch, try just replacing a bulb. Your weekend will thank you.
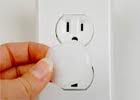 Besides protecting your child from chemicals in cabinets or falling down stairs, you must child-proof your electrical outlets.
Outlets are installed at a height that, unfortunately, lures curious kids. In a study conducted way back in 1997, the Consumer Product Safety Commission found that in cases of household shock injuries, 86 percent of those involved children between 1 and 4 years of age.
To solve your problem, you must turn off the power to the outlet at the main panel. At that point you can try to grab the object with needle-nosed pliers and pull the object out of the slot, but remember that outlets are plastic and can crack easily. If you can’t grab it, replace the outlet.
Replacing the outlet is simple. With the power turned off at the breaker, unscrew the outlet from the junction box and take note of where the wires are located. If your outlet is at the end-of-the-run (the last outlet on the circuit), you will only have one black, white and ground wire each. If you outlet is in the middle of the run, you will see two of each.
Replacing the outlet is as simple as placing the same wires in the same locations. You will notice that the black hot wires are secured around the brass screws, and the white neutral wires are attached to the silver screws. The green or bare copper ground wire wraps around the grounding screw (wrap the wires clockwise).
After that, gently fold the wires back into the junction box so there are no sharp bends and then screw the outlet to the box. The final step is to screw on the outlet cover plate.
To child-proof the outlet, you can buy plastic plugs that push into the outlet just as you would plug into a lamp.
There are also clever outlet covers that you can install (they replace the standard ones). These just screw onto the outlet but they are great at frustrating hurried children (hurried because their parents may catch them). These covers twist or slide to block the holes in the outlet’s face. Some people are averse to this style though because it is obvious that they look differently from standard outlets.
For those people, an outlet is made that looks like a standard outlet, but it actually has little doors that prevent a child from sticking something in the hole. The little doors open only when two objects (like a standard plug) are pushed simultaneously into the outlet.
 I was in an attic the other day and looked at a metal electrical junction box. The box had romex cable running into it after the knockouts had been removed. There were no cable clamps or grommets at this area to protect the cable.
If you are using metal junction boxes, you need to use cable clamps. A bag of these will cost only a few dollars, but will hold and protect the cable from damage. Without a clamp, if there was movement, the sharp metal box could cut into the wire and possibly cause damage. The cable clamp prevents the cable from moving at the box.
The cable has a collar that spins off. The clamp is then placed inside the box so that the threads protrude out of the exterior of the box. Then you can screw the collar onto the threads. This holds the clamp to the box. To hold the cable in the clamp, there are two small screws. Loosen them to spread the clamp open, run the cable through the clamp enough so that you have enough wire to make your connections. This is done with each cable that enters the junction box. The cables are held to the box and the individual wires are connected using the appropriately sized wire nuts.
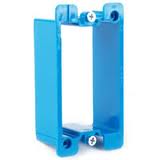 I got a call from a friend with an electrical problem. He was having granite installed and chose to run it up the backsplash. The problem was that the granite was ¾” thick and when he went to install the outlet covers back on, they didn’t reach, as the outlet was recessed in it’s old location. The answer is a box extender, also known as an extension ring.
An extension ring allows you to extend the junction box to meet the new surface of the granite, in this case. You can also use an extension ring outdoors if, for example, you were adding conduit to a run.
The box extender is simply a ring that extends the junction box. Turn the power off to the circuit and unscrew the outlet or switch. Gently pull the outlet or switch slightly away from the box and maneuver the box extender over it. The box extender gets secured to the junction box, and then the outlet gets screwed to the box extender. There are holes in the box extender for this. Once you have the outlet screwed to the box extender, you can install the outlet cover over it and everything will be flush with the surface.
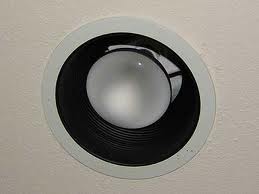 Here is an electrical problem that frustrates people. Recessed light fixtures will randomly turn off. It may be that you have a group of can lights on a switch and one or more will blink off. Why is this happening?
People will usually replace the bulb first, but it may not be the bulb. It may be that the fixture is getting too hot and shutting off. There is a high limit switch in the light fixture, that when it senses the temperature is too high, will cut the power to the fixture. You can try a few simple fixes. The bulbs are likely producing too much heat. The heat gets trapped inside the fixture which trips the high limit switch off. How about trying a lower wattage bulb? You could even go with LED bulbs that produce very little heat, but that might require you to replace the bulbs in all fixtures as they don’t look exactly the same when illuminated, and they are cheap. Try going from a 60 watt down to a 40 watt bulb…it may work or it may not.
You can also keep the current bulb in place but simply lower its position in the can. To do this, remove the bulb and loosen the wing nut at the side of the can. The socket will travel up and down after you loosen it. Lower the socket closer to the floor a few inches, replace the bulb and see if it stays illuminated. If it does, lower the bulbs in all the cans so that they look uniform.