 At Las Vegas Handyman, one of the most popular calls we get is to repair a garbage disposal. One of the issues is that the garbage disposal can become loose. My guess is that this is probably the result of a careless installation job. However, a garbage disposal does have good torque and maybe if it gets bumped around by an under-counter garbage can, it theoretically could become unseated and vibrate loose (I think this is a stretch, but that’s why the law of probability exists).
A garbage disposal can also become loose if it becomes jammed and instead of using a tool to unjam it, a broomstick is used. This can really cause some issues. Typically the disposal will come with a tool to clear a jam (or you can use an Allen wrench). Short of these, a homeowner will take to a broomstick and insert it into the disposal and try to dislodge it by pushing aggressively on the inside of the unit to free the grinding plate. Sometimes this works, but you can loosen the disposal and you may even be able to see the sink flex.
The repair is simple. The disposal has a mounting ring with ears on it that mate with the mounting assembly attached to the sink. They just fit together and you turn it clockwise until it bottoms out. If you have noticed that the disposal leaks from this area, it may be that that only two of the three ears were engaged. In this case you will have to remove the disposal from the mounting assembly and reinstall it. Of course if you remove the disposal, you will first need to remove anything that might impede its movement. This would include the side drain, and maybe the dishwasher air gap discharge hose. Plus, it’s always a good idea to unplug the disposal. Just line up the ears with the assembly and turn it until it bottoms out.
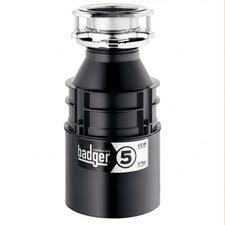
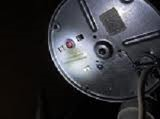 Las Vegas Handyman repairs garbage disposals, but before you call for service, try a few quick and easy fixes. If the disposal doesn't make noise when you turn it on, press the reset button on the underside of it. If the motor overheats or is overloaded, this button will trip and turn the motor off. Pressing the button back in will allow the motor to turn back on once you flip the wall switch (you should also test the outlet to make sure there is power getting to the disposal and, if not, check the breaker).
If the disposal makes a humming noise, but doesn't grind food, it is jammed. Most disposals come with a tool to clear a jam. If you have lost yours, you can use an Allen wrench. Take the tool and insert it in the
hole on the underside of the disposal. As you twist the tool, you will hear and feel the obstruction. Keep twisting until the blades move freely. If you still can't budge the blades, you'll need to remove the disposal
and manually clean out the obstacle. Some people use a broomstick through the top of the sink, but be careful you don’t damage the sink. On some thin stainless sinks, if you put too much pressure on the broomstick, the sink will tend to flex.
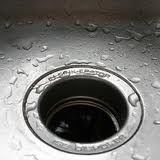
Once you get the disposal off of the sink, you can use a flashlight and take a peek down the neck of the disposal. You can pull the splash gasket off of the top to completely see into the unit. If you’ve had to come this far, the blockage is probably a broken piece of glass or a coin. You may need to use a screwdriver and try to pry the coin or glass from the blades.
 If your garbage disposal is leaking, the question of whether it needs to be replaced depends on where it is leaking. You will need to turn on the water and look under the sink. The leak will usually be coming from one of several places.
The Collar
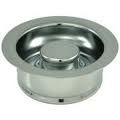
If the leak is coming from the collar area, the fix may be as easy as tightening the collar where the disposal meets the underside of the sink. There are screws that pull the sink flange down to squeeze out the plumbers putty and prevent leaks. There is a mounting ring that you twist to lock on the disposal. Check this area.
The Drain
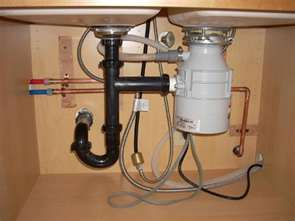
The drain areas are a common leak area as well. There are two outlets at the side of the disposal. The larger bottom outlet is the drain connection that the drain piping attaches to and runs to the wall piping. The smaller inlet on top of it is for the dishwasher air gap to connect to. This is held on with a hose clamp. If you have a leak here, either tighten the clamp, or you may have a tear in the hose.
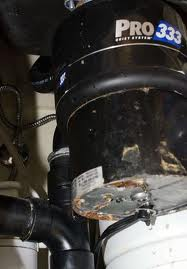
The Housing
Finally, if you have water dripping from the bottom of the unit and there are no obvious signs from a connection, you likely need a new disposal.
 A very common oversight when installing a garbage disposal is forgetting to remove the knock-out plug from the side of the unit. The purpose of the plug is to create a watertight seal in the event you don’t have a dishwasher.
If you have a dishwasher, the drain line connects to an air gap and then drains into a nipple at the side of the disposal. In this nipple is a plug that must be removed so that the drain water will flow freely into the disposal and out of the trap. If you don’t remove this plug the water will back up into the air gap and onto your counter. If you do not have a dishwasher (and therefore won’t be connecting one to the nipple), you don’t need to do anything to the plug.
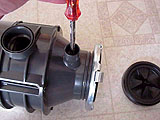
If you are connecting a dishwasher to the nipple, you need to remove the plug. If you have forgotten to remove it and the new disposal is already installed, you can remove the drain hose from the nipple and use a screwdriver and a hammer to tap it loose. You risk damaging the sink or the disposal doing this however, so you might want to place someone or something behind it to prevent it from moving do you your hammer strikes. The safest way is to place the disposal on the floor and tap out the plug with a screwdriver and hammer.
Once the screwdriver breaks through, you can either turn the disposal upside down, or reach inside and pull out the plug.
 If your garbage disposal has died and you need to replace it, you may be able to cut half the time of the installation…depending.
The mounting collar (aka ring or flange) is what holds the disposal to the bottom of the sink. You put plumber’s putty on the underside of the top half of the collar and place it in the hole of the sink. The bottom half mates with the top and then there is a tricky snap ring that holds them together. If these parts look good and are not leaking, you might be able to get away with not replacing them…if you buy the same brand.
Generally, disposal mounting rings are useful for only the manufacturer’s disposals. So if you buy the same brand and the old collar looks good, you might consider leaving the old collar in place and just twisting on the new disposal. If you change brands then go ahead and replace the collar.
The only thing you will save here is time. The most challenging part of the installation is the collar, so if you can avoid it you will save a little time. A new garbage disposal will come with the new collar, so if you want to , go ahead and replace it.
 When you buy a new garbage disposal, it generally will not come with a new cord. That leaves you to buy a new cord, or use the cord from the old garbage disposal. Whichever you choose, you will have to wire it into the new disposal.
You will need to turn the disposal upside down and remove the small coverplate, which is held with one screw. Under the plate are a black wire and a white wire. You will also see a green grounding screw.
There is also a knockout where you will thread the cord through (sometimes it needs to be removed and sometimes it has already been removed for you). You will need a cable clamp to hold the cord in place at the knockout so that it can’t move and get damaged by the edges of the metal. Thread the cord through the clamp, but I generally don’t tighten it until I’m finished.
Connect the green or bare copper wire to the green grounding screw. Connect the ribbed wire from the cord to the white neutral wire in the disposal, and connect the smooth cord wire to the black hot wire in the disposal. Connect the wires with a wire nut and gently push them into the disposal’s base, and then reinstall the coverplate.
 A garbage disposal ruined the football playoffs for me. I was at a party and during the game someone was making asparagus and decided it would be a good idea to throw the stalks down the garbage disposal…lots of asparagus. Well it didn’t take long for the sink to start backing up. Well, the owner of the house asked me to look at it and I knew exactly what to do…wait until halftime.
Throwing things down the disposal is tricky business. Some items pass and some cause the sink to back up. Grab a bucket and slightly disassemble the fittings enough to where the water from the sink will drain into the bucket. Then you can get to work.
If the sink is backing up only on the disposal side, you know that the clog is isolated to that side. Start taking apart the slip fittings until you find the restrictor pipe. It generally is placed in a horizontal position and carries waste into a pipe in a vertical position. A common place is where the disposal waste pipe joins the trap, but depending on your sink, it may be located elsewhere. It doesn’t matter though, remove pipes until you find it. You will know the right pipe because it will be heavier than the others due to a bunch of asparagus (or whatever went down your sink) sitting in it.
You can tap the pipe against the floor and watch the gobs of stuff come out of it. When it is clear, just reassemble the piping in the same manner that you took it apart.
 Installing a dishwasher without a garbage disposal sounds a little daunting, but it isn’t. You will need a few specialized plumbing parts, but otherwise it should be straightforward.
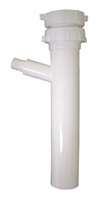
The dishwasher will go into the cabinet the same way the old one came out. Some people don’t like garbage disposals and so they remove them, I personally like them and don’t know why anyone would get rid of one. Anyway, when you remove the disposal, you will need to add a sink strainer and a dishwasher tailpiece. This looks like an ordinary tailpiece except that it has a nipple that sticks out of the side. This tailpiece nipple takes the place of the nipple on the disposal where the dishwasher drain was connected.
The dishwasher drain will run up to the air gap and then down to the tailpiece nipple. Secure the drain to the nipple with a hose clamp. The water supply connection is the same. Screw the water supply line onto the angle valve until snug after you wrap the threads with Teflon tape.
Shimmy the dishwasher into its final position so that it lines up with the cabinet faces and is centered in the opening. Open the door and secure the dishwasher to the underside of the counter with some short screws. The screws go through the brackets and into the underside of the counter.
 Removing a garbage disposal is easy and fast. Maybe you are replacing the unit, or maybe you need to remove the disposal to replace the rubber splash guard.
Unplug the disposal from the outlet and then focus on the drain piping exiting the side of the unit. There will be two screws that hold on the drain piping. Remove the screws and pull back the metal plate that the holds the flanged drain pipe to the side of the disposal. There will be a rubber washer behind the flanged pipe to prevent leaks.
If you have a dishwasher, the drain should run up to the air gap on top of your sink, and then back down to the garbage disposal. You will need to remove the clamp that holds this hose on. Once you pull the hose off, the disposal is ready to be removed.
It is held onto the bottom of the sink by a collar that with lugs in it. Support the weight of the disposal (I usually stick my knee under it) and place a screwdriver or other small stout object in the lug. Once you loosen the collar, the disposal will drop from the bottom of the sink.
 Maybe you’ve been using the garbage disposal and washing dishes in the sink and you go to drain the water and…it doesn’t drain. What do you do?
The distinguishing feature on a sink clog is whether both sides of the sink are backed up or only one side. If it is only one side, than the issue is probably related to the garbage disposal rather than the entire sink’s drain line. Although, if you have been washing dishes on the non-disposal side of the sink, it may be that the sink strainer is clogged with debris.
For the disposal, there is a discharge pipe that comes off of it’s side that leads to the trap. This is where you need to start. You probably have already turned on the disposal and swirled the water, but noticed that nothing happens.
Place a large bucket underneath the discharge pipe because the entire contents of the sink will soon be flowing into it. Unscrew the trap from the discharge pipe (you may have another section of piping here depending on the distance). You will start to get a slow flow of water. The source of the clog should be at the end of the discharge pipe as it exits the side of the disposal. You can stick your finger in there to try to dislodge it. When you do this you will start getting a lot of water flowing out. Let the water flow into the bucket until the sink is drained. Then you can remove the piping and fish out whatever object is causing the blockage. Make sure nothing else is blocking the drain downstream of the pipe and then reassemble it.