 When someone says they just installed a new shower diverter, but now they have a leak downstairs, that is a pretty good indication that the diverter installation didn’t go so well.
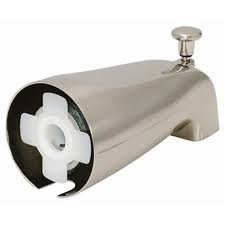
If you were to remove the tub spout diverter you would likely see just a bare pipe (although some are screwed onto threads). With the bare pipe type installation in particular, there is an o-ring that seals out water from exiting the rear of the tub spout diverter. Want to guess where the water goes when it exits? It goes into the wall. So I’m guessing that the cause of the leak has to do with the connection where the spout meets the pipe.
For the bare pipe connection, it may be that the o-ring has twisted or is torn. There is a lot of pressure on that part, and it is smart to remove it and inspect it. Use an allen wrench and loosen the set screw underneath the spout. Then you can pull it off. If the rubber is damaged, replace it. When you reinstall the tub spout, you can try some liquid soap on the o-ring to help it slide along the pipe without twisting. When you have the spout in the right location, tighten the set screw.
 A customer was adjusting his showerhead when he noticed that the arm to which it is attached was a little loose. There shouldn’t be any movement in the shower arm, only in the showerhead.
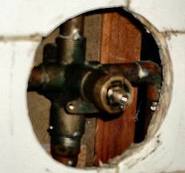
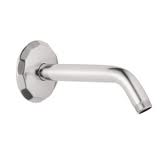
There is a valve in the wall that controls the hot and cold water. From this valve is a riser that goes up the wall and connects to an elbow with a female thread. This riser should be strapped to the framing in the wall to keep it still, and the shower arm screws into this female elbow. It may be that the riser wasn’t strapped to the wall, or it may be that you need to reinstall the shower arm; you would likely see evidence of a water leak.
You can check for leaks by removing the showerhead, then screwing a cap onto the end of the shower arm. Remove the escutcheon around the shower handle to allow access to the wall cavity, and turn on the water. This will pressurize the riser and if there is a bad connection from the shower arm to the elbow, for example, you should see water coming down in the escutcheon hole. If you have a leak, then try replacing or reinstalling the shower arm.
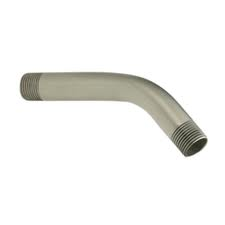
Reinstalling the shower arm is as easy as unscrewing the old one and screwing in the new one. Just make sure you wrap the threads of the new shower arm with several wraps of Teflon tape and slowly screw it in.
Because the shower arm has a bend in it, it’s pretty easy to cross-thread the arm as you screw it. So, at the point where the threads enter the elbow, you will need to hold it steady as you screw in the new arm.
Your chances of cross-threading it also increase because you won’t be able to see the elbow inside the wall. You will, however, be able to feel it as it screws in.
After you have the shower arm snug and in the right direction, place the cap back on and turn on the water; you shouldn’t see any water dripping down.
The other possibility is that the riser may not be strapped to the framing. This is a fairly easy fix, but you have to have access to the riser pipe, which means cutting open the wall. If you don’t have access through the back of the wall (for example, if there is a closet or bathroom behind the shower), you may need to go through the shower wall, which means removing tile or the surround.
This job can be a pain, because invariably the tiles will break and you may not be able to find an exact match for replacement.
To strap the pipe to the framing, cut the wall open slightly lower than the shower arm. Buy a ½” pipe strap and screw it in to hold the pipe in place. You may need to add apiece of lumber in between two wall studs if there isn’t any wood it the right place.
Seal up the wall when you are done and that should be the end of it.
If you don’t have any leaks, you might consider leaving well enough alone.
I don’t think most people play around with the showerhead each time they shower. But if it bothers you that much, be forewarned: you may be opening yourself up for a long weekend.
 A loose shower valve in the wall is a common item found during a home inspection. It is usually only found on single handle valves where the handle is pulled out to start the water, rather than the valve where you simply turn the know side-to-side. The problem is that the valve and associated piping wasn’t strapped to the wall framing. There are some simple fixes you can try first, before opening the wall to strap the fixture.
The reason the problem is more common is the pull-out handles is that sometimes it takes a lot of force to move the handle outward from the wall, especially if the cartridge is old and crusty. So an easy solution is to replace the cartridge in the valve. That is a common sense solution that many people don’t think about. If you lessen the force necessary to move the handle, then you lessen the movement of the valve in the process.
Another possible solution is to fill the wall cavity with some expanding foam insulation. You will have to remove the handle and escutcheon plate and then you can spray some foam around the valve and let it dry. As the foam dries it might (and I emphasize might) create enough resistance to the valve moving.
As a last resort, you can cut the wall open and properly strap the valve so that it doesn’t move. Then you will either have to repair the wall or maybe consider an access panel.
 If you have a single handle shower valve, have you ever pulled it out to start the water and noticed the entire valve moves with it? A lot of home inspectors pick this up during an inspection. It can certainly make a buyer apprehensive.
It probably stems from the fact that the piping and/or valve wasn’t strapped to the wall framing. The straps hold everything in place and so when you pull the knob, the valve stays in place. But what if the valve was never strapped in place?
The obvious answer is to open the wall and strap it. Of course then you have the burden of repairing the wall. You might be able to cut the wall open at the back side and repair drywall instead, or even install an access door. If you are lucky, the back of the wall is in a closet or some other inconspicuous place.
Aside from strapping the valve and piping, keep your fingers crossed. You can do a couple of things that might (and I emphasize “might”) minimize the movement of the valve. The first thing is to replace the cartridge with a new one. Old cartridges can get a little sticky, and installing a new cartridge will make the handle easy to move and put less stress on the valve. So this should minimize the movement. Additionally, you can try to squirt some expanding foam into the cavity around the valve. You will need to remove the escutcheon spray the foam in, an let it firm up. You may get lucky and it might work.
 If you have to replace a shower cartridge, the job should take less than 30 minutes. The most challenging part of the job however, is removing the old cartridge.
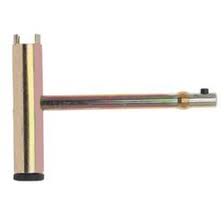
You will first need to remove the handle to gain access to the cartridge. For a Moen cartridge there is a clip that you have to pull out, which frees up the cartridge to make it’s exit. But it’s not that simple. Theoretically, you should be able to grab the stem with some pliers and pull it out. In reality though, it is more difficult than that. You can buy a cartridge removing tool to help out.
The tool screws into the screw hole that the handle was screwed into. Turn the handle on the tool until it starts to tighten. You will see that handle and the cartridge pull together. The ears of the cartridge will mesh with the tool. As the tool is tightened, the cartridge will start to lift out of the opening. There will be a time when you will be able to pull the cartridge out of the opening.
If the shower valve was installed with the cartridge inside of it, it may be very difficult to remove the cartridge. In this case, the stem may pull out, but leave the cartridge still in the opening. You can try to use a torch and slightly heat up the valve to loosen it. The tool will also have a skinny shaft (usually the handle) with a retractable ball bearing in it. You can stick this into the hole and twist it until it engages with the cartridge. Then pull and twist it out.
 If you have experienced a slow shower drain, you know it can be frustrating. The good news is that in many cases, the cause of the blockage is located just below the drain around the trap. You usually don’t need a snake to reach the blockage if it is in this location.
You will need to remove the drain cover from the shower drain. If you have a plastic cover, the strainer should just pop off. If you have a metal cover, it usually is held in place with two screws. The clog will be a mass of hair mixed with soap. Over time you will notice a foul smell as the hair degrades.
You can buy a “zip-it” tool to reach this area. This is nothing more than a long, thin piece of plastic with barbs on it. You stick the tool down the drain. On its way down, it pushes past the hair ball. It’s when you pull it out that the magic happens. The plastic barbs grab the hair ball and pull it out. It is easy but can be messy if you pull it out too fast. In a pinch, I suppose you could bend a metal coat hanger and put a little hook on the end of it to fish out the clump. I wouldn’t stick it past the trap though as you might not be able to get it out.
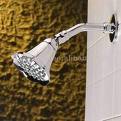
 If you want to improve your shower quickly and inexpensively, replace your shower head. This will take just a few minutes and you can get a ton of slick features.
Shower heads all go on the same way, so pick the one with the features you like and live it up. You can choose a massaging head, pulsing, or install a rain head. The choice is yours.
When you remove the old shower head, grab the arm it is attached to and hold it so that it doesn’t twist out also. The last thing you want is a leak behind the wall, where the arm attaches to the piping. With the arm firmly held in place, use a wrench and unscrew the shower head.
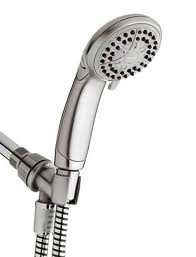
Clean up the threads, wrap them several times with Teflon tape and get ready to screw on the new one. If you are installing a hand held shower head, you will be screwing on a fitting to the end of the arm. This fitting connects a hose and finally the hand held shower head. The fitting also provides a mount for the hand-held shower head. This allows you to use the shower as if shower head were directly attached to the arm.
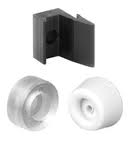 If you have sliding shower doors that bang into the jamb when you close them, you may check to see if the door bumpers are still in place.
It is unusual that the bumpers would break or fall off, but it does happen.. The door bumpers are located in the vertical tracks along each edge of the shower. They are held on to the vertical track by a screw. This screw often goes through the bumper and into the wall. So when you remove the screw to replace the bumper, you may encounter some bite to the screw as you remove it from a wall stud or anchor.
Getting a replacement bumper will likely be the most challenging aspect of this project. You can try a home center, but getting the exact part for the shower door enclosure you have might take you to a specialty company. Realize though, that you don’t need an exact replacement, the purpose of the bumper is to provide a cushion so that the glass door doesn’t slam against the wall. Even if you find something reasonably close, you could always modify it to fit, if necessary.
If a home center doesn’t have what you are looking for, you can try a glass shop. Many glass contractors install custom shower surrounds, and may have the right parts for your shower door.
 I frequently get calls about a shower heads that are leaking. Many people automatically assume that the shower head needs to be replaced. It depends on when the leak is occurring.
If the shower head is leaking when the water to the shower is turned on, the problem is likely with the shower head itself, or where the shower head screws on to the shower arm. You may end up replacing the shower head, or at the bare minimum, removing the shower head and re-taping the threads on the arm.
If the shower head is leaking when the water is turned off, the problem is not with the shower head, but rather the shower valve. The valve is not stopping the flow of water as it should. If the shower valve is a single handle that controls both the hot and cold water, you need to replace the cartridge in that valve. If the shower valve has separate hot and cold handles, then the stem and seat of whichever side is leaking need to be replaced. You can feel the water to determine whether it is the hot or cold side. For these parts, it is generally better to bring the parts with you to get replacements. There are many different styles that look alike but may have subtle differences.
 If you see signs of water damage at a wall, here is a test you can perform. You can’t see through a wall of course and so when you see bulging drywall on the opposite side of the wall, you have to make some assumptions. The damage could be from the shower valve leaking, or it may be from a maintenance issue, such as caulking or grout.
You can start to narrow the field with this test. Check first to see that the water meter is not moving, meaning that there is no water passing the meter. Then go to the shower and remove the showerhead and cap the shower arm with a ½ inch cap. Now turn the water on to the shower valve. No water will flow out of the shower because the cap is preventing it. However, now the shower riser and arm is pressurized. You can remove the escutcheon plate to see if any water is leaking or dripping (it’s a good idea to do this before you turn the water on and again after…it gives you an idea as to where the leak is). If water is leaking, then you have a leak somewhere between the valve and the shower arm. If there is no leak visible, then go back out to the water meter and see if it is moving.
If the water meter is not moving, it will confirm that the shower valve is not leaking. If the meter is moving, make absolutely sure that nobody just flushed a toilet, or that the icemaker is refilling, etc. If nobody is using any water and the meter is moving, you may have a leak where you can’t see it, which would warrant further investigation such as opening the wall.