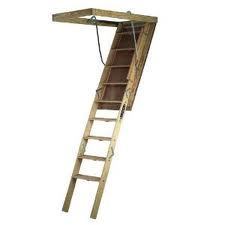
 Installing an attic ladder can be intimidating. From where to locate the door (where to cut the hole), to manhandling the door unit…it’s not a relaxing job. People think this has to be a two person job, but it isn’t so long as you are smart about it.
The key to making it a one-person job is to use a ledger board to support the door unit. You can cut the hole and push the unit into the attic through the hole. The tricky part is installing the door securely and then being able to climb out of the attic. You will typically cut a hole 54”x22.5”. You will frame a box at the short ends with the same dimensional lumber that is at the joists. At the short sides of the rectangle you will screw a ledger board (use a 1”x4”) so that only ¾” of it extends into the opening. You will do this from below to create a lip that the unit rests upon as it is installed. If you extend more of the boards into the opening, then the door won’t be able to open from above and you will make this a two-person job because someone will have to remove the ledger boards from below.
Once you have the ledger boards in place, set the attic ladder unit onto them. These will be the only things supporting the ladder until you secure it into the framing. There are recommended locations on the ladder to drive nails or screws into the ladder and the surrounding framing. Once it is secured, you should be able to push the ladder open and climb down.
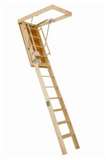 When you install a wood attic ladder in the ceiling, you will have to trim the legs so that when you unfold the ladder, the feet contact the floor at the right angle and make for a stiff set of stairs.
This isn’t hard to do, but it’s one of those things that pays to measure twice and cut once.
The bottom of the ladder will fold forward so that once the legs are cut to the correct length, the legs will be straight and rest on the floor. This will make a rigid ladder and give you confidence that it won’t collapse or move under your weight.
With the legs folded back, and the stairs extended, you want to take two measurements on each leg. You want to measure the distant from the back of the leg to the floor, and the distance from the front of the leg to the floor. You will do this for each leg and you may have four different measurements. It makes sense that both rear measurements and both front measurements should be the same, but this may not be the case if the floor is slightly sloped, etc. When you measure the distances, use something rigid. Don’t use a tape measure because it will flex and droop and will not be exact. Instead, use something like a 1”x2”, line it up along the leg and make a mark. Then transfer this distance onto the leg once you extend the stair back out. Do this for both the front and back of each leg.
What you will have made is a cut line on the leg. Mark a line between the two marks and cut along this line. Do this with each leg and the attic ladder should be cut perfectly.
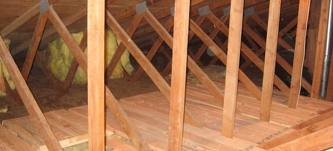
Installing an attic ladder can give you a significant amount of storage space where you didn’t have any before. For it to be useful, many people like to add a surface so that you can walk in the attic (assuming you have the space). This can be a lengthy process as you can’t just throw some plywood on top of the joists. There are a couple of pitfalls here. You will have electrical cables and maybe even some plumbing or gas lines running through the attic across the joists. So if you just lay plywood across them, you may pinch or damage them. You will need to add some furring strips on top of the joists to elevate the plywood. In this way, it will not touch the cables or piping. 2”x 2” strips are good for this. You can cut them to length so that they don’t interfere with the location of the cables or pipes. Once you have the strips secured to the top of the joists, along comes problem number two: you can’t get a full sheet of plywood into the attic. The standard size opening for an attic ladder is 22 ½” x 54”. If you are lucky, you will only have to cut a sheet of plywood one time down the middle of its length. That will leave you with a 24” x 8’ piece of plywood to pull through the opening. It will fit on a diagonal assuming the roof doesn’t get in the way of you pulling it into the attic. Once you have it in the attic, you can secure it into the strips on top of the joists.
 Many people like having access to their attic via an attic ladder. You don’t need an attic ladder unit to gain access though. In fact plenty of people will cut an access hole through the ceiling and just use a regular ladder to get up there. If you decide to go that route, know a couple of things. Cutting a hole in your ceiling will breach the fire rating of your ceiling. Many people still choose to do this for the added storage space.
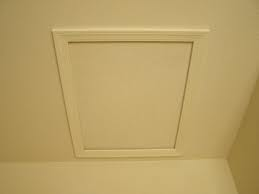
If you choose to cut an opening, you will install trim molding around the perimeter of the opening. The purpose of the trim is two-fold. First, the trim provides an attractive finish to the cut. Second, the trim acts as a ledge for the drywall ceiling piece to rest upon when you don’t need access into the attic.
Use trim molding that is wide enough not only to cover the rough cut, but also to extend far enough into the opening to that the drywall has plenty of room to sit and not fall out.
People typically cut along the width of the ceiling joists and then form a box by installing two 2”x4”s to make the box. In this way, you have something to nail into to hold the trim in place. Make sure that when you install the trim, you hit the ceiling joists with the nails, otherwise the weight of the drywall will push the trim out and the trim and drywall cut-out will fall to the floor.
 After you install an access ladder, you will have a fairly unattractive rough finish. You can dress it up alot by installing molding around the perimeter of the opening. Think of how your front door would look if you didn't have any trim around it. You would see gaps and wood shims around the perimeter. It's the same thing with an attic ladder.
To trim out an attic ladder, cut the wood shims so that they are flush with the ceiling. This will make it so that the trim will sit flat against the ceiling.
You can select whatever size and style of molding you like, but it is very helpful to have a power miter saw to cut the angles at the corners. You will have to measure and cut 4 lengths of molding, with a miter cut of 45-degrees on each end of each piece of molding. Instead of cutting all pieces at once, I cut the first piece and move around the opening one piece at a time. It makes for a much more accurate installation.
To secure the molding to the ceiling, Use a nail gun if you have one, otherwise you can use 4d finishing nails and a hammer.
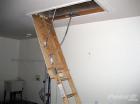 If you don’t have an attic ladder, you are missing out. Depending on how your attic is framed, you may have to stoop or you may be able to walk in there. Here is an article on how to install an attic ladder. It takes basic carpentry skills and tools that most homeowners already have.
After the attic ladder is installed, you will have a gap around the perimeter of the ladder. This gap will span from the attic ladder frame to the edge of the drywall that you cut to install the ladder unit. It is a little unsightly, but you can cover the gap with trim molding.
This type of carpentry trim job doesn’t have to be perfect as the attic ladder is usually not in a conspicuous place. A lot of times it is in the garage, and people just aren’t as concerned with how it looks as they would be if it were in, for example, the living room.
You can buy a length of door trim or baseboard molding…whatever profile you like. Use a miter saw (power is better) and cut the lengths at 45-degree angles. A finish nailer works great for this but you can always resort to a hammer and 4d finish nails. The most important thing about installing trim molding around the attic ladder is that the molding must not interfere with the operation of the ladder. So make sure you give a little room between the nose of the trim and the ladder.
If you feel froggy, you can caulk around the perimeter of the trim and paint it to match.
We all accumulate a certain amount of junk over time and need storage space. Your options for storage space are garage cabinets, overhead racks, a rental storage unit, an attic ladder, or even a garage sale. Garage cabinets are expensive and take up valuable floor space, a rental unit is a recurring expense, overhead rack systems are great but can leave the space feeling a little closed-in or claustrophobic. An attic ladder will take several hours to install, but the finished product is hidden, doesn't affect the size or appearance of the room, and is likely the least expensive option.
Installing an attic ladder takes moderate carpentry skills. Here is a link on how to install an attic ladder. Depending on how your roof was constructed, you may have very little space, or you may be able to walk into it like a room addition. On my old house I installed an attic ladder and I could walk from one end of the attic to the other (and I'm 6'2"). I also ran some lights in there and installed a light switch at the opening. The amount of storage space up there was incredible. Plus it's a great place to store holiday decorations and hide Christmas presents!