 Las Vegas handyman certainly does plenty of drywall repairs. Whether large or small, you can count on us. We encourage homeowners to attempt the easy ones, and then all us if they get into trouble or if the project is bigger than they are comfortable doing.
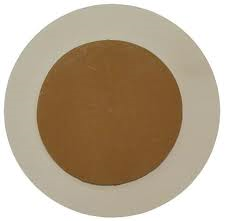
A common drywall repair is a doorknob hole that punctures the wall. You can do a traditional drywall repair using a wood backer, drywall, and float out the joint compound. You can also buy kits that make quick work of the repair.
The kit will include a template that you place around the damaged area. The template has to completely cover the damage. It is usually a large circular shape that you place over the damage. Draw a line at the template and cut out the along the line leaving a circular hole. The drywall plug that comes with the kit fits perfectly inside the circular hole that is left in the wall. It has a tape flap around it so that you can apply some mud and stick it in the hole. At that point you can just float the patch out to blend in just like a regular drywall repair. You can put a couple of coats on and then texture it to blend in with the surrounding wall.
As for painting the patch, if your house has been recently painted and you have kept the paint indoors, you are probably fine just to touch up the patch. If there is any doubt, you may want to paint the entire wall from corner to corner.
 When you patch a drywall hole, you have an ugly eyesore staring at you. After you have patched the hole, taped it and floated drywall compound (mud) over it, you have a smooth area in the middle of a textured area (unless your wall wasn’t textured).
The key to making a drywall patch is getting the surface flat so that it doesn’t protrude or indent from the surrounding area. When you reach that point it is a matter of spraying some texture on it and painting.
Once the mud dries, many people use sandpaper. If you use sandpaper, use a fine grit. Beginners tend to use a medium grit and it leaves scratches. Finer is better. Sandpaper will remove dried mud quickly, so use light strokes over the entire area.
You can also use a damp sponge. Ring the water out and lightly use a swirling motion. The sponge will clog with wet mud, so you will need to dunk the sponge and wring it out again.
Once everything is flat, use a damp sponge and get rid of the border of the patch. When you spread the mud on the patch, it will fill all of the textured divots. Try to erase the border of the patch to bring the textured area back. Once you have done this, you can spray some texture on the drywall and paint it to match.
 Cutting open a wall to repair a plumbing leak is a pretty big deal. These holes can be a few inches or a few feet large. Once you have repaired the plumbing issue, you have to contend with the drywall repair. That means a good patch, matching the texture, and matching the paint.
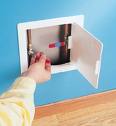
If you want to avoid all the drywall headaches, you can always install an access panel. You wouldn't want this in a conspicuous spot, but it works very well in certain applications. For example, when replacing a shower valve in the wall, it is common to cut the wall open. Your options are either remove and replace ceramic shower tiles, or cut the drywall on the backside of the shower. If the backside of the shower is, for example, in a closet, this is an ideal spot for a plumbing access panel.
The panel will likely be hidden by hanging clothes anyway, and if you ever have a problem with the valve again, you can just open the door on the panel and fix it without having to go through the drywall issues again.
The plumbing access panel is a small door mounted on a frame. The frame is fairly wide compared to the door which allows it to cover a variety of holes from around 6-inches to about 15-inches. It can save a lot of time and frustration. You can paint them to match the color of the wall, or they also come in stainless steel.
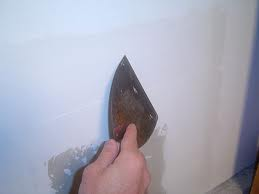
 If you've ever had to patch drywall, you know that it is a process. After you patch the hole, you have to tape the patch and float out some drywall mud (compound). Typically you have to sand the mud after it dries to level out the patch with the surrounding area. Then you can texture the patch, if necessary.
Sanding the patch is a very messy job. If you are careful, you may not have much sanding to do. If at the end of the mud job you can smooth out the mud and get most of it off with your taping knife, you may not have much to sand away anyway.
The sanded drywall mud is a heavy dust that seems to cake on everywhere it lands. The cleanup of sanded drywall mud is awful. It will clog vacuum filters, and you will have to sweep it off of hard surfaces many times. One alternative is to use a damp sponge. You can wring out a sponge until there is no water left in it, and then use a slight swirling motion on the mud. When the sponge gets filled with drywall mud, dunk it in a bucket of water and again wring it out until it is just damp. This will keep the clean up to a minimum. Once the drywall patch is flat, you can texture and paint it. Here is some additional information on drywall repairs.
 Matching paint is tough. Two weeks ago I wrote about matching exterior paint for stucco. Well, more often I find myself having to match interior paint for a drywall repair, or just freshening dirty walls. You can have a perfect drywall patch and poor matching paint and the wall patch will look terrible. You can have a mediocre drywall patch and perfect paint, and the result is very nice. So how do you get a good paint match?
Most homeowners don't know how to color paint, which is why they make computers to do this for us. As long as the machine has been properly calibrated, the quarter-size sample you bring in can be matched. If you don't have a piece of broken drywall (that has the correct paint on it) laying around from your drywall patch, here is a little trick. You can go to an inconspicuous area, like a closet or down low on the wall, and cut out a paint sample. Now when I say cut out, I'm taking about making a shallow cut in the drywall just deep enough to peel off the paint and the top layer of drywall paper. Do this by using a utility knife and cutting about 1/16" deep into the drywall. This will cut through the paint, texture, and top layer of drywall paper. Make a cut about 1 ½" square...this will be big enough for the computer to match. Then take the blade and lift the corner of the cut and gently peel it off.
So you will have another small drywall blemish to fix and texture, but at least the paint should be a very good match. Here is some information on repairing drywall.
 A drywall patch for an inexperienced homeowner can leave your knees knocking. There is a trick though that can shave a little time and apprehension off of your job. When I say small, I mean about 4 inches or less, so a hole caused by a doorknob is perfect. They sell screens that go right over the hole, but I prefer to use a drywall plug.
First off you want to clean up the hole. Cut the drywall hole larger ( I know it sounds counterproductive)in the shape of a square. Now you will need a piece of drywall (the same thickness as the piece you're working on, either ½ inch or 5/8 inch) 3 inches larger than the size of the hole you are patching. That means if your hole is 4 inches square, use a piece 7 inches square. We are going to make this 7 inch piece of drywall fit into this 4 inch hole...sort of.
Normally, you would screw a couple of wood boards behind the hole so the drywall patch has something to screw into. Then you would use tape (either paper or fiberglass) to cover the edges and float out the drywall compound (aka mud). However, with the plug method, you can bypass the wood and the tape.
Here's how you do it. Lets assume the hole is 4 inches. With your 7 inch piece of drywall you will remove everything but a 4 inch square in the middle, that means we will take off 1 ½ inches from each side of the piece. Use a utility knife and score the back side of the drywall piece. Then snap the drywall and pull it away from the paper face. You will do this on all 4 sides and when done you will have a flap of paper that is connected to the patch. This flap will act as the tape.
Butter up the flaps and smoosh it the hole. Once you push it in, the drywall compound will squeeze out around the perimeter of the patch. Use a drywall knife or putty knife and float it out. After it dries you can clean up the perimeter, texture and paint. Here are some details on how to texture drywall.
 Drywall repair and drywall texture can be very frustrating. Sometimes you get a good patch, but the texture just doesn't match. Or maybe the texture looks good, but the underlying patch was poor and noticeable. Homeownership is full of these challenges.
My career of blending in damaged surfaces started when I was about 10 years old. In one of his fits of unprovoked rage, my brother chased me up the stairs with my sister's baton.
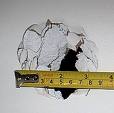
Well, I narrowly escaped by hurling myself into my room and locking the door. My brother dug in and -- reminiscent of a major leaguer -- put the baton through the cheap hollow door. My parents were due home shortly and we knew we would be in big trouble if they saw the hole.
I stuffed the hole full of newspaper and slid a piece of cardboard inside to hold it all together. A couple of pieces of masking tape finished the primitive patch. Fortunately, the color of the tape matched the door.
It was 10 years before my parents realized that the door was damaged. By that time the statute of limitations had expired and my brother and I had a good laugh. The point is that even if the patch job is excellent, you will likely notice it because you know where it is. Someone walking through the house would probably not.
I doubt there is a home repair person around that has not wrestled with the challenge of matching texture. Short of reshooting the entire wall, you will have to experiment with different techniques and mixtures to get the right look.
You first want to make sure your wall patch is dry and then sand it. Use fine sandpaper and a sanding block to level the patch. Use a swirling motion with your hand to get rid of the high spots.
You're going to see a flat patch in the middle of the textured wall. Before you start texturing the patch, feather the patch into the surrounding texture. Use warm water and either a sponge or a soft-bristled toothbrush. Dip the sponge or toothbrush into the warm water and swirl the border of the patch away (if you use a sponge, wring it out first). You want to erase the outline of the patch.
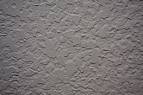
There are two main types of texture: orange peel and knockdown. Orange peel uses a thinner material, higher pressure and a smaller orifice than knockdown, which is leveled with a wide trowel to create larger flat areas. Between these options, you can get a lot of variety in the finished look.
You can buy spray texture in a can that does a pretty decent job. It sells for about $12 and claims it will cover up to 100 square feet, depending on the splatter size. For this option, I recommend the Homax brand. It comes with three straws of varying diameter to shoot different sized splatters. It's also oil-based and will dry in about 30 minutes. The downside is that it stinks and will stain carpet and clothing, so cover everything up.
You can adjust the nozzle pressure by changing the temperature of the can. If the pressure is too low, stick the can in warm water for a few minutes. If the pressure is too high, stick it in cool water.
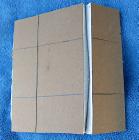
Practice on a piece of cardboard first. You want to hold the can 1 or 2 feet from the surface and use a quick sweeping motion. Don't hold the button down for too long.
If you have knockdown texture, instead of using a trowel to flatten the texture while it is drying, wait until it has completely dried and use fine sandpaper on a sanding block to flatten it. You will have more control.
You can also try to match the texture using a sponge. Choose one that has various sized holes. Use a flat pan (like a pie pan) and mix some joint compound with water. The mixture shouldn't be too soupy or too thick. Practice on scrap before you move to the wall.
Get the sponge damp and push it gently into the mixture. Touch the wall with it and pull it off. Peeling the sponge off will give a different look. You will be left with little spikes that you will have to knockdown.
Along the same lines is to mix up some joint compound and water and use a turkey baster. This technique is good for small patches. Just don't load up the baster so much that it just squirts a big blob on the wall. The tip should have a space so that as you squeeze the baster, the rushing air picks up the texture and throws it on the wall.
Probably the most important part of the job is the paint. You can make most patches go away by repainting the entire wall and not just the patch.