 Replacing a shower head is an easy way to save money. There is lots of technology out there to conserve water, and the energy needed to heat that water.
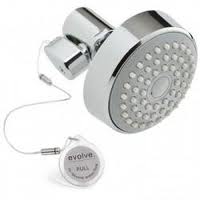
One cool product is by Evolve shower heads. These showerheads come in both 2.5 and 1.5 gallons per minute. That’s not unusual. What is unusual is the adapter that comes with the showerhead. The adapter, which you can buy separately for you own showerhead, senses the temperature of the water. When the water hits 95-degrees, the showerhead slows to a trickle until you manually open the flow on the adapter. Pretty cool. I can’t tell you how many times someone in my house will turn on the hot water in the shower and leave to do something else. When they return 5 minutes later the shower is now a steam sauna from the hot water that has been flowing. Now when they return, they will find a slow trickle of water from the showerhead signaling the temperature has reached 95-degrees.
At press time the chrome model sells for about $40.00, and my local utility is giving a $20 dollar rebate on the shower head. By the way, the company website says that it will save 2,700 gallons of water per year based on shaving 1 minute off of each shower.
 Removing a door knob is certainly a beginner repair job. If you have never done it, once you have done it you will see there was nothing to be intimidated by.
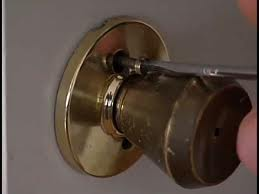
Door knobs sandwich the door and activate the latch mechanism. The hardware always secures the door knob from the inside of the door. There are usually 2 long machine screws on either side of the handle on the interior. If you unscrew these screws, the knobs on both sides of the door will pull away from the door. These screws are sometimes covered by a decorative cover. If yours are covered, use a screwdriver and pop the cover free. It will turn and you will need to align an opening in it with each screw, so that you can get the screwdriver in the screw head.
Pull the handles apart and you will see the latch mechanism sticking through the edge of the door into the door knob hole. The latch mechanism is also held in place with two screws. The mechanism is held in place in the door’s edge. Remove these two screws and you can pull out the old latch mechanism. Now you can install a new door knob and latch.
Also, you can replace the door strike plate on the door jamb. This is the curved metal piece that the door knob latch hits against as the door closes and latches. You certainly would want to replace this if you are changing the finish on the old door knob, but also if it is scuffed up, which it usually is.
 So what effect do you think shading and insulating a swamp cooler might have on its temperature? I suggest you do some testing yourself to see.
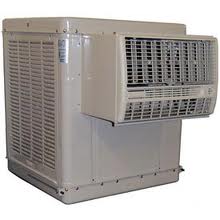
I have a side-draft metal swamp cooler that is roughly a 36” cube. Although I’ve done nothing scientific, I did a few things to see what changes might occur.
The cooler sits on the south side of the building in full view of the sun. There is a tall wall to the south of that, but with the sun higher in the sky in the summertime, it plays no role in shading the cooler. I keep a digital hygrometer connected to the front grill to monitor the temperature of the cooled air as it enters the interior of the building. At night the temperature of the cooled air will get down to 54-degrees (you don’t want to be standing in front of it without long sleeves). During the heat of the day, it is a different story. Of course, low humidity is the key to cold comfortable air in the building.
With the cooler off and the sun beating on it (the high temperature that day was 103), the hygrometer read 98 degrees at the mouth of the cooler. I set a piece of ¾” polyiso insulation board on the top of the cooler and 10 minutes later the meter read 88 degrees. Not bad. Realize that I was not running the cooler at this point.
I will be playing with getting temperature readings of shading and non-shading and posting them in the future. Just remember that if you are going to be shading your cooler, don’t block or restrict the areas where the air enters the cooler.
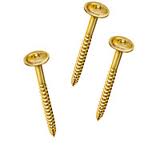 Different screws are made for different handyman jobs. Ones with larger heads apply more bearing pressure against the surface to which they are attached. This is especially true when a washer is placed under the head. Also, with a larger bearing area, there is a lesser chance the material will pull out from the screw.
A machine screw has finer threads than a wood screw and is made to mate with a nut or a tapped hole. A sheet metal screw is a stubby screw but has coarse threads, and a self-tapping screw drills its own hole as it screws into the material.
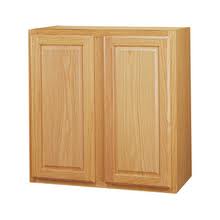
A drywall screw is typically a universal screw. They are sharp, come in coarse or fine threads and can make quick work of a project. However, this screw is brittle and has poor shear strength. It can snap or shear with moderate stress so you sure don’t want to use these for cabinets.
When screwing two surfaces together, another trick is to use a bar of soap. Rub the threads of the screw on the bar so there are flakes of the soap all over the screw threads. You can also wrap the screw threads with Teflon tape. Either one of these act as a lubricant to make the screw sink into the hole like a hot knife through butter.
 I had a customer that was installing some cabinets and trying to screw the two frames
together. He didn’t have much luck, as the first time he attempted this he
twisted the screw head right off of the screw. Luckily he was able to
wrench it out. The next time, he almost got the screw all the way in, but
heard a loud crack. He reversed the screw and noticed that the wood had
cracked.
It sounded like he may have not pre-drilled the holes, and that possibly he was not using the right screws.
When you screw together two pieces of hardwood, you need to predrill the
hole. This allows the shaft of the screw to enter the hole without
splitting the surrounding wood, and allows the threads to cut into the
sides of the hole. Soft wood will compress but hardwood won’t; it splits.
The diameter of the hole you drill depends on the size of the screw. I
usually hold up the screw and look at the shaft (the diameter excluding
the threads). I will then find a drill bit that is the same diameter or
slightly less before I drill the hole.
Before you predrill, clamp the pieces together and make sure the bit is
sharp. The spiraling action of the drill bit should remove the wood
shavings as the bit cuts, but you should pull the bit out of the hole
regularly to clear it. You will find that with hardwood especially, the
shavings will compact and friction will cause it to smoke.
The other possible problem is your choice of screws. For cabinets, you
should be using wood cabinet screws. The manufacturer may have supplied
you with the proper screws or at least listed the proper kind. Bore the
screw into the predrilled hole until snug.
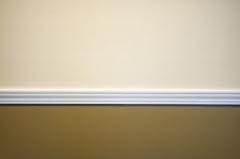 Chair Rail is certainly conspicuous because it sits at about waist high and usually separates two different wall treatments. What I mean is that you may have two different colors of paint, or even something like wall paper or wainscoting below the rail, and paint above the rail. So, the corners should look clean as they will attract attention.
The decision to either cope the inside corners or miter them, probably lies in what material you are using and how the chair rail will be finished.
If you are planning on painting the chair rail, you can get away with mitering the corners and then using a small amount of caulking to fill in any imperfections.
If you are planning on staining and varnishing the rail, any small imperfection will stand out and be very noticeable. Your other option is to use wood putty to fill in the imperfections, but it typically absorbs more stain than the surrounding wood and will look like a dark blotch. In short, it will look like someone stuffed some wood putty in there to try to make it blend in.
Coping the corners takes much more time, as you cut the exact profile into the edge of the chair rail so that it mates perfectly with the opposing piece.
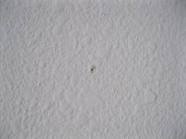 Walking through a customer’s home, the drywall texture really stood out. They had obviously done some repairs, but didn’t do it very well. It looked like the holes they patched were very small, probably some nail holes or wall anchor holes. Anyway, it looked like they had just gone through the house and smudged a giant 2” swath of spackle across a tiny little nail hole. Boy did that stand out.
I’m not sure why they didn’t just fill in the tiny nail hole; they could have just smudged a little joint compound on the end of their finger and filled the hole.
The goal here is to minimize the visual impact of the repair. Even if you don’t have any experience, you don’t have to just smudge a glop of compound on the wall. Once the compound starts to set you can use a toothbrush and some warm water. You want to slightly soften the surrounding area and bring the texture back out. Right now the voids are all filled with compound, but you can use the toothbrush to open them back up. Use a light swirling motion to clear out the smooth swath of compound from the wall. Dip the toothbrush in the water and swirl lightly. Of course the other option is to spray some texture on the wall, but the job really tends to grow when you do this.
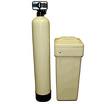 Some folks want to take the water softener with them when they move, and others just want to be rid of it. So how do you remove it?
If you plan on removing the water softener, you have to connect the loop back so that the house will still get water. As water enters the house’s plumbing, it is diverted into the softener and back out (except for the kitchen sink). When a softener is removed, there will be a void where the piping used to be. You just need to reconnect these pipes.
After you turn the water off to the house, disconnect the piping at the softener. Typically you will find that there are some male adapters on each end of the loop, and the lines leading to the softener are just threaded onto those. Use a wrench and unscrew the supply lines where they connect to the male adapters. You will get a little water that comes out.
To span the void left by removing the softener, you can use copper, copper flex, or braided. The flex is nice because you can just screw the ends on and be done.
You will have to disconnect the drain line from the stub-out in the wall. When you do, I would cap that line.
 Removing a pet door is the easy part, patching the hole is the tough part. Most people look at a small dog door hole and think it will be a fast job. Consider this: you will need to install insulation in the wall, sheathing, and whatever material your house has on the exterior (stucco, etc) and exterior paint. For the inside, you will have drywall, tape, texture and a second color of paint. Somehow this isn’t going to be a one hour job.
There is a sequence to follow for this type of job. Obviously, you first should remove the dog door. Depending on the type of door you have , you may need to remove some screws that hold the ends of the door together (they sandwich the wall), and then cut through the caulking at each surface. If you have a homemade dog door, you will probably have to remove any molding around the opening and then pry out any pieces that form the opening. What you will have left is a square opening.
You will need to install some pieces of 2”x4” or other strips to act as nailing surfaces. Cut your sheathing to fit the opening, nail it to the strips and add the exterior surface materials (its always a good idea to close in the exterior first).
Add insulation in the opened wall, and then drywall the opening. Then you can texture and paint the patch.
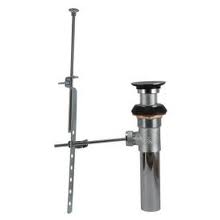 If your bathroom sink stopper won’t lift back up, there are a couple possibilities to check out. You will need to open the cabinet and look around. The simplest reason is that the clip that holds the lift rod (the thing you grab and pull) to the pivot rod (think of a teeter-totter that pushes the stopper up and down) has slipped off. If this has happened, look on the floor of the cabinet for a “V” shaped piece of metal with some holes in it. It may also still be attached to the lift rod and just barely hanging on.
To reinstall the clip, slide one leg back on to the lift rod, thread the lift rod through a hole in the pivot rod, and then squeeze the legs of the clip together and slide it back on to the lift rod. This holds the pivot rod in place on the lift rod and doesn’t allow it to move.
The other likely reason the pop up won’t move is that the end of the pivot rod has broken. This end threads into the base of the pop up stopper and moves it. Over time this end will corrode and break off and will be unable to move the stopper. You can unscrew the nut at the back of the pivot rod and pull the rod out. Replace it by threading it back into the stopper, tightening the nut that holds it in place, and then reattaching it to the lift rod.