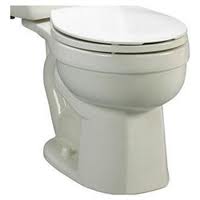
 Do you have a toilet that will start running and then suddenly stop for no reason? You need to replace the fill valve and/or the flapper. I’ll bet it’s the latter.
Your toilet is running because either water is running in the toilet or water is running out. Take the cover off of the tank and look at the overflow tube (typically a white tube about the diameter of a quarter). If water is running down this tube, your toilet is overfilling. The cause is either the fill valve or the float connected to the valve.
If the overflow tube looks OK, the cause is either the flapper or the lift chain. I would change both of these parts because when one goes, the other isn’t far behind. Changing these items is easy and inexpensive.
Many things can go wrong inside a toilet (besides the obvious), but changing these two parts will fix 90 percent of toilet problems.
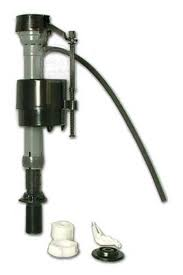
First, turn off the water supply valve under the toilet. Next, flush the toilet; this will empty the tank. Unscrew the coupling that connects the water supply tube to the bottom of the toilet, and slowly pull out the tube. Now, unscrew the nut that holds the fill valve on and remove the valve. Have some rags and a small bucket ready to catch any excess water that didn’t drain from the tank (this water is clean).
Slip the rubber washers onto the new fill valve according to the manufacturer’s instructions, and insert the valve into the hole in the bottom of the tank. Screw the nut onto the valve to secure it in place and re-attach the water supply line. Hand-tighten only. Adjust the height of the valve, again per the manufacturer’s instructions, and connect the fill tube to the overflow tube.
To replace the flapper, disconnect the pull chain from the flapper, then pinch the tabs on the back of the flapper. It will lift right out. Install the new flapper by inserting the rear tabs into the retainer and connecting the pull chain.
 Tightening toilet bolts is a fickle business. Whether you are working on the tank-to-bowl connection or bowl-to-floor connection, there is that fine line to want to creep up to but not pass.
Toilets are made of vitreous china and if you put too much stress on them they can crack. So the question of how tight do you tighten bolts becomes how good is good enough. If you continue to tighten toilet bolts, the toilet will crack, so you have to know when to stop. The only problem is that usually only comes with experience.
I would first suggest using a very small wrench. This will make it so you are cognizant of the pressure you are placing on the bolt and nut. If you use a large wrench, you gain leverage on your side and in my opinion are more likely to crack the toilet. So use a small wrench and take incremental turns on it. Tighten it slightly and check for movement of the bowl or tank, whichever you are working on. Also, alternate tightening the opposing sides of the piece you are working on. Whether or not it is a bowl or tank, tighten one side slightly and then the other slightly then test for movement. If you hear a “crack” you will be buying a new piece.
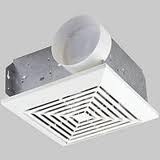 When a toilet (or rather bathroom) exhaust fan stops working, things can get downright musty in there. Not only does an exhaust fan ventilate smells, but also moisture from a shower or bath. Fortunately, it shouldn’t be too hard to figure out.
Before you grab a ladder, check to see if a GFCI outlet has tripped. You can press the “reset” button on the offending outlet to restore power and get the fan running again. You can also check the breaker, but you would see more electrical issues than just a bathroom.
If everything checks out, get the ladder and pull down the grill. They will unhook from the box in the ceiling. The fan plugs into an outlet in the box. You can unplug it and plug in a tester and then turn on the switch. If the tester lights up, it is time to replace the fan. If the tester does not light up, then you are not getting power to the fan and therefore you have an electrical issue to figure out. To verify the fan does work, if you want you can plug an extension cord into an outlet that you have verified is working, and then plug the fan into the other end of the cord.
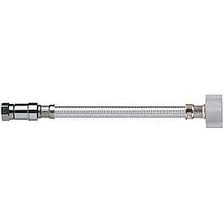 Plenty of floods come from a toilet. Whether it is an overflow or a pressurized water leak, there are ways to prevent them.
One upgrade for a toilet supply line involves replacing the supply line and angle valve if necessary. Sometimes these are one piece and so you have to replace both. You can buy much higher quality supply lines that will put your mind at ease over the builder-grade metal lines.
As an upgrade, you can buy plastic lines or even steel-braided no-burst lines (these usually carry a long guarantee). You can also buy flood safe lines that have a mechanism that stops the flow of water even if you sever the line. It’s pretty slick.
They all install the same way. Turn off the water and unscrew the hose fittings and remove the hose from the toilet tank and angle valve. The new supply lines simply screw back into the place of the old ones.
For the flood safe hose, the flood safe mechanism is connected to the water supply valve and then the braided steel hose is connected to the toilet tank. If the flood safe mechanism senses a water flow greater that the factory preset, then the water flow is stopped since it thinks a flood is occurring. The mechanism can be reset by turning the water off and removing the flood safe from the angle valve. This will reset it to allow the flow of water. Then just reconnect it back to the valve and slowly turn the water back on.
 If you have ever replaced a toilet with a smaller toilet, you may have some challenges. Particularly if your new toilet has a smaller footprint. That is to say that the toilet you are installing doesn’t cover the area that your old toilet covered. If you’ve ever removed an old toilet, you know that the area under it can be mighty unsightly.
There is a decorative floor plate that you can install to make up this gap. In my opinion, they are not pretty, but they are functional. If your options are replacing the floor or installing a cover, the cover all of a sudden doesn’t seem so bad.
There are covers that allow you to install them without removing the toilet, but many require that you do. It really isn’t any different that installing a new toilet with a small step thrown it.
Once you have the old toilet removed, you can add adhesive caulking to the flange and push on the cover plate and attach it to the floor. Install a wax ring (get the type with the rubber throat built into it) and then install the new toilet like normal.
Once you are finished, the base of the toilet will look somewhat out of proportion to the new smaller toilet, but it is cheaper than replacing the floor.
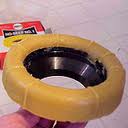 Underneath your toilet is a wax ring that compresses to keep the waste from leaking out. The wax compresses against the underside of the toilet and the flange that the toilet bolts to. I get homeowners that ask “how often should I replace the wax ring?”
It’s not a difficult job, but if you’ve never done it before, you might want to get some light instruction first. My answer is you shouldn’t replace the wax ring unless you are removing or replacing the toilet or if you have a leak or suspect a leak from the toilet area.
The wax shouldn’t degrade and should therefore keep a tight seal. The thing to watch out for is movement where the bowl meets the floor. If you get any movement of the bowl, the seal is breached and you can get leaking when you flush the toilet. Sometimes the toilet bolts will corrode and lose their ability to hold the toilet to the floor and the toilet can move. Also if the toilet holes weren’t directly over the flange holes, the bolts may be at a slight angle, which can allow some movement. Unless you see a leak issue at the toilet, I wouldn’t replace the wax ring.
 A running toilet is horribly frustrating. If you can hear the toilet tank filling continuously, lift the lid and take a look around. In most cases, I end up replacing the fill valve and flapper, but you may be able to get away with just adjusting the fill valve to turn it off earlier. If the fill valve is continuously running, it is a sign that it can’t quite turn off, and you should replace it. If the water continues to flow, it will fill up to the point of flowing down the flush valve in the center of the tank. Yes, it will waste a lot of water.
If you have an old style ballcock, you can bend the metal arm downward. If you have a newer fluidmaster style, adjust the float downward. Both of these will cause the valve to shut off earlier than it normally has. It may work, or you may need to replace it.
If you hear the water filling sporadically, I would also replace the flapper as this indicates that water is slowly leaking out of the tank to the point the fill valve turns on to refill the tank. Adjusting the fill valve is really more of a band-aid approach if the valve has been working without problems in the past.
 The question of whether or not a toilet seat can be repaired is a little silly; of course you can. The real question is why would you? Generally, the less time working on toilet seats, the better.
There aren’t many things that can go wrong with a toilet seat. If there is a problem, it is just that the seat is loose and needs to be tightened. Wear rubber gloves when touching the nether regions of the seat and underneath the bowl. Check that the hinges are tight at both the lid and the seat. If you can move the seat side-to-side, then the nuts under the bowl are loose (this is a good time to put on the aforementioned gloves).
At the rear of each hinge is a cap you can pop up to expose the head of a plastic bolt. You can tighten this bolt while holding the nut underneath still (some nuts have a little arm that keeps them from turning). Once you have the seat snug, just pop the caps back down to cover the heads.
If the seat is damaged, like a crack or if the finish is no longer smooth, just replace it. It just isn’t worth the work, when you can replace it in 5 minutes.
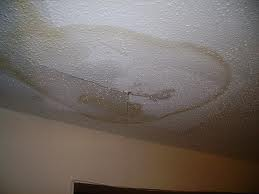 So one day you notice a stain on the downstairs ceiling, which just happens to be below a bathroom upstairs. Where do you start?
The answer is that it is a guess. Just because a stain is in a certain location doesn’t mean the leak is directly above it. I know people that measure the distance from walls and determine that the cause must be this or that because it is directly above the stain. Not so. Water (or waste) doesn’t always drip straight down, but will land on a framing member and follow it until it finally drops onto the ceiling below.
If you are into the guessing game, you can try to replace the wax ring to the toilet first. This is a common cause, and it is a fast job. The only way to really determine the cause of the leak is to cut open the ceiling and look around. The cause will be evident. You will see stains from the path of the water leading to the source. In any event, run the water until you find the cause. It will typically be either the drain or the pressurized piping.
You can turn this into a guessing game or you can open the ceiling and know for sure. It is painful, but once you know the cause, you can repair it.
 A toilet refilling shouldn’t make unusual noises. What I commonly see is as a toilet is refilling with water the problem is with the float at the fill valve.
The old ballcock style is famous for these types of noises. As the tank fills, the float will rise to the point that it shuts off, but it never quite shuts off. Instead it will repeatedly stop and start the water making a “bang bang bang” sound. It’s really more of a loud stuttering sound. You can try to bend the arm downward (toward the water) to get it to shut off earlier, but generally when they start behaving like that, it’s time to replace them.
A fluidmaster is a better design (and takes less space), but the noisemaking can also happen with it. It seems once they get old they get to the point where they just don’t quite shut off and you get the noises.
I would recommend replacing the fill valve with a fluidmaster. While you are at it, also replace the flapper. You can buy these items separately, but they are cheaper if you buy them in a kit, plus it will only take you 15 minutes to replace them.