 As you walk up your driveway you notice that half of your landscape lights are on and the other half is off. There goes the weekend. If all of the lights are on up to a certain point and then they are all off, you likely have a damaged cable (the other possibility is that the lights are run by two separate transformers, and maybe one of them needs to be reset).
You can repair the cable, but first you have to locate it. You can get an idea for where it is by following it from the landscape light that is working. It will have a connection from the light to the cable. The cable generally isn't very deep, but you will have to do a little digging. Once you find the cable, look for a break or damage to it. Most of these are pretty obvious as you will see rust from where water has entered an opening in the cable.
You can cut out the bad section of cable and use a cable splice to reconnect the cable. You can find a lot of suggestions on splicing cable that include soldering, etc. I like the splices that are small ridged sections that have sharp points to pierce the cable and maintain the electrical path (they are referred to as "pierce-point"). Some are filled with silicone or jell to fight against water intrusion. Whatever type of splice you choose, make sure they are specifically for direct burial.
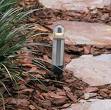 As you pull up to your house at night, you notice that a few of the landscape lights are not working. Fortunately the weekend is coming up and you have nothing better to do that work on some landscape lighting repairs.
The simplest fix is to change the light bulbs, but if that doesn't work, use a low-voltage tester (about $12 from a home center) to test that the light bulb receives power. The tester will have two terminals. Manually turn the lights on and stick a terminal in both sides of the light socket. You may have to place a piece of black duct tape over the light sensor if the transformer doesn't have a manual switch.
I say "light socket," but it doesn't look like one. This socket will have either two holes, or two clips depending on the system. If the tester indicates you have power to the socket, then you have a bad bulb. You can also use the continuity-testing feature on the multi-meter to test the bulb.
If you aren't getting any power to the socket, you will need to dig up the light base assembly. This assembly contains the socket, the wiring that connects the socket to the underground cable, and the stake that holds it all in the ground. The entire assembly will only be about six inches deep, but dig it out carefully as you don't want to sever the cable.
You want to find where the light assembly connects to the cable. In many cases, this area corrodes or gets clogged with dirt preventing electrical contact. Unscrew the connector or pull it apart, then clean it off with a soft brush.
At the ends of the light assembly's wires will be sharp contacts. These contacts are pushed into the cable to provide electricity.
Use the continuity tester by touching a terminal to both contacts. If the light assembly is good, the tester will show continuity. If there is no continuity, replace the light assembly (between $12 and $25).
If the light assembly tests fine, then re-install the connector into the cable. It is possible that the contacts have either pulled away from the cable's wiring or that dirt has prevented the contacts from touching the wires. Clear away any dirt, then re-install the contacts into the cables. The connections are secured by either twisting on a retainer cap, or by pushing the contact wires together until they lock in place.
Had the entire system been dark, you would have first checked that the transformer was getting power from its source (typically a GFCI outlet). If it was not, then you would need to backtrack from the GFCI outlet (try pushing the "reset" button on the outlet).
If the transformer were receiving power but not delivering it to the lights, you may have needed a new transformer. Many transformers have a circuit reset button. Try pushing the button before you buy a new transformer.
If all of the lights work up to a certain point and the rest of the lights are not on, you may have a damaged cable.
In this case, start by digging up the first light assembly that doesn't work and pull the contacts out of the cable. Manually turn the system on and stick the tester in the holes of the cable that the contacts made. If you get power from the cable, the problem is somewhere in the light assembly or bulb.
If there's no power, dig up the cable between the last operating light and the first nonoperating light. Find the damaged area of the cable and splice a new section of cable in its place. New cable and splice connectors are available at most home centers.