 We get called to do plenty of drywall repair jobs. A common occurrence is when someone will be moving furniture (or something heavy) and it will gouge the wall. It typically digs into the drywall and removes the paint and texture as well. Fixing it is pretty simple, if you have the right paint match.
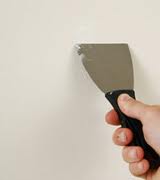
Fill the gouge will drywall mud and get it level with the surface. This step doesn’t have to be perfect as you may have to add some more anyway. Let this dry. Some people use sandpaper to level it, but I like a damp sponge. Get the sponge wet, wring it out, and wipe away the excess drywall using a swirling motion. This will also clean out the mud from the textured area surrounding the gouge. This will help the repair blend in by minimizing the repair area.
When the area is dry, spray some texture on it and make sure the splatter size is consistent with the surrounding texture. If the height of the new texture is somewhat taller than the surrounding texture, use a sanding block and take one swipe of it using a fine grit sandpaper. When the texture looks right, you can paint the patch and be done with it.
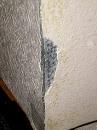 The corner of your drywall is prime real estate for damage. It sticks out like a sore thumb waiting for something to hit it. Most of the time it gets damaged, it is usually a dent or a scrape significant enough to remove paint and texture. I would rather fix it than replace it. Fixing it is not difficult.
Start off by removing any loose texture. If the metal corner is pushed out, it may be easy enough to use a hammer and tap it into place and fill in the void with drywall compound. Don’t worry about getting it exactly straight in line with the wall, let the joint compound do that. Use a putty knife and fill in the void and let it dry. You probably will have to do this on each side of the corner to get a nice square edge. Once this is dry you can sand it or use a damp sponge to form the corner. You likely will have to add a second coat and repeat.
When the corner is formed you can spray some texture on it to blend it in with the surrounding wall. If you can exactly match the paint then you can probably dab on the touch up paint. If you can’t match the paint, you may be forced to paint both of the walls that form the corner.
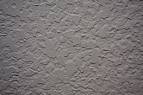 Drywall texturing is one of the most challenging things in home repair. Most homeowners have the courage to patch a small hole, but putting the finishing touches on the patch can be an anxious moment.
A couple of keys to hiding a patch are getting the patch level with the surrounding area, blending in the border of the patch, and using the right paint. Fail at any one of these and your patch will be noticeable.
After you patch the drywall, tape it and float the mud out, let it dry before you flatten it. The drywall patch should be mostly flat just from the taping knife, but when it dries, you can either sand it or use a damp sponge to remove any excess drywall compound.
Now use the toothbrush. Dip the toothbrush into some water and tap off the drops on the rim of the glass. Rub the bristles of the toothbrush along the border of the drywall patch to expose some of the texture on the wall. This is original texture that you will have covered up with the joint compound. The idea here is to erase the border of the patch to minimize it. You want to get rid of the defined border and make it blend in more.
Once you have gone around the patch to blend it in, you can spray some texture on it. There are as many ways to do this as there are drywall repair professionals. For most homeowners, I would suggest the texture in a spray can. It is easy and the results are very good.
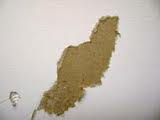 If you have ever removed wallpaper from drywall, you know the situation is ripe for tearing the paper on the drywall face. Drywall paper can get torn from a variety of causes….from a pet to moving furniture.
The problem with tearing the paper on the drywall face is that it will suck up wetness from the drywall compound and leave you with a blemish on your drywall repair. You can sand and paint all you want, but you will still have a noticeable patch because of this.
You can remove the torn areas as best you can using a razor blade. Your finished product should look something like a smooth piece of cardboard. You don’t want a bunch of torn fibers poking up above the surface. Next you want to seal the paper. You can use Kilz or another stain sealer on the area. Spray or brush the sealer on the paper area and just outside the border. A few coats of this works nicely and it dries fast.
Once the sealer has dried you can repair the area with drywall compound, letting each coat dry before the next one is applied. Float the area with the appropriate width taping knife and finish as normal. Here is an article on drywall repairs.
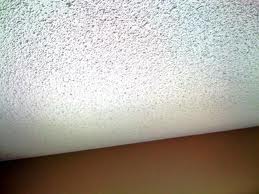 If you have a house that has the acoustical texture (aka popcorn texture or cottage cheese) on your drywall ceiling, you know what a pain it can be if you get a stain on the ceiling. A lot of older houses have this texture and it is repaired differently that typical orange peel or knock down texture.
When you get a leak on your popcorn-textured ceiling, sometimes the texture will peel off of the drywall and sometimes it will stay but turn brown. It will look as if someone spilled coffee on your ceiling. Assuming it was just a one-time leak, the area will be dry but unsightly, but make sure the source of the leak was fixed before you start repairing the ceiling as you only want to do this repair one time.
If the popcorn texture is still on the ceiling but you have a stain, try sealing the stain with Kilz or some type of stain sealer. Use a spray can rather than rolling or brushing it on the surface as popcorn has a tendency to fall off of the ceiling when disturbed. You can spray on a few coats after each has dried and then paint it to match, or paint the entire ceiling.
If you have popcorn texture that has fallen from the ceiling, you can seal the area and use a spray can product to patch the area. You can buy popcorn texture in a can. One such product is called “Up Shot” and you hold the can away from the ceiling and squeeze the trigger in short bursts as you move the can. It’s a good idea to go light on the trigger as you don’t want to make a stalactite on your ceiling. Once you have a good blended patch, you can paint it after it dries.
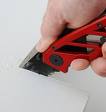 If you've ever done any drywall work, you know it can be a messy job. Drywall dust is a sticky dust that avoids being picked by brooms or vacuums. So cutting drywall with a minimum of dust is important, especially when you are working in a customer's house.
Drywall comes in sheets of 4'x8' and larger, although some home centers sell smaller pieces for small homeowner jobs. There are different methods of cutting drywall depending on the application.
To cut a sheet of drywall, it is easiest to score one side of the drywall. Cut through the paper on one side of the sheet and then snap the drywall sheet along the score line. Depending on whether you are working alone or with a partner, you can use the weight of the sheet to snap the line. By scoring deeper into the sheet, you have better control over the finished edge, but a rasp will take care of any rough edges. This is referred to as the "score and snap" method. Once you snap the drywall, just cut the paper on the other side of the sheet. Remember though, installing drywall is not a job of absolute perfection. That is left to when you finish the job with skim coats and drywall texture.
If you are working around pipes and have to cut a circle in a sheet, you can use a hole saw or a drywall saw. These will each leave dust on the floor, so it's a good idea to cut it in the garage or outside. A drywall saw is a pointed saw that you push through the drywall sheet to start the cut. A hole saw cuts a perfect circle. It is chucked in a drill and cuts very quickly.
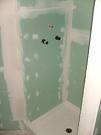 As a handyman service, we see water damage in houses almost daily, and much of it is caused simply by neglecting routine maintenance items. When caulking starts cracking or peeling up in a shower, it's time to replace it. If you let it continue, water will creep behind the caulking and into the drywall causing it to swell. From here, things only get worse, with tiles falling off and the possibility of mold growth. In wet areas like this, you should be using cement board.
Greenboard has the same gypsum material as drywall with the exception that greenboard has a waxy paper on the outside rather than regular paper. This waxy paper helps the greenboard to resist water. As it's name implies, greenboard is green in color. Greenboard is meant for damp locations and is "water resistant". It is not water proof as many people falsely believe.
For wet locations such as a shower, cement board is the preferred material. You can buy it at home centers under the name "Wonderboard". Greenboard costs slightly more than regular drywall, and cement board is at the top of the pricing structure. Although green board is frequently used in wet locations, you might consider spending the extra money for the cement board.
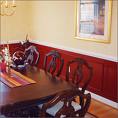 We were asked by a customer to do some drywall repair that had been damaged by the backs of some chairs. These were wooded chairs that when people would push away from the dinner table the chairs would ram into the drywall and chip away the paint and texture. Sure, this handyman can do that. However, there may be a better solution.
Repairing the drywall will look great....until someone rams the same chair into the same spot...again and again. It seems to me that installing some chair rail is a great option.
Chair rail will not only cover the damage and be more resistant than drywall, but it will make future damage easy to repair. You can buy a variety of sizes and profiles of chair rail to fit against the wall. In this case, simply buy a height that will cover the repetitive damage, but also works will with the size of the room. If the ceilings are high, you can go with a taller chair rail. If you have 8 foot ceilings, try to minimize the height so as not to make the room appear small.
You can paint the chair rail before you install it, nail it to the wall, and then fill and touch up the nail holes. The next time someone damages that area of the wall, the wood chair rail will probably be undamaged, but when it gets time to repair it, just fill in the dings and touch up the paint.
 Cutting open a wall to repair a plumbing leak is a pretty big deal. These holes can be a few inches or a few feet large. Once you have repaired the plumbing issue, you have to contend with the drywall repair. That means a good patch, matching the texture, and matching the paint.
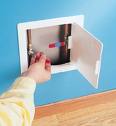
If you want to avoid all the drywall headaches, you can always install an access panel. You wouldn't want this in a conspicuous spot, but it works very well in certain applications. For example, when replacing a shower valve in the wall, it is common to cut the wall open. Your options are either remove and replace ceramic shower tiles, or cut the drywall on the backside of the shower. If the backside of the shower is, for example, in a closet, this is an ideal spot for a plumbing access panel.
The panel will likely be hidden by hanging clothes anyway, and if you ever have a problem with the valve again, you can just open the door on the panel and fix it without having to go through the drywall issues again.
The plumbing access panel is a small door mounted on a frame. The frame is fairly wide compared to the door which allows it to cover a variety of holes from around 6-inches to about 15-inches. It can save a lot of time and frustration. You can paint them to match the color of the wall, or they also come in stainless steel.
 Some homeowners like the idea of using the attic for storage space, and some choose to install an attic ladder, but you can't just leave a big hole in your ceiling.
The hole in the garage ceiling breaches the fire rating, and restoring the rating will take measures that you may prefer not to do. Many homeowners enjoy the attic's storage capacity, but many are unaware of the increased fire risk. It's always safer to repair the fire rating of the ceiling rather than just cover the hole.
It is a code requirement to use fire-rated drywall in the ceiling of your garage. The drywall is five-eighths of an inch thick and has "type-x" stamped on it. It also has noncombustible fibers added to it to achieve fire-resistance ratings, and its thickness slows the transfer of heat during exposure to fire.
If you have a big hole in your ceiling and a fire starts in the garage, it can get into the attic. You can buy a fire-rated access door, but these are typically special-order items and cost several hundred dollars. They are fairly easy to install though.
The fact that you want to cover the hole for cosmetic purposes is personal preference, just be aware that the danger of an attic fire exists.
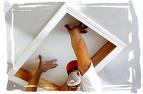
So, to make your ceiling hole semi-attractive again, you will need a piece of type-x drywall, as well as some molding to hold it in place. Realize that using the fire-resistant drywall panel alone isn't going to restore the fire rating. There will be a gap around the perimeter of the panel, and the panel will be held in place with wood molding.
You want the drywall panel to be slightly smaller than the actuall hole in your ceiling. You can make the panel one-half inch smaller in both length and width, so that when you do go into the attic, the panel will be easy to remove.
You can easily cut the drywall with a drywall saw, or you can use a utility knife and score the paper on one side, break the drywall along the score line, and then cut the paper on the back side.
To hold the panel in place, buy some molding and cut it to fit. You want the molding to have a one-half inch lip along the inside perimeter of the opening. That way, the drywall panel will rest on it as it sits inside the opening. Try using a miter saw and cut 45-degree angles at the ends for square corners and a clean appearance.
Nail the molding to the ceiling and into the ceiling joists so that the nail penetrates the joist by at least three-quarters of an inch. If you feel froggy, you can texture the drywall and paint it to match the surrounding ceiling.