 The worst thing about replacing a florescent light socket is standing on a ladder. Otherwise it is an easy wiring job to replace the socket.
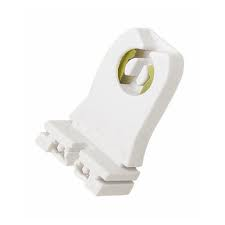
To gain access to the socket, remove the plastic lens cover and then remove the light bulbs (the tubes). The socket is what the ends of the tubes are sitting in. To get access to the wiring, remove the metal cover right below the tubes. This may have screws holding it in place, or it you may be able to squeeze it and pop the tab out of the slot.
With the cover removed you will be able to see the ballast (s) and wiring. Follow the wires from the socket to the ballast. You will need to cut the two wires leading to the broken socket and replace it. The new socket will come with a length of wire attached. Make sure the power is off to the fixture and cut the wires so that you have plenty of wire to work with. The last thing you want to do is to make the cut so short that the socket leads don’t reach.
The old socket will snap out of its holder, and the new socket will snap right in its place. Use wire nuts to hold everything together and gently tuck the wires back in place. You don’t want sharp bends in the wiring, only gentle loops. A sharp bend could damage the wiring and you want to avoid that.

A leaking shower is enough to make you pull your hair out. Typically, the cause is a shower cartridge. A shower cartridge is about the size of a roll of nickels, and has holes and rubber washers all around it. It is located in the shower valve, which is in the wall, but it is easy to access. It will take about 30 minutes to fix, but will save lots of water as a result.
If you have to pull out the knob to start the flow of water, the replacement cartridge will cost about $20. If you simply turn the knob from side to side, the cost is about $45. You can find replacement cartridges at most home centers, but if they don't have your particular type, try a plumbing supply store.
Now, let's get to the repair. First, shut off the main water supply to the house. Open a faucet to let out the water pressure, then move to the shower.
Using a small, standard screwdriver, gently pry off the shower knob cover. Under this cover is a screw that holds the knob onto the cartridge. Remove the knob.
Next, you'll find the valve body, which covered by a decorative escutcheon. Remove the escutcheon by gently pulling it straight out.
A retaining pin holds the cartridge in the shower body. This pin will have a nub sticking out of the top of the shower body. Grab a pair of pliers and pull it straight up.
The only thing left to do now is remove the actual cartridge. I recommend that you get your hands on a cartridge remover, which costs about $10. You also can try your luck with pliers, however, the cartridge- removing tool is made just for removing cartridges.
Place the larger, hollowed end of the cartridge remover into the shower body and over the old cartridge. Tighten the screw on the end of the tool. This screw fits into the hole where your shower knob was, and it locks the tool into the cartridge. When the ears of the tool are engaged with the ears of the cartridge, turn the tool (and consequently the cartridge) to break the cartridge free from years of torment. The cartridge will pull straight out.
Install the new cartridge simply by pushing it into the shower body with the ears in the 12-and-6 position. Push it in far enough so that when you replace the retaining pin, it slides completely into place and locks the cartridge in place.
Next, turn the water back on and make sure there are no leaks. Replace the escutcheon and the handle.
Now, test to make sure that the hot water side is hot and the cold water side is cold. All you need to do is remove the shower knob, take a pair of pliers and rotate the stem (the part of the cartridge that the shower knob screws into) 180 degrees. The cartridge stays put, but the stem is free to rotate. It's the knob and the escutcheon that restrict the movement of the stem.
I'm amazed at the number of people who believe this reversed-temperature problem means that they'll have to re-plumb their shower. Maybe the next time someone presents this problem to me, I'll grimace, shake my head, and ask them for a calculator. Once I see the sweat pouring from their heads, I'll let them in on the easy fix.