 At Las Vegas Handyman, one of the most popular calls we get is to repair a garbage disposal. One of the issues is that the garbage disposal can become loose. My guess is that this is probably the result of a careless installation job. However, a garbage disposal does have good torque and maybe if it gets bumped around by an under-counter garbage can, it theoretically could become unseated and vibrate loose (I think this is a stretch, but that’s why the law of probability exists).
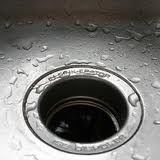
A garbage disposal can also become loose if it becomes jammed and instead of using a tool to unjam it, a broomstick is used. This can really cause some issues. Typically the disposal will come with a tool to clear a jam (or you can use an Allen wrench). Short of these, a homeowner will take to a broomstick and insert it into the disposal and try to dislodge it by pushing aggressively on the inside of the unit to free the grinding plate. Sometimes this works, but you can loosen the disposal and you may even be able to see the sink flex.
The repair is simple. The disposal has a mounting ring with ears on it that mate with the mounting assembly attached to the sink. They just fit together and you turn it clockwise until it bottoms out. If you have noticed that the disposal leaks from this area, it may be that that only two of the three ears were engaged. In this case you will have to remove the disposal from the mounting assembly and reinstall it. Of course if you remove the disposal, you will first need to remove anything that might impede its movement. This would include the side drain, and maybe the dishwasher air gap discharge hose. Plus, it’s always a good idea to unplug the disposal. Just line up the ears with the assembly and turn it until it bottoms out.
 Las Vegas Handyman repairs drywall every day. Lots of homeowners repair drywall as well, but may lack a little when it comes to matching the texture. Matching texture is not easy, but it is cheap and you can practice before you apply it to the wall.
Before you spray texture on a drywall repair, make sure the patch is good. It should be flat with no bumps. You can hold a shop light next to the patch and shine light along the wall. If the patch is not flat you will see shadows behind the uneven areas.
Once the patch is flat, use try to remove the borders of the patch. Grab a toothbrush and some warm water and use a swirling motion to minimize the border of the patch. You want to remove the drywall mud that has filled the surrounding texture.
For small patches, the aerosol cans of texture work great. Practice on a piece of cardboard or scrap material and get the spray pattern right. You can change the pressure in the can by holding it in cold or warm water. You can use the dial setting to control the size of the splatter. Practice until you have the right look. I generally start with a large sized splatter and then move to small splatter. It takes some playing with to get it looking right. Let it dry and then take one swipe with fine sandpaper in a sanding block to level the top of the texture.
 Las Vegas Handyman repairs garbage disposals, but before you call for service, try a few quick and easy fixes. If the disposal doesn't make noise when you turn it on, press the reset button on the underside of it. If the motor overheats or is overloaded, this button will trip and turn the motor off. Pressing the button back in will allow the motor to turn back on once you flip the wall switch (you should also test the outlet to make sure there is power getting to the disposal and, if not, check the breaker).
If the disposal makes a humming noise, but doesn't grind food, it is jammed. Most disposals come with a tool to clear a jam. If you have lost yours, you can use an Allen wrench. Take the tool and insert it in the
hole on the underside of the disposal. As you twist the tool, you will hear and feel the obstruction. Keep twisting until the blades move freely. If you still can't budge the blades, you'll need to remove the disposal
and manually clean out the obstacle. Some people use a broomstick through the top of the sink, but be careful you don’t damage the sink. On some thin stainless sinks, if you put too much pressure on the broomstick, the sink will tend to flex.
Once you get the disposal off of the sink, you can use a flashlight and take a peek down the neck of the disposal. You can pull the splash gasket off of the top to completely see into the unit. If you’ve had to come this far, the blockage is probably a broken piece of glass or a coin. You may need to use a screwdriver and try to pry the coin or glass from the blades.
 Las Vegas handyman certainly does plenty of drywall repairs. Whether large or small, you can count on us. We encourage homeowners to attempt the easy ones, and then all us if they get into trouble or if the project is bigger than they are comfortable doing.
A common drywall repair is a doorknob hole that punctures the wall. You can do a traditional drywall repair using a wood backer, drywall, and float out the joint compound. You can also buy kits that make quick work of the repair.
The kit will include a template that you place around the damaged area. The template has to completely cover the damage. It is usually a large circular shape that you place over the damage. Draw a line at the template and cut out the along the line leaving a circular hole. The drywall plug that comes with the kit fits perfectly inside the circular hole that is left in the wall. It has a tape flap around it so that you can apply some mud and stick it in the hole. At that point you can just float the patch out to blend in just like a regular drywall repair. You can put a couple of coats on and then texture it to blend in with the surrounding wall.
As for painting the patch, if your house has been recently painted and you have kept the paint indoors, you are probably fine just to touch up the patch. If there is any doubt, you may want to paint the entire wall from corner to corner.
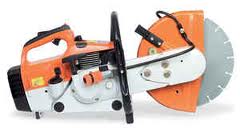 As a Las Vegas handyman, we are asked to do many things, much of which involves simply giving advice. Regarding cutting masonry, it depends on how many pieces you have to cut. If your project includes cutting things like bricks, blocks, or roof tiles, then you need a large, fast-moving masonry blade.
If you are cutting lots of these items, you might want to rent a masonry saw. This is the right tool for the job if time is a concern. They cut quickly, but they are heavy and require a two-handed operation. They are also quite loud, and they kick up a ton of dust.
You can rent one for about $50, but you should only do that if you have a heavy load. The machine runs on gasoline and has a pull-start engine.
As you fire it up and get the blade spinning, gently plow into whatever you are cutting.
Masonry blocks are heavy enough that they won’t move as you cut them, but smaller bricks will likely move, so you will have to weigh them down with something or put your foot on the edge of the brick (be careful here).
When you cut masonry products, were eye, ear, and breathing protection. The dust created from cutting such products is a heavy, gritty mess. It will get in your hair, clothes, and so on.
If this is a one-time cut, you can stick a masonry blade in a circular saw. Using a circular saw typically won’t produce a perfectly smooth finish even with an expensive blade, but since you will be using mortar to join the pieces, the flaws will be hidden anyway. Just take the cut slowly and steadily.
Realize that a circular saw will take longer to cut as it doesn’t have the power of a gasoline-fired engine. Also, a circular saw won’t react well to masonry dust, so you will need to clean it up after you are finished.
You also have a choice in the type of blade. The cheapest type is silicon carbide, and then it gets expensive with either segmented or continuous diamond blades. The more money you spend on the blade the better it performs and typically the cleaner the cut (a continuous blade will leave a very smooth cut).
When you are cutting masonry products, take several gradual passes.
Start the saw and let it build up to full speed before you sink it into the masonry. If you try to cut too much on one pass, you will hear the motor of the saw bog down and you will need to ease up on the depth and speed of your cut. The performance and sound of the saw will tell you the proper depth and speed, just start out slow and shallow.
 Take it from a Las Vegas handyman. If you need to cut through a stucco wall, there is a right way and a wrong way to do it. Tools make all the difference.
Reasons you may need to cut through a stucco wall might be for the installation of a dog door, or installing a swamp cooler, or maybe even for various plumbing repairs.
You might be inclined to grab the nearest reciprocating saw and go at it. This will certainly cut through the stucco, but it will also leave a very ragged cut. The cleaner the cut, the more attractive the installation of the dog door or swamp cooler will be. It also leaves less work to do for trimming out the opening.
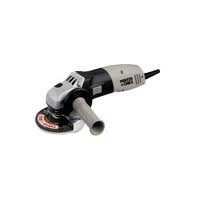
Rather than using a reciprocating saw, use an angle grinder with a masonry wheel in it. This is a small cutting wheel that will cut very precisely through the stucco surface. Not only will it cut through the stucco, but it will also cut through any wire netting behind it.
Start the wheel spinning and let it work up to full speed. Then gently sink it into the surface of the stucco. Go slowly and evenly. The sound of the blade spinning will tell you if you are going too fast, as you will hear it bog down and the blade may throw some debris around. Incidentally, you should definitely wear eye, ear, and breathing protection for this.
 As a Las Vegas Handyman service, we find broken window locks in many houses. It may be that a homeowner was cleaning the windows and broke the lock mechanism, or that over time toggling the lock damaged it. There are a couple of options for getting your window to lock again.
You can replace the original lock with a duplicate, if you can find it. This usually involves removing the two screws that hold it to the frame and taking it with you. You will likely not find anything at a home center, and so I wouldn’t even try the big box stores. Instead, take the part to a window or glass company. Bring the part with you so they can match it up.
If you are looking for a quick fix and forego the trouble of finding an exact replacement, you can buy thumb locks at a home center. These will come in either black, white, or silver and they just screw onto the window track right behind the sliding window. So if you were trying to move the window, it would hit the thumb lock, preventing it from moving.
The thumb lock has a sharp point at the tip which will dig into the metal window frame, preventing it from moving.
 Many modern houses have stucco exteriors, and that makes hanging a flag a little challenging for a Las Vegas handyman. Stucco is hard and there is some guesswork as to where the wall studs will be located. This can make it hard for someone just trying to be patriotic.
The flag will hang at an angle from the house and so it must be securely installed through the stucco into the wall studs. The flag is not heavy, but a good wind will yank it from the wall. The flag will come with a wall bracket and screws. A word of advice: don’t use the screws that come in the package. They are too short and won’t reach the studs. Instead buy some longer deck screws that will extend through the stucco, sheeting (and sometimes foam board) and into the wall studs.
Figure out how high you want to mount the bracket and then estimate where the studs will be. The best location for minimal guesswork will be near a corner of a wall or column. You know there will be studs at the corner, but there will also be a thickness of material you won’t want to screw into as mentioned earlier. Two inches from the corner is a good starting point. Secure the bracket into the wall studs and then you can hang your flag.
 This Las Vegas handyman does lots of repairs to sprinklers. Our climate is such that during the summer, if the landscape doesn’t get irrigated daily, even multiple times daily, the landscape will die quickly. So it doesn’t help when the sprinkler head gets hit with the lawnmower.
When sprinkler heads get hit or kicked, it’s not the sprinkler head that breaks, it is the riser that it is screwed into. The riser is a threaded fitting that connects the sprinkler head to the elbow. When the riser snaps off, it can sometimes be a challenge to get out. If there is any of the riser still sticking out of the elbow, you can try to grab it with pliers and turn it out. This, however, can lead to tearing the rest of the riser off flush with the elbow.
Then it’s time to grab the extractor. A sprinkler riser extractor is a cheap tool that works great. It is shaped like the letter “T” and has a tapered set of teeth at the bottom. Place the tapered end into the riser, apply some pressure, and start turning. The teeth will bite into the riser and unscrew it.
With the broken riser removed, you might try installing a shorter riser so that an impact will lessen the chances of breaking it again.
 Our Las Vegas handyman service fixes lots of things. Leaks seem to be at the top of the list. A very common leak repair is under the sink. Plastic drain piping gets bumped around and will leak. Many of the sink drain leaks I find are where pipes are connected. For example, there will be a leak where the trap connects to the tailpiece. It is usually in the area of the slip fitting.
Most commonly we find that a slip washer is cracked or that the connection is loose. It’s funny, you don’t need any adhesive or Teflon tape for a leak-free joint here, but you would be amazed at the number of people that use it. The drain pipes are not under pressure, rather they are simply a vehicle to carry the waste to the sewer.
The slip washer is prone to cracking. It is triangular shaped and as the tailpiece enters the P-trap, the slip washer fills the tiny gap between the two. The slip nut gets screwed onto the threads of the trap and holds the slip washer in place so that there won’t be any leaks.
You can first try to tighten the slip nut to see if that fixes the leak. After that, remove the nut and disassemble the connection. Goose the slip washer up and check it for damage. A new one costs under a dollar and the assembly goes back together in a few minutes.