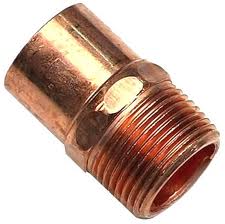
 Copper plumbing sometimes needs some work. It is high quality but occasionally it will spring a leak. Removing a copper fitting can be done in several ways.
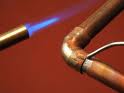
A torch will make quick work or removing a copper fitting. You will obviously need to turn the water off and drain the water from the piping to allow the pipe to get hot enough to melt the solder. If you don’t drain the system, the water will boil and turn to steam, and will absorb the heat that is necessary to turn the solder to liquid so you can pull it from the pipe.
Make sure you have a bucket of water nearby and a flame cloth to protect the surrounding area. Heat up the fitting by touching the tip of the blue cone (the end of the torch’s flame) to the fitting. Move the torch over the fitting to make sure the entire fitting is hot enough to pull away from the piping that is connected to it. Use long handled pliers or channel locks to quickly grab and release the fitting. Heat will travel quickly down a metal tool, so protect your hands and don’t hold onto the hot surface for too long.
Instead of the torch, you can also use a pipe cutting tool. This is fast, but you will be shortening the pipe rather than just removing the fitting. So, if you are replacing the exact fitting, you will have to make up the distance that you cut out.
Place the jaws of the pipe cutter around the pipe and tighten gradually as you encircle the pipe with the tool. You will notice that it first will score the pipe and then it will stay in the groove. As you gradually tighten it, it will cut a deeper groove until it eventually cuts through the thickness of the pipe’s wall.
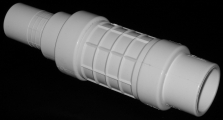 If you have a PVC plumbing pipe break there are several options to fix it. One of the coolest is the telescoping fitting. A telescoping fitting does just what its name implies...it telescopes out to repair the pipe.
When you have a crack in a PVC pipe, such as a sprinkler pipe, you can cut the damaged section out of the pipe. You will need to cut out an area large enough to get the fitting in. The fitting is somewhat large. It will be larger in diameter than the pipe and it will be fairly long, which allows it to telescope. Most of these fittings will telescope out 3-4 inches, so you have a good amount of play with errors. The fitting itself will be 4 inches or so depending on the repair.
With the section of the pipe cut out squarly, remove the burrs from the ends of each pipe. Collapse the fitting and glue it to one side of the pipe. Loosen the nut in the middle of the fitting and pull the other side of the fitting out to mate with the other end of the broken pipe. Use primer and PVC glue for each side. Tightening the nut in the middle of the fitting will compress a rubber O-ring and seal out any leaks.
 Plumbing Leaks can sometimes be fixed with common sense. Plumbing valves often need to be replaced, but occasionally you can tighten some parts and get it to quit leaking. Here are some ideas to try before you end up replacing the valve.
In the case of a hose bib, such as for a washing machine or a hose faucet, try to tighten the cap ¼ turn. This might work and your problems are over. If this doesn’t work, remove the cap and add some packing to the assembly. Packing looks like a thick piece of dental floss. It is made of various materials for different applications but generally it is made of Teflon and can be wrapped around whatever it is that is leaking. Adding packing is part art and part science. The correct amount to add is however much it takes to stop the leak.
With the case of the hose bib, you can add packing around the stem and tighten the cap nut. If it still leaks, add a little more. Realize, that you may ultimately end up replacing the hose bib, but that would be as a last resort. Make sure after you add packing to the plumbing fixture, you tighten the cap nut back down enough. You wouldn’t want to have a leak simply because you didn’t adequately tighten the nut back down.
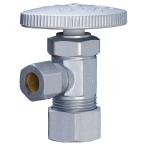 A leaking angle valve is a pretty common plumbing repair. These valves are located under a toilet or sink and rarely get touched, unless you need to service the fixture that they are supplying water to. When the time comes to turn them off, they tend to leak…and not stop.
In the event this happens to you, there are a couple of tricks you can try. First try to turn the packing nut slightly. This is a nut located right underneath the handle. Turn it clockwise and with any luck, the leak will stop. If it doesn’t, go to plan B.
Before you replace the valve, try turning off the water to the entire house. Remove the handle and packing nut and you will see the valve stem. Remove the valve stem and you will see the washers. Try to clean the stem and washers and get the washers pliable, as you might find some nasty deposits on them. Put everything back in place and turn the water back on. With any luck, you will have water flowing to the fixture and no water leaking from the angle valve.
If you still have a leak, you will need to replace the angle valve.
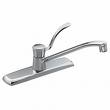 There are many places a kitchen faucet can develop a leak. One of the common ones is at the base of the spout. Particularly on a single handle faucet, the spout assembly slides over the faucet body and down onto the base of the faucet. Inside the faucet body is the cartridge and the means to hold the cartridge in place. This spout assembly slides over the faucet body.
The most common cause of this leak is the o-rings that seal the spout assembly to the faucet body. To access these o-rings, you have to remove the handle at the top. Pop off the decorative cover on top of the handle and remove the screw that holds the handle. You will then have to unscrew the cap retainer. Finally, grab the spout assembly with both hands and gently move it back-and-forth while lifting it up and it should lift off.
You will see the o-rings it their retainer grooves...one at the top and one at the bottom. It's likely that the o-ring on the bottom has failed, but replace them both while you have the spout off. Use liquid soap and slather up the new o-rings and slide them into the grooves without twisting them or you will likely develop a leak. The soap will lubricate the o-rings and make the re-installation of the spout assembly easier and less likely to damage the new o-rings. Re-install the remaining parts in the reverse order and test for leaks.
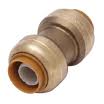 Connecting plumbing lines can be a slow process. If you are using copper piping you have to clean, flux, and use a torch to sweat on fittings. For CPVC you have to glue the fittings onto the piping, and for PEX you use crimp fittings that are squeezed around the plastic piping to mate each piece.
Sharkbite fittings are fast and make solid connections. They don't use glue or heat, but rather use o-rings, grip rings and a series of collars to line everything up. The grip ring is what holds the pipe to the fitting. It looks like a metal ring with angled teeth on it so that when the pipe is pushed into the fitting these teeth are angled in such a way that you can't pull the pipe out (without a special tool). This pins the pipe past the o-ring and into the tube stop for a tight seal. If you need to remove the pipe, you can buy a plastic release tool that pushes a sleeve into the grip ring which releases the teeth.
I generally use the shark bite fittings in certain situations. If I am concerned that a torch is too close to flammable material, or if space doesn't allow traditional joining methods, I'll reach for a sharbite. At nearly 3 times the cost of a copper fitting, they are expensive but worth it when the situation calls for them.
You can join a variety of piping using a sharkbite fitting including copper, CPVC, CTS, and PEX. Just pick the right diameter, cut the pipe squarely, push the pipe into the fitting with a slight twist, and it's done. A depth gauge, which is sold separately, tells you that the pipe has been pushed into the fitting correctly.
 If you have people in your house with long hair, chances are your drains may get clogged a little more often than other peoples drains. Plumbing is funny that way. If I walked into a master bathroom with 2 sinks, I could probably tell which of the sinks the female used (assuming her hair is longer than the male's) and which one the male used...simply by the smell. As hair goes down the drain, and gets caught in the trap, or the sink stopper linkage, it starts to degrade and you typically get an ammonia smell.
The trick is to stop the hair from going down the drain. You can buy small screens that do a nice job is stopping the majority of hair from going down the drain. One brand is a "Hair Snare", but there are several that will work.
To install one in your shower, you can remove the drain cover and set the screen in place and then re-secure the drain cover. Other styles just drop over the drain. Note that sometimes these will cause the cover to rise up slightly and you will get a small amount of water that puddles around the drain cover. When you see water backing up, you know its time to remove the screen and get rid of all the hair that has collected in it.
 If you've ever been a little nervous to fire up a torch and heat up copper piping hot enough to melt solder...join the crowd. It is a test of fortitude to stand with a torch hissing fire to repair a plumbing leak or extend a copper line. Copper adhesive might be your answer. It is sold under various brand names but they all do the same thing: make copper pipes and fittings stick together and not leak.
I have used Copper Bond before and I like it. It comes in a syringe-style package with a plunger and when you depress the plunger, it pushes out 2 compounds side-by-side. These compounds are then thoroughly mixed and applied to the mating surfaces of the copper being connected.
Before you apply the adhesive, clean the surfaces as if you were soldering copper pipes. Use sanding cloth and a wire brush to get the surfaces to shine. Then apply a thin film of the adhesive to both the exterior of the pipe and the interior of the fitting. Push them together and give it a slight twist. After the appropriate drying time (usually 30 minutes) you can turn the water back on and check for leaks. If you have a leak, you can use a torch and heat up the joint. This will allow you to pull the copper apart and re-glue the joint.
 There are many different methods to cut PVC when doing a plumbing repair, and much of it will depend on where the PVC is located. Is it accessible in the garage or is it below ground at the sprinkler valves?
If the pipes are accessible and you have the room, you can use a traditional hacksaw. This will make quick work of cutting the pipe, but the edge will be rough and will leave burrs around the cut which you will have to remove before you glue the pipe. If access is limited, you can use a one-handed hacksaw, which is basically a small handle with a hacksaw blade sticking out of it. This will also leave a rough cut.
You may also choose a pipe cutting tool that revolves around the pipe as you apply more pressure through the cutting wheel. This tends to leave a small flare at the end of the pipe, but it is a clean cut.
For areas where space is restricted, you can use a wire saw. This works well when the pipe is below ground. You simply thread the wire under the pipe and alternate the pull stroke with either arm. This will cut the pipe and leave a fairly clean cut.
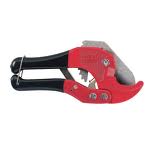
The PVC cutting tool I like best looks like a large pair of scissors. You open the jaws, place the blades where you want the cut and start squeezing. This tool has a ratcheting mechanism that allows for a slow, clean cut. The only warning here though, is to make sure the blades are sharp. If not, at the end of the cut, the pipe will tend to break off rather than cut cleanly.
 We were called to diagnose and resolve some plumbing issues at a 10,000 square foot house. The plumbing problems all related to the generic term of low water pressure. One of the key pieces of evidence was that the problem was universal throughout the house and not limited to any one fixture or area. So what should you do?
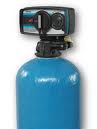
Check the big picture items like the main water meter and any secondary valves (like those found in a garage that shut off water to the entire house). If these valves are fully opened, you might check the PRV (pressure reducing valve). After snooping around, we decided to have a look at a fixture. After turning on the bathtub, there were tiny beads coming out of the tub spout. This was a dead giveaway that the water softener had ruptured.
The softener has resin beads that are inside a membrane. These resin beads play a vital role in exchanging salt for minerals and hardness in the water. However, when the membrane breaks that holds these resin beads in place, they are free to travel wherever the flow of water takes them. In this case, to every faucet, shower, bathtub, and toilet that were used prior to the problem being diagnosed.
If this happens to you, immediately go to the water softener and engage the bypass valve. This is found at the rear of the piping behind the softener and will completely bypass the softener. In effect, it is like no softener is installed. Your only option to once again have soft water is to replace the unit.
To repair the plumbing clogs, you will need to go to every affected plumbing fixture and remove the resin beads.