 The other day we were working in a 50 year old house whose bathroom faucet at the bathtub would not stop running. This is a case of replacing (or rebuilding) the stem and seat. The stem is attached to the handle and rises up and down. At the end of the stem is a washer that pushes against a seat to stop the flow of water. Over time, this washer will wear down, or the seat will develop pits that won't allow it to stop the flow of water anymore. These parts need to be repaired or replaced.
So after you turn the water off to the house, prepare for some fun.
1. Remove The Old Handle
This isn't as easy as it sounds. Usually a screw is removed and the handle pops right off. Well in older plumbing, the handle can seem like its welded to the stem. In this case a handle puller can help remove the handle...or break it trying.
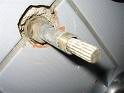
2. Remove The Old Stem
Removing the old stem can be a leap of faith. A deep well socket and a breaker bar will usually extract it, but you just hope that nothing else breaks. Once we got the old one out, it was time to go hunting. This stem was nasty and difficult to identify. After searching, we were not able to find a replacement for it. Instead we bought new parts and rebuilt it. But that only solves half of the problem.
3. Replace Or Resurface The Seat
The faucet seat screws into the faucet body and has a hole in the center of it. In this hole you insert a seat wrench to remove the seat and replace it with a new one. If you can't remove the seat, you can use a seat resurfacing tool to smooth out the surface so that the stem washer can stop the water.
Once you reassemble the bathroom faucet, the it should operate as it did 50 years ago. Many modern showers use a single handle to control the hot and cold. Here is how to replace a shower cartridge.
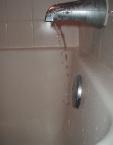 Nothing says relaxing weekend like doing some tub faucet repair. If you have a single handle that controls both the hot and cold water, you simply replace the cartridge. For faucets with separate hot and cold handles, there are a few more parts. If your faucet won't completely shut off, chances are the seat and stem are the culprit.
These items are fairly easy to replace, but you may need to buy a few specialized tools.
If the water dribbling out is warm, then start at the hot handle, and vice versa.
The handle is attached to the stem. As you turn the handle toward off, it pushes the stem against the seat of the faucet body. At the bottom of the stem is a washer that compresses against the seat and stops the water from flowing. However, the washer gets brittle and the seat wears out, and over time they won't fully stop the water.
Begin by turning off the water to the house and opening the tub faucets to let any pressure out. Pry off the handle cap and remove the screw that holds the handle to the stem. The handle should wiggle free, but in the worst case you may need to buy a handle puller for the job.
The handle puller is a goofy-looking tool but it works. Thread the rod of the handle puller into the faucet handle's screw hole and place the arms of the puller at the back of the handle. Turn the rod clockwise and the handle will pop free.
The stem will be partially hidden inside the escutcheon. Unscrew the escutcheon to gain access to the rest of the stem. Now you will be able to see the entire stem assembly.
Depending on how large the opening in the wall is and how deep inside the wall the stem assembly sits, you may be able to get a wrench around it to unscrew it. You may, however, have to buy a set of tub sockets. These look like a regular socket set, but they are much larger and much deeper.
Slip the socket over the stem assembly and unscrew it. At the bottom of the stem is the washer, which is held in place with one screw. Remove the washer.
The seat is located in the nether regions of the faucet body. If you look into the hole where the stem once sat, you will see another hole deeper into the faucet body. This is the seat and it looks round with squared edges cut into the center of it.
Use a seat wrench, stick it into the hole and unscrew the seat. A seat wrench looks like a mini version of an "L" shaped lug nut wrench for car tires.
Take all of the parts to a home center and buy replacements. You may have to go to a plumbing supply store, but a home center will have the basics.
While you are at it, you may as well replace both the hot and cold water parts. Why ruin two weekends when one will do? You might also consider replacing the entire stem instead of just the washer.
Once you have the replacement parts, apply some pipe dope on the threads of the new seat and screw it back in. Put some pipe dope on the threads of the stem assembly (called bonnet threads) and screw it back in. If you choose to replace the just the stem washer and reuse the old stem, lubricate the parts with plumber's grease and then screw it in.