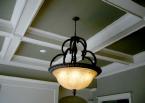
 Those ceilings are very detailed and difficult to install. Although it looks like the coffers are made from solid beams, they are actually pieced together using lightweight stock.
First, plan how you want the ceiling to look. Consider how large and how deep the coffers will be and whether you will be painting or staining them. Also, make sure your ceilings are high enough and expansive enough so that the room doesn't look to cramped. Something else to cinsider is how your lighting or air-conditioning vents will look if they run through the ceiling.
The supports for the coffers will be channels that are glued and screwed to the ceiling. These will lok like an upside-down "U" and be made from lightweight stock; don't use the heavier MDF or plywood.
To build the U-shaped channel, cut the stock to the length and width of your choosing. Lay one piece flat on a worktable and then apply a bead of carpenter's glue alon gthe two long edges. Stand the two side pieces of the channel up, press them against the glue-covered ends of the piece laying flat, then use a finish nailing gun to nail along the edges to hold it together.
You are going to build these channels in three shapes: a cross, a "T" shape, and a straight section. The T-shaped channel will be attached to the perimter of the ceiling where one beam ends at another. The crosses will be installed where two beams intersect, and the straight sections will be used for support and alignment if you are using large coffers. You will decide the dimensions of these pieces based on your plan.
Lay out lines and mark them on your ceiling, so it looks more or less like a checkerboard. You should make parallel lines that match the width of the channels, so you will know exactly where to put them. You can use a chalk line for this, or if you have a projector, you can follow the lines it displays.
Apply thick beads of heavy-duty construction adhesive to the back portion of the channel and place it against the ceiling along your chalk lines. The open side should face down.
Screw the channel to the ceiling joists so that the screw sinks into the joist at least three-quarters of an inch. If you run into an area that doesn't have a joist, use 8d finish nails and shoot them in at an angle. You may not hit a joist on every leg of the channel, but once the entire ceiling is attached together, it will be very strong.
Now your ceiling will look like an afterthought, but this is where it all comes together. To close in the bottom of the channels, glue and nail long lengths of boards (the same lightweight stock or you can use a symmetrical baseboard of chair rail) to the underside of the openings. Make any cuts to the boards where they intersect with another board at a point that is not in the middle of the run. These intersections can later be covered with decorative caps.
To close in the coffers, build boxes out of baseboard to fit inside the squares that the channels have created. Miter the corners and glue them together. You can also drive a couple of brads into the corners to help the box stay tightly together. This baseboard box will attach to the bottom edge of the channel using 4d finish nails.
There will likely be a gap between the ceiling and the baseboard box, but that doesn't matter because you will build a second box from crown molding to transition from the vertical side of the coffer to the ceiling. The molding will cover any gaps.
You can choose any style or type. Since baseboard has the profile on top, you will turn it upside down so that the profile is visible from below. The nice thing here is that you can build both boxes on the worktable, transfer them to the ceiling and then nail them in with the finish nail gun.
When you are finished installing the coffers, you can putty over the nail heads and then paint or stain them.