 So your doorbell is missing on the foreclosure you just bought. It may look ugly, but it is easy to fix. If this is the scope of your repairs, consider yourself lucky.
Make sure the system works by touching the two wires together that are sticking out of the wall. The chime should sound when you touch the wires. If you don't get any "ding-dong" sound, then it might be the previous occupant started fixing it and got in too deep to finish it.
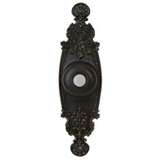
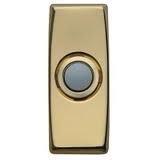
Let's assume that the wires make the chime ring. The only thing to do is to choose which door bell button you want to use and then connect the wires. The back of the doorbell button will have two screw terminals. Place a wire at each terminal and tighten the screw. You don't need to turn off the power as these are low voltage and won't hurt you.
Once you have the wires connected, you can push the button into the wall. Some buttons have small wings that create friction inside the hole in the wall, and some walls have a small pipe for this and some just a small hole that holds the wires. If you don't see any obvious way to secure the button to the wall, use some adhesive caulking and apply a bead around the button. Then just push in to the wall.
 A doorbell button is simply a switch. It controls when power will flow and make the chime unit sound off. The doorbell connects the power and causes the transformer to ring the chime unit. So when a doorbell isn’t working, it can really only be a couple of items to look at: the doorbell button, the wiring, the transformer, or the chime unit.
Testing the doorbell button is easy. You will first need to remove the doorbell button and cover. Sometimes the button has two screws that hold it to the wall, but in many cases, the button is pushed into some caulking. If you don’t see any screws on the housing, try to pry it off of the wall. Even if the button does have screws, there usually aren’t and holes in the wall for the screws to go into, so in that case, the screws will just rest slightly in the house’s exterior surface, whatever that may be.
With the button pried off of the wall, you will see two wires connected to the back of the housing. These are low-voltage wires. Remove these two wires from the back of the housing and touch the two wires together. If the doorbell chimes (makes the “ding-dong” sound), then the doorbell button needs to be replaced. Touching the wires together effectively does what the doorbell does.
 With Halloween coming up, you'll want to make sure your door bell is working. What would be the fun if the kids rang your doorbell and ran, only to find out the darn thing didn't annoy you. Door bell repairs are a must for the season.
Most doorbell problems are caused by loose wire connections or worn-out switches. To test your system, you will need a multi-tester (under $15), which checks voltage and continuity. It will even test batteries for you.
Start by removing the screws that hold the doorbell button to the house. Pull it away from the wall and check that the two wires are securely fastened to the unit. If they aren't, tighten the screws then test the doorbell. If it still doesn't work, disconnect the wires and test the doorbell with the continuity tester. If the meter registers no continuity, replace the doorbell button.
If the button is OK, twist the wires together to test the other parts of the system (don't worry, this is a low voltage system, so it won't curl your hair). Look for the doorbell's transformer, which is a small metal box about 3 inches tall by 3 inches wide and is likely located near the ceiling in your garage, or a closet. The transformer has two screws on it with one wire attached to each screw and will have a voltage rating of less than 20.
Set the dial of the multi-tester to the 50-volt setting, then touch the probes of the multi-tester to the screw terminals on the transformer. You should get a reading within a few volts of the actual rating on the transformer. If not, replace the transformer (about $10).
If you get no reading, there may be a loose wire in the box that the transformer sits on. Shut off the power to the transformer at the main panel, remove the cover to the box then check that the connections are secure.
If the multi-tester showed the proper voltage, move to the chime unit. Remove the cover and inspect the low-voltage wire connections. If any are loose, reconnect them. Next, take the multi-tester (again set at the 50-volt setting) and touch the screw terminals inside the chime unit. If the reading shows power within a few volts of the transformer rating, then the chime is receiving the proper current from the transformer. If the test shows no power or very low power, then there is a break in the low-voltage lines, and new wiring must be installed. Re-assemble the doorbell system and push the button. If the chime doesn't sound, you need to replace it.