 Showers that look gross leave you feeling nasty even after you’ve just showered in them. It’s like eating gourmet food out of a dog dish…the experience just isn’t what it should be. Fortunately, there are a few things you can do that will make you feel clean again without totally breaking your budget.
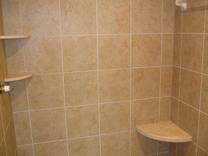
You can start by re-grouting, re-caulking and replacing your outdated shower handles and showerhead with modern ones. Now would be a good time to change grout colors if you would like. If you have white tiles, I would stick with white grout and caulking, otherwise the different color will contrast too much and it will look a lot like a checkerboard. If you have dark tiles, you can change to a slightly lighter or darker color to avoid getting dizzy while showering.
The biggest challenge you will have will be the shower handles. Many people go out and buy whatever handles appeal to them, not realizing that they may not fit. Different manufacturers have different patterns when it comes to attaching their handles to the stem that juts out of the shower wall. So you can’t just install a handle from one brand to the stem of another. There are some universal kits available, but with those there is usually a certain degree of play in the handle, which will cause the setup to wear prematurely and break. So you should buy new handles from whichever manufacturer produced your current shower valve. Realize though, that this is no guarantee it will fit, especially if your shower valve is very old and you are installing new handles.
The safest way is to remove your handle and take it with you when you go shopping. That way you can see if the pattern matches up. You can buy replacement handles at home centers or plumbing supply stores. If your handles are old, I would go and have an experienced parts technician find what you are looking for. You also can try contacting the manufacturer directly or placing an order online. While you are dressing up the handles, also get a new escutcheon plate, shower head, and shower arm. That way, all the visible parts will match in color and style.
The shower handle will remove by a screw. This screw will be hidden under the handle (usually a set screw-you will need an Allen wrench to remove it), or behind a cap on the handle. You will need to pry off the cap, and you may not even recognize it as a cap as it is built into the handle. With the handle removed, you can take out the escutcheon plate. It will be held on with an obvious screw and then caulked against the surface of the wall. Once the screw has been removed, you will need to pry off the plate with a screwdriver. The only caveat to be aware of with the escutcheon plate is to make sure you buy one that is large enough to cover the hole in the wall. You can reinstall these items exactly like they came out, just make sure you run a bead of caulking around the inside of the escutcheon plate before you screw it to the wall.
With these inexpensive changes to your shower, it will look modern, and you may even feel clean after you shower.
 If you are planning on replacing your shower surround, plan on a messy job. Depending on what type of surround you are removing, it may come off cleanly, but don’t bet on it. I’ve never had a lot of luck removing a surround and keeping the green board intact. The surround is glued or mortared onto the walls and it isn’t supposed to come down easily, so don’t expect it to.
The best you can hope for is minimal damage. When I say minimal, I mean torn paper on the green board face. You will likely have dried glue or mortar sticking to the green board when the surround is removed. It really depends on the type of surround you are removing.
The best chance you have for “minimal damage” is if you are removing a fiberglass surround. You can start peeling it up and keep gently peeling in the hopes it doesn’t start taking a chunk of the drywall with it. You can try using a stiff putty knife to try to sever the bond between the drywall and the surround.
If you have a tile surround, good luck not damaging the drywall. I say this because it is difficult removing ceramic tile that has been mortared or glued to the wall without making holes in it. You may find it easier to pull down the surround and the green board along with it, then reinstall new green board in its place before installing the new surround.
 If you are going to tile a shower or bathtub surround, the age-old question becomes whether you should use green board or cement board as backing. You will get different answers depending upon who you ask.
Greenboard is a water resistant drywall. It has a waxy surface that repels water better than regular drywall. I’m told by people in the know that it also has a water resistant gypsum core. It is lighter than cement board and therefore easier to move around; it is also easier to cut than cement board.
If it were my shower, I would install cement board. Yes it is heavy and slightly more difficult to cut (although you can score and snap it), but it is tough. I have seen green board turn to mush.
Whichever you choose, the installation is very important. Make sure you leave a gap between the shower pan or bathtub lip. After the tile is installed on the backing, the gap is caulked. This gap will make it so that if water gets by the caulking, it won’t wick up the backing and cause damage.
Cement board is also known as “durock” and has specific screws to use to fasten it to wall studs. There are markings on the cement board for spacing of these screws.
 Some people might consider this the cheapest shower remodel around. If you use a shower curtain and straight rod, you might consider installing a curved rod instead. It actually makes the seemingly cramped shower more roomy. It’s not more roomy, but it since you have more space up near your head and shoulders, it sure feels roomier.
Installing a curved shower rod is only slightly more difficult than a straight rod. With a straight rod, installation is as simple as twisting the rod until enough tension is placed on the rod to hold it up. With a curved rod, you will need to fasten it to the wall.
An important aspect of the installation is placement. Since the rod is curved, you want the curve centered at the curve of the tub/shower. The ends of the curved rod usually mount closer to shower hardware so that the arc of the rod aligns properly with the edge of the tub/shower.
Once you have the placement of the rod laid out and level secure the hardware to the wall. Installing into wall studs is best, but if you are going through ceramic tile, you will need to use a glass/tile bit and a hollow wall anchor, which is included in many of the kits. Then it’s a matter of threading the shower curtain on the rod and cleaning up.
If your shower is looking a little tired, you can dress it up inexpensively by doing a few simple things. The first thing to do is clean it! We work in homeowner's showers every day and you would be surprised at how nasty some of these are. I sure wouldn't feel clean after coming out of one.
Second, remove the old caulking and install fresh silicone caulking in the shower. Here are some details on caulking a shower.
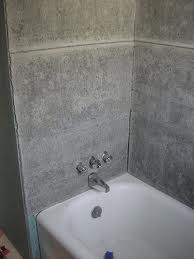
Finally, you can replace all the hardware in your shower. This is easy as long as you stay with the same manufacturer of your existing fixtures. For example, if you have Moen fixtures in your shower, you can buy a Moen trim kit to replace your existing hardware. The same for Delta and Price Pfister. Don't try to use Moen handles, for example, in place of Delta handles. Each has different patterns of mounting the handles to the stems. You can buy new handles, shower heads, shower arms, and the decorative escutcheons to completely upgrade the look of your shower. This also applies to bathtubs too. The nice thing is that these upgrades basically twist off and back on. You will need a screwdriver to remove the handles. For the shower arm, use Teflon tape and wrap the threads to prevent leaks.