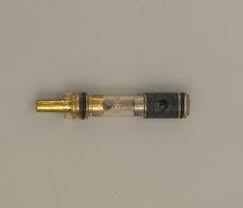
 A shower cartridge is the part inside a shower valve that controls the flow of water to the shower head. The cartridge is connected to a single handle that turns to allow the blending of hot and cold water. How to you know when the cartridge becomes worn?
There are several signs of a cartridge needing to be serviced or replaced. The most obvious is that you have a drip or running water when you turn the handle to the off position. You may also get a drip at the handle itself. Furthermore, you may feel the handle getting increasingly more difficult to turn.
These conditions can be repaired easily enough. If you contact the manufacturer, they may send you free parts. The parts they send are new molded rubber parts that help the cartridge to seal. You will need to turn off the water to the house, remove the handle, and pull out the cartridge. From there you can replace the old rubber parts. Lubricate the cartridge and slide it back into the valve.
If you are going to install a new cartridge, you can follow the same steps above except that you obviously don’t have to worry about replacing the molded rubber parts since the new cartridge will have all new parts anyway.
 How are you supposed to know when a shower cartridge is broken? When the shower’s water flow doesn’t operate like you want it to.
A shower cartridge sits in the valve behind the wall. Think of it as the maestro during an orchestra. It controls the flow of both hot and cold to give you the temperature you are looking for.
Many people think that if the hot and cold water is reversed in the shower, that either the plumbing is backwards or that the cartridge is bad. It usually is the result of the cartridge either being installed incorrectly, or that the stem just needs to be rotated 180-degrees.
So to answer the question more specifically, the cartridge is broken if you turn the water off and it continues to run or drip. That is a broad brush stroke, so let me say this: your cartridge may also be considered broken if when you turn it to “hot” and the water pressure slows down to a drip. That is very common with a Moen Positemp cartridge. You can replace the cartridge or just clean it up. You can pull it apart and clean out all the deposits in it. Generally, if you can shake the positemp cartridge and it rattles, you are good to reinstall it.
 A shower cartridge can get awfully crusty and be very difficult to remove by hand. This is where the cartridge removing tool comes in. It’s like magic.
Moen makes a cartridge pulling tool and Danco has a tool as well. Both work great for removing Moen cartridges.
The first thing to do is to shut off the water and remove the handle. The handle may have a setscrew at the base or the cap may pop off and reveal a screw to remove. Once the handle is out of the way, remove the retaining clip. It has a small tab that you will have to grab and pull outward. Needle nose pliers work great for this. One the retaining clip is removed, you can use the puller.
Each style of cartridge puller operates the same, although the tools look a little different. You will place one end of the tool over the cartridge and screw the threads into the top of the stem. As you are doing this, the ears of the tool will engage the cartridge. The ears fit into 2 slots at the top of the cartridge. With the Danco tool, you rotate the entire tool to free the cartridge. With the Moen tool you rotate a large nut or handle at the rear of the tool. As you turn the tool you will be able to see the cartridge lift out of the opening.
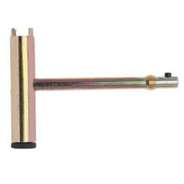
 Removing a broken shower cartridge is no picnic. Plenty of things can go wrong. You can use a cartridge removing tool which attaches to the threaded stem in the middle of the cartridge and gently goose the cartridge out of the opening. This works most of the time without incident. Then there are the times it doesn’t work and the stem pulls out of the cartridge.
For times like these, take a deep breath and relax. If you look at the cartridge removing tool, it looks like the letter “T”. The long leg of the tool is skinny and has a small ball bearing on the end of it. This ball bearing retracts enough so that you can slide the leg into the hole of the cartridge. When the leg exit’s the rear of the cartridge, the ball bearing pops out to grip the rear of the cartridge. Now you can use the tool to pull out the rest of the cartridge. This is not always easy. Maybe when the shower valve was originally installed, the installer failed to remove the cartridge before he applied the heat of the torch to the fittings. This intense heat can make removing the cartridge very difficult.
A shower cartridge installation can make a beginner a little nervous. There is the whole issue of turning off the water to the house and then removing parts from the valve in the wall. When you get the job done and turn the water back on…and it drips?
As you might imagine, there are some problems that might occur.
If you install a new cartridge and it leaks, you will have to remove the cartridge again (yes like you are starting over) after you turn the water off. The cartridge fits into an opening that is a tight fit. The O-rings are the only part of the cartridge that touch the cylindrical opening and it sometimes occurs that the O-rings will twist and cause a leak. You can’t just horse a cartridge into the opening without a little finesse. You need to lubricate the exterior of the cartridge so that when you push it into the hole the rings don’t twist and leak.
Use liquid soap for lubricating the O-rings. It makes the cartridge very slippery and it should push into the hole without any trouble. Once the cartridge is in place, secure the pin to hold it in place. Re-assemble the handle and test to make sure that the hot side dispenses hot water and the cold side is actually cold. If not, you need to rotate the cartridge stem by 180-degrees.
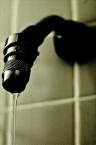
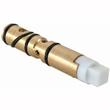
A leaking shower is enough to make you pull your hair out. Typically, the cause is a shower cartridge. A shower cartridge is about the size of a roll of nickels, and has holes and rubber washers all around it. It is located in the shower valve, which is in the wall, but it is easy to access. It will take about 30 minutes to fix, but will save lots of water as a result.
If you have to pull out the knob to start the flow of water, the replacement cartridge will cost about $20. If you simply turn the knob from side to side, the cost is about $45. You can find replacement cartridges at most home centers, but if they don't have your particular type, try a plumbing supply store.
Now, let's get to the repair. First, shut off the main water supply to the house. Open a faucet to let out the water pressure, then move to the shower.
Using a small, standard screwdriver, gently pry off the shower knob cover. Under this cover is a screw that holds the knob onto the cartridge. Remove the knob.
Next, you'll find the valve body, which covered by a decorative escutcheon. Remove the escutcheon by gently pulling it straight out.
A retaining pin holds the cartridge in the shower body. This pin will have a nub sticking out of the top of the shower body. Grab a pair of pliers and pull it straight up.
The only thing left to do now is remove the actual cartridge. I recommend that you get your hands on a cartridge remover, which costs about $10. You also can try your luck with pliers, however, the cartridge- removing tool is made just for removing cartridges.
Place the larger, hollowed end of the cartridge remover into the shower body and over the old cartridge. Tighten the screw on the end of the tool. This screw fits into the hole where your shower knob was, and it locks the tool into the cartridge. When the ears of the tool are engaged with the ears of the cartridge, turn the tool (and consequently the cartridge) to break the cartridge free from years of torment. The cartridge will pull straight out.
Install the new cartridge simply by pushing it into the shower body with the ears in the 12-and-6 position. Push it in far enough so that when you replace the retaining pin, it slides completely into place and locks the cartridge in place.
Next, turn the water back on and make sure there are no leaks. Replace the escutcheon and the handle.
Now, test to make sure that the hot water side is hot and the cold water side is cold. All you need to do is remove the shower knob, take a pair of pliers and rotate the stem (the part of the cartridge that the shower knob screws into) 180 degrees. The cartridge stays put, but the stem is free to rotate. It's the knob and the escutcheon that restrict the movement of the stem.
I'm amazed at the number of people who believe this reversed-temperature problem means that they'll have to re-plumb their shower. Maybe the next time someone presents this problem to me, I'll grimace, shake my head, and ask them for a calculator. Once I see the sweat pouring from their heads, I'll let them in on the easy fix.