 A handyman is frequently called to unjamb a garbage disposal. In that case I generally try to coach a customer through the process rather than visit the house and charge them for a 2 minute job. In those cases where glass breaks and goes down the disposal, there are some tricks to removing the glass before you have to remove the disposal from the sink. Naturally, unplug the disposal to avoid injury.
Try to avoid running the disposal if you know there is glass in there. This will further break the glass which will increase the chances of a small piece of glass becoming lodged in between the grinding plate and the side of the grinding chamber. Instead, use a wet/dry shop vacuum and suck out the broken glass. This should clear most, if not all, of the glass. Alternatively, you can pick out the larger pieces of glass with tongs, and then place the vacuum in to the hole.
Although I have never tried it, I have been told cutting a potato in half and pushing it into the disposal to grab the broken glass is effective if you don't have a shopvac.
If the disposal is jammed with broken glass, you can try freeing it up by using an allen wrench or the unjambing tool that came with the disposal. Stick the tool in the bottom of the disposal (underneath where the cord enters the housing) and rotating it back-and-forth. You might find this frees it up temporarily until the loose glass jambs it up again.
As a last resort, remove the disposal form the underside of the sink. You will have to remove the discharge piping and then loosen the collar with a screwdriver. Turn the disposal upside down so that the opening of the disposal is resting on the floor. Use the allen wrench or unjambing tool to try to get the blades to move. With luck, the blades will move enough to allow the small glass fragments to fall out. With the disposal still sealed to the floor, briefly plug the disposal into an outlet to guarantee that it is clear. Be careful on this one. Even though the glass should be contained, it is a good idea to wear safety glasses and take the proper precautions. When it spins freely, re-secure the disposal to the sink.
My friend decided to try some home repair on his day off. He had a garbage disposal that was humming, but not working. He called me up and I told him it was jammed. I told him to use an allen wrench and place it in the hole underneath the disposal, and try to work the blades free by jiggling it back and forth. No luck.
I asked him if he knew what could be jamming the disposal.He said that he had broken a glass in the sink and that some of the broken glass may have fallen into the disposal.
There are only a couple of things that would prompt me to remove the disposal from the sink to unclog it. One is broken glass and the other is a coin, and both of these are commonly associated with children.
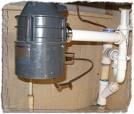
To remove the disposal from the sink, first unplug it and then remove the drain pipe jutting from the side of the disposal.This is held in place with a retaining ring that is screwed into the side of the disposal. You may also need to remove the dishwasher drain line (if you have a dishwasher). You might have enough slack in the drain line to be able to look inside, but if not remove the hose clamp and the disposal will pull free.
Set the disposal down and remove the rubber splash guard to see inside. You can use needle nose pliers to remove the obstruction. Most commonly the obstruction will be in between the blade and the wall of the disposal. Try using needle nose pliers or wedge a standard screwdriver in there to free the obstruction. You will probably want to have the disposal laying on its side so that the obstruction doesn't fall further into the unit.
Once the disposal spins freely just reinstall it back into place then reconnect the piping back to it.
 Ahh, the fragrant stomach-curdling smell of old food. You know, the kind that looks like a science experiment, except this isn't in a petri dish... it's in your garbage disposal. Coincidently, the garbage disposal isn't working.
At least half the calls I get for broken garbage disposals turn out to be easy fixes.
If the disposal doesn't make noise when you turn it on, press the reset button on the bottom of it. If the motor overheats or is overloaded, this button will trip and turn the motor off. Pressing the button back in will re-start the motor (you should also test the outlet to make sure there is power getting to the disposal and, if not, check the breaker).
If the disposal makes a humming noise, but doesn't grind food, it is jammed. Most disposals come with a tool to clear a jam. If you have lost yours, you can use an Allen wrench. Take the tool and insert it in the hole at the bottom of the disposal (near where the cord enters underneath). As you twist the tool, you will hear and feel the obstruction. Keep twisting until the blades move freely. If you still can't budge the blades, you'll need to remove the disposal and manually clean out the obstacle.
If your disposal is dead, plan on spending about $85 for a 1/2-horsepower disposal, and about an hour to replace it. You can save yourself some time if you buy the same brand of disposal, since the new one will attach easily to the old mounting ring.
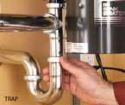
To remove the disposal, unplug it and grab a screwdriver. You'll need to disconnect the dishwasher drain hose, which is attached with a hose clamp, and the drainpipe. They should easily disconnect, but have a rag handy to absorb a little water.
The only thing left holding the disposal in place is the mounting ring. The mounting ring squeezes a rubber gasket (the black thing you see when you look down at the sink) into the mounting assembly, which holds the disposal to the sink. The mounting ring has "ears" on it that hold it to the mounting assembly. It also has round lugs in it that will allow you to remove the disposal.
Stick a screwdriver in one of the mounting ears and, as you support the disposal, rotate the ring counter- clockwise. The disposal will drop off into your hand.
If you've chosen the same brand disposal, it should re-attach easily to the old mounting assembly. If you are using a different brand, you'll likely have to remove the old assembly and install the new one. Removing the old assembly usually involves unscrewing the mounting screws and removing the snap ring, gasket, mounting and backup rings, and the sink flange. The new mounting hardware will be included in the new disposal package. If you install the new mounting assembly, make sure you use plumber's putty under the sink flange to keep out the water.
Once the mounting assembly is in place, make the electrical connections in the bottom of the disposal (most disposals don't come with electrical cords included, so if the old cord is in good shape, save yourself $8 and re-use it).
You will need to connect the white wires together with a wire nut, then connect the black wires together. Connect the green wire to the grounding screw and replace the cover plate on the bottom of the disposal.
Next, if you have a dishwasher, remove the knockout plug by placing a screwdriver against the plug and tapping it with a hammer.
Hold the disposal against the mounting assembly so that the mounting ears fit into the openings in the assembly. Turn the mounting ring clockwise until the disposal is supported by the assembly, but don't fully tighten it yet. Line up the drainpipe so that it will easily connect to the disposal. If it is too long, cut it to length with a hacksaw. Attach the dishwasher drain hose to the dishwasher nipple on the side of the disposal and tighten the hose clamp.
Finally, lock the disposal into place by inserting a screwdriver in the mounting lug and turning clockwise until the mounting ears bottom out. Plug in the disposal and listen to the sweet sound of food being ground into oblivion.