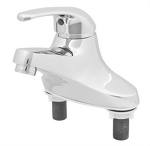
 A homeowner called and said his new faucet wouldn’t shut off the cold water. Now that’s strange. He was looking under the sink to try to figure it out. The problem has to be related to the faucet and not under the sink however. This was a two handled faucet and so the problem is isolated to the cold water side.
It might be as easy as repositioning or tightening the handle depending on the style. Sometimes if the handle is not engaging the stem it either won’t turn it all the way on or off, or if it is not correctly aligned, it may hit an integral stop before it is meant to. They will show itself as either low pressure or in your case, the water won’t shut off. You can remove the handle, turn the stem by hand until the water shuts off, and then correctly reposition the handle and tighten.
In the event that is not the problem, you may need to replace the stem and or seat (although this would be rare in a new faucet). You might call the manufacturer of the faucet and they can send out a new free part….or just take the faucet back to the retailer for a new one.
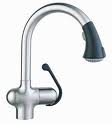
 A kitchen faucet leak becomes more common as the fixture ages. If you have a faucet with a sprayer, you have more opportunity for leaks. A common source of leaks is at the sprayer attachment.
You may find a leak under your kitchen faucet when you see the small puddle of water laying on the cabinet floor. This is going to take some investigative work, along with a flashlight. You will need to turn the water on to the faucet while looking for the leak. Pay particular attention to the area where the sprayer hose connects to the base of the faucet. If the leak is occurring at another location of the faucet, you may end up replacing the faucet if it is not leaking at a connection.
If the leak is at the connection of the sprayer hose, you can try to tighten it, remove it to find the problem, or replace the entire faucet. Some hoses are held on with a threaded connection, and some are held on with a clip. It may be that you can remove it, replace a washer, re-tape the threads with Teflon tape, and screw it back on. However, if the faucet looks to be in generally bad shape I would replace it.
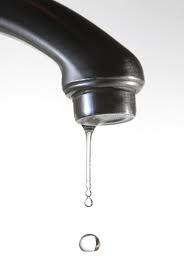
 A faucet that leaks at the base of the spout might not actually be leaking where you think it is. Since water runs downhill, check around the aerator to make sure the water isn’t dripping from there are simply running down the underside of the spout where it collects on the base of the faucet. It may be that you can remove the aerator and clean it up and the leak will stop. Otherwise, you have a decision to make.
If you have a single handle faucet with this problem, the repair is pretty easy. If you have a faucet with separate handles, you might consider replacing it if you have a lot of corrosion around the base. The choice is yours.
If you have a single handle faucet, you can replace the O-rings. You will need to remove the handle, which involves lifting a cap and removing a screw. You can jiggle the spout back and forth while lifting it off. You will see two O-rings on the faucet body, one at the top and one at the bottom. Replace these O-rings and use plumbing grease or liquid soft to lubricate them. You don’t want these to twist as they will allow water to pass and leak out. Once the O-rings are on, carefully slide the spout back on.
 If you are looking to replace your faucet handles, the biggest question I get is “how do I remove them?”. It’s really easy once you know the story.
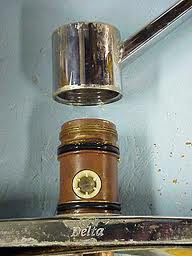
Faucet manufacturers make replacement hardware specific for their faucets only. In other words, you generally can’t install a Moen handle on a Delta faucet. The pattern of each is different from the other. If you have a replacement handle for your fixture and it is from the same manufacturer, you should be looking at a 10 minute job.
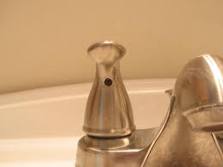
The trick is figuring out how the handle is held to the faucet. The handle is typically held in place by a screw under a cap on the handle, or a small setscrew near the base of the handle.
Look at the top of the handle for a seam. Although it may not look like it, you should be able to get a screwdriver into the seam and pry off the cap. Under the cap is the screw that holds the handle to the faucet.
If you don’t have a cap, look for a small indention at the base of the handle. You may need a flashlight to see the small setscrew inside the indention. Use an Allen wrench and loosen the screw and the handle should pop off.
Once the handle has been removed, you can install the new handle and tighten the screw.
 If you need to remove sink faucet handles, you might be scratching your head. Manufacturers do a pretty good job concealing the means to remove them. There are some tell-tale signs though that they are made to be removed. Generally, the less expensive the faucet, the easier it is so see how to remove the handles.
Most faucet handles are held in place with a screw through the top of the handle and then covered by some type of cap. Sometimes the caps are very conspicuous and sometimes they are the entire top of the handle. Look for a small seam that you can pry up with a small screwdriver or blade. Be careful here though as you want to pry off the cap, but don’t want to scratch the faucet handle.
Other faucet handles are held in place with a small setscrew. These are not obvious as a set screw, but rather reside in a small hole somewhere on the handle. Look for a small hole near the base of the handle that you can insert an Allen wrench into to remove the setscrew and pull off the handle.
Finally, some faucets have lever-style handles where the base of the handle screws off of the faucet. This one is the least obvious methods of holding the faucet handle to the body. Grab the bulbous end near the base of the faucet and unscrew it. With the handle off, you can service the faucet.
 If your kitchen faucet sprayer leaks when you turn the water on, it may be time to replace it. Some faucets have a pull-out spout and some have a sprayer mounted on the side of the faucet base. Both are similar to repair or replace.
If your sprayer is leaking where it attaches to the hose, you might be able to unscrew it and clean it up a bit. There is a rubber washer where the two connect (you’ll see it after you unscrew the head). You can try to clean up the washer and maybe flip it over. If that doesn’t work, try installing a new washer, and if that doesn’t work, replace the sprayer head.
For a pull-out spout, the parts are pretty specific to the faucet. If you need to replace the head, you may have to order the part from the manufacturer so that the color and finish is correct. That’s why it is better if you can repair it. If the spout dribbles out of the end, you should be able to unscrew the aerator. It is a delicate job to remove this as it is sometimes flush with the end of the spout. Once you have the aerator out, clean it up with a mild detergent and an old toothbrush. You want to make sure the holes are clear of any debris and scale deposits. Once it is clean, reassemble it and screw it back on to the spout. You should have great pressure and no leaks.
 Shower faucets and sink faucets that use separate handles for the hot and cold use a stem and a seat. The stem rotates as the handle is turned and a rubber washer on the bottom of the stem presses down against the seat to stop the flow of water. The flow of water is started when the stem lifts off of the seat to allow the flow of water. When a leak develops, it is usually the case that the washer at the bottom of the stem needs to be replaced, and the seat in the faucet body needs to be replaced.
After shutting off the water to the house, the stem can be removed and serviced by unscrewing it. The seat however can be a problem. You can remove it using a seat wrench but there are times when it seems the seat is welded in place.
Your other option is to resurface the seat. You can buy a resurfacing tool and place it into the valve body until it contacts the seat. By hand you can rotate the tool to smooth the surface of the seat. It will abrade the tiny pits on the surface so the stem washer and the seat will seal out any plumbing leaks.
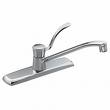 There are many places a kitchen faucet can develop a leak. One of the common ones is at the base of the spout. Particularly on a single handle faucet, the spout assembly slides over the faucet body and down onto the base of the faucet. Inside the faucet body is the cartridge and the means to hold the cartridge in place. This spout assembly slides over the faucet body.
The most common cause of this leak is the o-rings that seal the spout assembly to the faucet body. To access these o-rings, you have to remove the handle at the top. Pop off the decorative cover on top of the handle and remove the screw that holds the handle. You will then have to unscrew the cap retainer. Finally, grab the spout assembly with both hands and gently move it back-and-forth while lifting it up and it should lift off.
You will see the o-rings it their retainer grooves...one at the top and one at the bottom. It's likely that the o-ring on the bottom has failed, but replace them both while you have the spout off. Use liquid soap and slather up the new o-rings and slide them into the grooves without twisting them or you will likely develop a leak. The soap will lubricate the o-rings and make the re-installation of the spout assembly easier and less likely to damage the new o-rings. Re-install the remaining parts in the reverse order and test for leaks.
Many kitchen faucets become loose where they connect to the sink after many uses. After years of pulling out the faucet sprayer or pushing the spout from one side of the sink to the other, the faucet develops a little play in it. Eventually it will grow to a wobble and will seem like it is ready to slide off of the sink. It seems that this happens more with sinks that have a little flex in them, such as a thin stainless steel sink. If, for example, the faucet spout is hard to move, the flexibility in the sink seems to encourage the faucet to become loose.
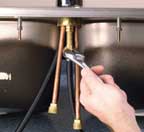
So how do you fix it? It's actually pretty easy. You are going to have to climb under the sink and get access to the faucet. The faucet is held to the sink by any one of several methods, which all clamp the faucet to the sink with threaded nuts. On more expensive single-handle faucets you may have only one large nut located in the center of the faucet.
Whichever style you have, it is a matter of tightening these nuts. In most cases you can do this with just your fingers, but you may need a wrench if the space is small.
If you have a kitchen sink with deep bowls, you may not be able to get your hands into the small space afforded for the faucet. In this case use a basin wrench and tighten the faucet to the sink.
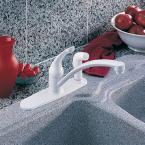 Kitchen faucet sprayers tend to leak, especially the cheap ones. This may be a case of you get what you pay for. It seems to be the builder-grade faucets with the side-mounted sprayers that give the most problems. There are 2 problem areas; one where the sprayer connects to the hose, and the other where the hose connects to the faucet body.
In many cases, if you look under the kitchen cabinet and see water dripping off of the hose it may as simple as tightening the sprayer head where it connects to the hose. The builder-grade faucets use a vinyl hose that twists, and in many cases after you use it there is some torque in the hose that causes it to come loose from the handle. This is a quick fix by screwing the handle tight to the hose. If necessary, you can replace the washer in the handle and use some liquid soap as a lubricant to get a good tight fit. The same goes for the connection at the hose to the faucet body.
The worst case is that you have to replace the faucet sprayer. You can buy the builder-grade models at any home center, but the higher quality sprayers may have to be ordered, or you may get lucky at a plumbing supply house.