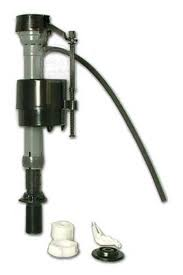
 A running toilet is horribly frustrating. If you can hear the toilet tank filling continuously, lift the lid and take a look around. In most cases, I end up replacing the fill valve and flapper, but you may be able to get away with just adjusting the fill valve to turn it off earlier. If the fill valve is continuously running, it is a sign that it can’t quite turn off, and you should replace it. If the water continues to flow, it will fill up to the point of flowing down the flush valve in the center of the tank. Yes, it will waste a lot of water.
If you have an old style ballcock, you can bend the metal arm downward. If you have a newer fluidmaster style, adjust the float downward. Both of these will cause the valve to shut off earlier than it normally has. It may work, or you may need to replace it.
If you hear the water filling sporadically, I would also replace the flapper as this indicates that water is slowly leaking out of the tank to the point the fill valve turns on to refill the tank. Adjusting the fill valve is really more of a band-aid approach if the valve has been working without problems in the past.
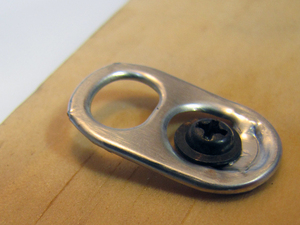 Here is a quick picture hanging solution that not only makes hanging pictures a snap, but also quenches your thirst as well. If you want to hang a picture and your frame doesn’t have a hanger, you might give this trick a shot.
Crack open a cold beverage (your choice or not) and break off the tab on top. Be careful at this point because both the tab and the can will be sharp. You can move the tab back and forth until it snaps off. Use pliers and squeeze the sharp area against the back of the tab.
A pan-head screw is a good choice to hold the tab against the back of the frame. Pre-drill the hole in the frame in the center, as you won’t be able to adjust it much when it is on the wall. Tighten the screw into the frame so that the lip of the screw head holds the tab against the back of the frame. You can use a nail or screw in the wall to hang the tab. If the picture is slightly askew, you can move the tab at an angle by slightly loosening the screw and then re-tightening it. Once you are done you can finish your drink.
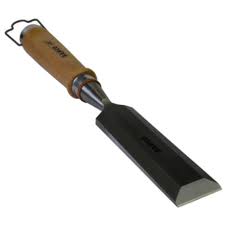 If you have ever done any kind of handyman woodworking project, you occasionally need to secure wood together with screws. Screw heads are not the most attractive fasteners in the world, so it makes sense to cover them and try to make them blend in. You can do this with wood plugs.
You will need to recess the screw heads into the wood with a tapered counter sinking bit. Once you pre-drill the hole and make sure the countersink is both deep enough to cover the head and get a plug to fit, you can get a plug. The plug should be the same species of wood and the correct size to fit into the countersunk hole. You can either buy plugs or make your own with a plug cutting bit.
Gently tap the plug into the hole. You can cut the plug flush with the surrounding surface by holding a sharp chisel at an angle and cutting it off with a slight tapping motion. You can also use a hand plane and run it across the surface a few times to level it out. You might be able to tap the plug in gently with a hammer and set it so that it is flush with the surrounding wood. Then you can stain or paint all the surfaces so that they blend in.
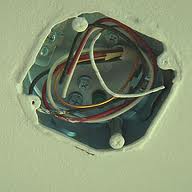 A ceiling fan that wobbles when you turn it on is very frustrating. Most people will simply buy a balancing kit and attempt to balance the fan with small weights. This works great, so long as the ceiling fan has a solid foundation. In this case the foundation is the point where the fan connects to the ceiling.
A loose junction box may be the culprit. If the box is not properly secured to the ceiling, you will never get the fan to be stable. Also, the box may be plastic and have too much flex in it to support the weight of a fan. If the junction box is metal, you may be able to drive a few screws into it to make it rigid. If that doesn’t work you can try a brace bar.
A brace bar will solve many problems, including a loose junction box. You will need to remove the old junction box first. If it is nailed in, it is easier to run a demolition blade between the box and the joist to cut it free…just make sure you clear the cable out of the way. Once the old box is out, you can slide the brace bar into the hole and run the cable through it.
 Have you ever noticed how some smaller houses actually look larger than they really are? It’s by design and it usually involves the idea of bringing the outdoors in.
Imagine having a small room with one window and a solid door. Now imagine that same room with multiple windows, a glass door, and a skylight. Being able to see the outdoors, along with all of the natural light makes the room look larger. Now you probably don’t want to replace your windows and cut through your roof to install a skylight, but replacing your door will only set you back a few hundred dollars, and it isn’t major surgery to install.
So if you get rid of your solid door and install a glass door, you can see through to the outside. If having clear glass makes you uncomfortable, you can certainly choose an obscure glass which will still allow light in, but not allow someone passing by to see inside. Certainly you could choose clear glass and place a window treatment on the door, or just choose the door with built in blinds inside the panes of glass. Going a step further, you can add a patio or deck to extend the living space and then you can add double doors for a more open area.
 Attic insulation is extremely important for energy savings. If you have ever gone into your attic, you may not even know what you are looking for. With insulation, it is the R-value that people look for. Certainly R-value is important, but so is the way the insulation is installed.
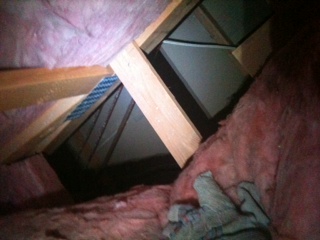
If you have fiberglass batts installed, most people will look for a printed R-value. If they see R-30, then they think all is well. Not so. If your insulation is compressed or worse, not even contacting the drywall ceiling below, your R-value could be virtually zero.
Take a look at the picture. If you were just to pop your head up in the attic and look around, you would see a beautiful sea of fiberglass batt insulation, seemingly doing its job to perfection. Under all that insulation lies a nasty secret: areas of that insulation aren’t doing a darn thing.
The picture shows me lifting up a batt to check out what is underneath it, and as it turns out, there is about a 4 foot drop to the ceiling below. You can see some pipes running across the uninsulated ceiling. This dropped ceiling is over a front entryway and a chandelier hangs from it. This entire area has no insulation and is approximately 6’x 12’. This large area will effectively lower the R-value of the entire ceiling.
 When you buy a new garbage disposal, it generally will not come with a new cord. That leaves you to buy a new cord, or use the cord from the old garbage disposal. Whichever you choose, you will have to wire it into the new disposal.
You will need to turn the disposal upside down and remove the small coverplate, which is held with one screw. Under the plate are a black wire and a white wire. You will also see a green grounding screw.
There is also a knockout where you will thread the cord through (sometimes it needs to be removed and sometimes it has already been removed for you). You will need a cable clamp to hold the cord in place at the knockout so that it can’t move and get damaged by the edges of the metal. Thread the cord through the clamp, but I generally don’t tighten it until I’m finished.
Connect the green or bare copper wire to the green grounding screw. Connect the ribbed wire from the cord to the white neutral wire in the disposal, and connect the smooth cord wire to the black hot wire in the disposal. Connect the wires with a wire nut and gently push them into the disposal’s base, and then reinstall the coverplate.
 The next time your handyman is over, ask him to check on your appliances. Appliances should be balanced and level for them to operate correctly. In addition, they look better too. You may not have even noticed, but appliances have adjustable feet that allow each corner of the appliance to be raised or lowered. If you have noticed that your washing machine walks across the floor when it runs, here is an opportunity to fix it.
The adjustable feet screw in or out to raise or lower the appliance. If you want to lower the appliance, screw the feet clockwise which draws the feet closer to the appliance and lowering it. To raise the height of the unit, turn the feet counter-clockwise which will put more distance between the appliance and the floor.
Most of the feet have a nut right above them that allow you to place a wrench on and move the foot in-or-out. Depending on the type of flooring you have, this may not be a good idea. With the full weight of the appliance on the foot, you will be turning it and potentially scratching the floor. Instead, try lifting up slightly on the appliance (if possible) to take some of the weight off. You can probably just use your fingers to move the foot.
 A customer installed a water heater recently, and the installation went great. However, after the installation it takes a long time for the hot water to reach the faucets.
There are several possible reasons for the problem. Recirculating pumps need electricity to run, and so it may be as easy as plugging the unit back in or testing the outlet for power. If there is no power at the outlet, a GFI outlet or a breaker may have tripped. If this is the case, you can reset whichever has tripped and you are back in business.
You also may need to reset the timer on the pump. Some pumps have a built-in timer and so you may need to adjust the time on it (it may now be running when you are asleep and may be off when you are awake and demanding hot water). Generally, when the pump is running, it will have a slight hum to it, and it will be very warm.
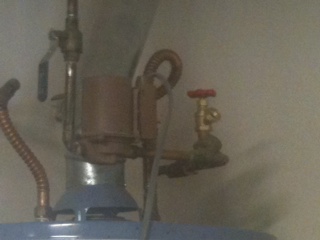
If these easy fixes don’t work, you may have air in the pump that needs to be bled out of it. The air in the pump creates back pressure that won’t allow the hot-water loop to operate properly. The good news is that you can add a valve to the piping that will allow you to get rid of any air in the line.
Adding a bleed valve requires that you intercept the return line in-between the pump and the water heater. You will need to cut the return line and sweat in a copper “T”. To the top of the “T” you will install the bleed valve, which is nothing more than a glorified hose bib. After the valve you will install a shut-off ball valve. This combination allows you to divert the water from going back into the water heater and have it exit out of the valve along with any air.
There won’t be a lot of room in between the pump and the water heater, so the quarters will be a bit cramped. You will need to turn off the water and relieve the pressure before you cut the pipe. Slip in the “T”, sweat in a ball valve, and then continue the line back to the water heater.
Once everything is soldered into place, turn the water back on and check for leaks. Assuming everything is watertight, screw a garden hose onto your bleed valve and run it outside (ideally to a cleanout). Shut off the ball valve and open the bleed valve to divert the water out of the hose. Turn on the pump and let it run for a minute, then open the ball valve and shut off the bleed valve. This should purge the air and give you back your hot water quickly.
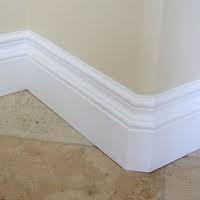 Baseboards get dinged up and gouged as part of their everyday lives. Repairing them can be done with a variety of materials.
Baseboards with various curves in its profile can be more difficult to repair. Basically you are looking to fill in the gouge or chip so that you can’t tell it ever happened. Certainly wood putty can be used. It is applied with a putty knife by pushing the putty into the damaged area. Run the putty knife over the area to smooth it out somewhat. The putty will dry with a course surface and so it will need to be sanded. Once it is sanded smooth, you can paint it to match, although it is easier to just paint the entire piece of baseboard.
You can also try drywall compound. If you use 5-minute mud, you can follow the same steps outlined above, but work quickly. When the packaging says 5 minutes, it means it. You can remove most of the high spots with the putty knife and then sand it if you need to.
If the damaged area is in an area where it is likely to be damaged again, you might want to stick with the wood putty as it will tend to stand up to a beating a little better than the compound.