 Painting is a job that is inexpensive on materials, but intensive on labor. In other words, you get to put in the elbow grease. It’s not difficult work, but you can’t be careless about it, either.
Depending on the quality of paint that you use, you can paint an average-sized bedroom for about $100. Plan on spending a day or so on the project. As is usually the case, painting the room is fast and easy; it’s the preparation that is the most important and time consuming.
If you can, remove everything from the room. If something is too large, put it in the middle of the room and cover it with a plastic tarp. Next, protect the carpet by running 3-inch masking tape along the baseboard. Push the tape under the base with either a wallpaper smoothing tool or a dull putty knife so as not to cut the tape.
Cover the carpet with either fabric or plastic drop cloths (fabric is better because it won’t move or become slippery). If you choose plastic, tape them down with the masking tape.
Remove all switch plate covers, air register grates and window coverings. Also, tape over outlets and switches as well as doorknobs, doorstops, hinges and strike plates. Remove light fixture covers, and cover the light bases with plastic bags and tape.
If you find old water stains on the ceiling, seal them with a stain sealer.
Sand the woodwork (if you have any) with a medium-grit sanding sponge. This will roughen the hard surface, as well as remove any high gloss finish.
Next, consider cleaning hand oil deposits from areas around light switches and door moldings with a de-glosser/cleaner. This will help the new paint properly adhere.
Prime the woodwork with a solvent-based primer. Use a small brush for the doorjambs, casings and baseboards, and a ½” nap roller for the door.
Fill in nail holes and gouges in walls and lightly sand the walls with medium grit sandpaper to knock off any bumps or imperfections from the previous paint job.
When you buy paint, stick with a higher grade from a recognized manufacturer. A gallon of quality paint will typically cover about 400 square feet. Estimate the amount of square feet you are covering (don’t forget the ceilings and closets) and divide by 400. Always round up so that you have extra paint, and realize that this number assumes only 1 coat of paint. If you are changing colors, particularly from a darker color to a lighter one, you will likely need multiple coats.
Next, roll on the ceiling paint. If you have popcorn ceiling texture, use a ¾” nap roller (if you have typical knock-down texture you can use a ½” nap). Roll on the first coat lightly in one direction, and then roll the second coat perpendicular to the first coat. You want to avoid having any popcorn texture fall from the ceiling and a light touch helps. Actually, popcorn texture should be sprayed with an airless sprayer to avoid texture on the floor.
Caulk all wall and woodwork joints with paintable caulking and smooth it out with a wet finger.
Cut in with a 3-inch brush and roll one wall at a time (“cutting in” refers to transitioning from one wall to another, particularly if the walls are different colors). This way, the wet cut-in will blend with the rolled area and will not leave a noticeable mark where the hand-painted area meets the rolled area. Use a ½” nap roller for the walls, first from top to bottom, then from side to side.
If you need to take a break, leave the roller in the tray and wrap the tray with plastic wrap. If you want to quit for the day, put the brush in a plastic bag and place it in the freezer-just thaw it out 30 minutes before use. I would replace the roller and the tray liner with new ones for the next day.
 A balcony is a great feature, but you have to check the drain or drains every so often. A large balcony will generally mean a large roof and that has the potential to cause problems when a downpour occurs. Some of my neighbors have a balcony in front and several have water stains on the garage ceiling below the balcony. When you consider that the huge roof dumps onto the balcony below, you can understand how important it is to keep the drains clear.
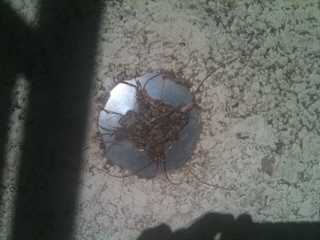
Certainly, it makes sense to give a thorough inspection to other potential problems as well. When it rains heavily, look out at the balcony deck. There is probably a primary drain and a secondary drain in case the water starts rising quickly. You might have just cleared the balcony of all debris, but when it rains heavily, the rain will wash the debris on your room down onto the balcony, which can clog the drains. It is a good idea to be vigilant when it really starts coming down. In some cases the drains will clog and will get high enough to enter the house from under the door. Take a look at the picture, there isn’t any large piece of debris there. It is just lots of small leaves that slow the draining water enough to allow a back up.
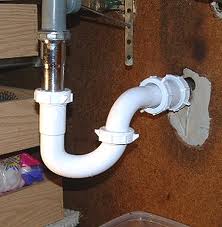 A leaking drain line under a sink is a fairly common repair. Many people consider repair vs. replacement. Many drain repairs can be repaired, particularly at the connections. With plastic drain lines, if the leak is occurring at a point where two pipes connect, a repair might be in order.
Plastic drain piping is susceptible to just about everything. It connects easily, but if you bump it, it may start to leak. Lots of people will throw their kitchen garbage can under the sink and it will hit against the pipes and they can start dripping. So make sure you actually have a damaged pipe before you start worrying.
If the leak is coming from a connection, check to see that everything if fitting properly. There is a slip washer that, if not properly seated, will leak where the slip nut holds it down. If you do have a cracked pipe, I would replace it. There are plenty of folks who swear by gluing the crack or even using a leak tape, but over time these products can fail. A new plastic drain pipe will cost you under five dollars and all you have to do is cut it to fit (you may not even need to do this) and slip it into place. Make sure the slip washers and nuts are properly seated and hand tighten.
 This is a handyman tip that will save your knuckles from looking like hamburger. At some point it will happen that you will put all your might into removing something from the end of a pipe…it could be a cap or a valve. Rather than risk the wrench slipping off of the cap and you skinning your knuckles, use a little physics to save your skin.
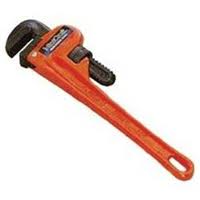
Use The Right Wrench
Using the right wrench for the job helps a lot. If you have a nut with machined sides on it, use a wrench, like an open end wrench, that doesn’t adjust. Adjustable wrenches, like crescent wrenches have too much play in them and this will wear down the corners on the nut and will slip, leaving you with skinned knuckles. A large wrench made for this particular use goes a long way in getting the job done.
Use Opposing Force
Instead of using a wrench and throwing all your strength into it, try using two wrenches. Let’s take the example of removing a threaded cap off of the end of a pipe. For this I would use two pipe wrenches, as the cap will have a couple of lugs to hold on to. To remove the cap, place one wrench on the pipe itself close to the cap, with the opening facing up. This wrench would be in the 9 o’clock position. The other wrench would be on the cap with the opening facing down in the 10 o’clock position. Positioning the wrenches in this position allows you to hold both wrenches in your hands while you squeeze. Obviously, you want to squeeze more on the wrench on the cap while holding the pipe still. This may sound a bit confusing, but once you position the wrenches it is easy. You just want to get the cap to move and the larger the wrenches, the more force you can leverage on them, all without skinning your knuckles.
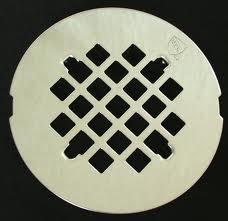 A loose shower drain cover is one of those things that really bothers some people; others really don’t care much about it.
Drain covers should be in place enough where they don’t slide all over the floor when you are using the shower. However, they need to be removable for the times when you need to snake the drain. Some older drain covers are held in place with screws. You find these types with customer mud pans. Modern plastic drain covers can just snap into place. If you need to remove them, you can just pop them off with a small standard screwdriver.
If you can’t figure out how your drain cover stays in place, you can always use a small bead of clear silicone caulking around the perimeter of the drain cover. Just a little bit on the underside will hold it in place until you need to remove it because of a clogged drain. If you need to remove it, pry it up (you may need to cut the caulking in between the cover and the drain recess it sits in.
By the way, you probably want to handle the drain cover as little as possible. When you do have to handle it, wear rubber gloves as drains are a breeding ground for germs.
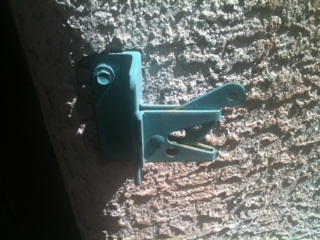 If you have a gate on the side of your house and the latch is secured through the stucco, you should probably prepare yourself for some maintenance. If you have to choose which side of the gate to hang on the stucco, I guess the latch would be preferred because it is not as heavy as the gate itself. However, as the gate will tend to slam into the latch and overtime will tend to loosen.
There are a couple of ways to deal with this problem. Some folks would consider moving the latch, which would mean you also have to move the gate by the same amount. You could also use longer screws and make sure they enter some framing lumber in the wall. Along with that you can repair the broken out stucco. They make a product which is basically mortar in a caulking tube. You can load this in a caulking gun, cut the top off, and squeeze some into the void under the latch. You will want to position the latch where you want it to stay while the mortar dries. I would leave it that way overnight. The next day it should be rock hard with no movement…until people start slamming the gate again.
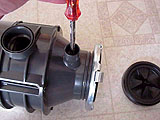 A very common oversight when installing a garbage disposal is forgetting to remove the knock-out plug from the side of the unit. The purpose of the plug is to create a watertight seal in the event you don’t have a dishwasher.
If you have a dishwasher, the drain line connects to an air gap and then drains into a nipple at the side of the disposal. In this nipple is a plug that must be removed so that the drain water will flow freely into the disposal and out of the trap. If you don’t remove this plug the water will back up into the air gap and onto your counter. If you do not have a dishwasher (and therefore won’t be connecting one to the nipple), you don’t need to do anything to the plug.
If you are connecting a dishwasher to the nipple, you need to remove the plug. If you have forgotten to remove it and the new disposal is already installed, you can remove the drain hose from the nipple and use a screwdriver and a hammer to tap it loose. You risk damaging the sink or the disposal doing this however, so you might want to place someone or something behind it to prevent it from moving do you your hammer strikes. The safest way is to place the disposal on the floor and tap out the plug with a screwdriver and hammer.
Once the screwdriver breaks through, you can either turn the disposal upside down, or reach inside and pull out the plug.
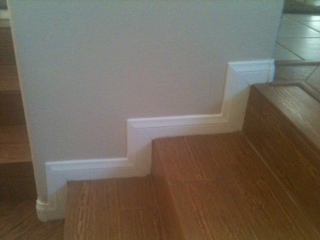 Installing baseboard around stairs certainly gives you the opportunity to use the miter saw. It takes much longer to install baseboard around stairs rather than walls, simply due to the number of cuts and the short pieces you will be using. With a wall, you may be able to do 20 feet in a matter of minutes. With stairs it may take you a few hours.
Installing baseboard on walls, the miter cuts are in a vertical position. With stairs, the miter cuts are as the baseboard is laid on the wall so that the entire piece changes direction to follow the stairs. Most pieces will have two miter cuts with the exception of the very top piece and the very bottom piece. These pieces lay in a horizontal position and either begin or end the directional change.
The cuts will be at 45-degrees and will mate with the corresponding 45-degree cut to make a 90-degree corner. You will need to map out which direction the cuts are to be made and for this I would recommend making some templates out of scrap material. That way you can place two cuts together and make sure they are correct before you use your nice stock. You can start out using a measuring tape, but you will likely have to nibble away with a saw during the installation.
I would start at the top, cut the first piece, and nail it in place with a nail gun. Then move to the second piece and nail it, and so on. I would not cut all the pieces at one time and try to install them as there will be some variation.
 Is your handyman an unreliable flake? I can’t tell you how many people call me telling me their stores of how long they have been waiting for “their” handyman to show up, and that they are ready to try someone new. Then it seems, once the flake hears that their customer is going somewhere else, they drop what they are doing to finally race over in an effort to keep them. It’s really funny. It is almost like a breakup, and then one party gives in and does what the other wants.
The question is why? I guess that people resist change, even when it will help them. If someone is not doing what you need them to do, there are plenty of others that will. As you might have guessed, I am often the guy that the flake’s customer is calling to come over to do the job. Then at the last minute the customer will call me and cancel citing that their handyman finally showed up. I mean, if you can even get the guy to show up, how can you expect him to come back and complete the job the following day? It is amazing and confounding, how a perfectly reasonable homeowner will continue to allow themselves to be a victim of an unreliable handyman, over and over.
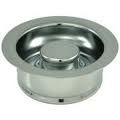 If your garbage disposal has died and you need to replace it, you may be able to cut half the time of the installation…depending.
The mounting collar (aka ring or flange) is what holds the disposal to the bottom of the sink. You put plumber’s putty on the underside of the top half of the collar and place it in the hole of the sink. The bottom half mates with the top and then there is a tricky snap ring that holds them together. If these parts look good and are not leaking, you might be able to get away with not replacing them…if you buy the same brand.
Generally, disposal mounting rings are useful for only the manufacturer’s disposals. So if you buy the same brand and the old collar looks good, you might consider leaving the old collar in place and just twisting on the new disposal. If you change brands then go ahead and replace the collar.
The only thing you will save here is time. The most challenging part of the installation is the collar, so if you can avoid it you will save a little time. A new garbage disposal will come with the new collar, so if you want to , go ahead and replace it.