 A home inspector completed an inspection of a resale home on behalf of the new buyers and found a problem with a double door lock. He suggested the buyers contact a handyman to repair it. On a set of exterior double doors, you will have a stationary door that secures to the top jamb and the threshold with a set of sliding bolts or pins that sink into the opening preventing the door from operating. The swinging door latches into the stationary door and locks into it. If the stationary door has problems with the bolts that secure it to the frame, then the swinging door has little chance of locking and securing the opening.
Many of these problems deal with the fact that the sliding bolts may not be fully engaged into the holes that receive them. This may be for many reasons but repairing them shouldn't be very difficult. Sometimes the hardware will be loose and it is a matter of tightening up the sliding bolts and making it so that the bolts actually go into the holes again. In other cases the easiest thing to do is to ream out the holes slightly larger so that the bolts can engage the holes and securely lock the door. You can also clean the hardware and lubricate it so that it slides easily.
 I generally like the universal door sweeps that just slide along the door bottom and get screwed to the back. It is adjustable and works on all doors. However, if a customer has a specific door sweep, I would rather use it than a generic one.
A customer has a front door that has a rubber door sweep inserted at the very bottom of the door. She purchased a new door sweep and wants it installed. The sweep she bought is specific to this door. It has two arms that are barbed that install into some grooves into the bottom of the door. This door will need to be taken off of the hinges for the new sweep to be installed.
Removing the old sweep is a matter of goosing it out of the grooves. After you remove the door from the hinges, use a standard screwdriver and, starting at one end, gently pry the old door sweep from the grooves. It will likely come out pretty easily.
Installing the new door sweep isn't much more difficult. There will be some resistance from the barbs on the arms that go into the grooves, but this is good since that is what will hold the sweep in place. Line up the sweep with the edge of the door and start pushing it into the grooves. You will likely need to hold a thin piece of wood under the sweep and hammer against this wood to fully insert the sweep into the grooves. A few paint stir sticks held together works well for this. Once the sweep bottoms out against the door, trim the edge of the sweep so that it is flush.
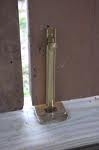
 Pneumatic door closers are the weak little sister of hydraulic door closers. Pneumatic door closers are good for closing lightweight screen doors, as they use air in the closing mechanism versus the oil used in the more powerful hydraulic closers.
As a handyman, we are asked which type to use, and the answer is that it depends. It mainly depends on the weight and size of the door. Lightweight doors, such as screen doors or hollow doors, can generally be pulled shut by a pneumatic closer, whereas heavier doors, such as steel exterior doors, need a hydraulic closer.
The closing is done by an internal spring inside the closer. As you open the door, the spring tension begins to close the door. The rate of closing is controlled by a piston and chamber that fills with air when the door is opened. There is an adjustment screw on the end of the closer that controls how quickly or slowly the air empties from the chamber, and consequently how quickly or slowly the door closes. That's why you hear a hissing noise as the air escapes from the chamber...it's more of a controlled slamming of the door.
These pneumatic closers are a game of adjustments. You can adjust how quickly the door closes by adjusting the screw that allows air to escape. However, the door may still give you problems. If the door doesn't close the last few inches, you will need to play with the bracket on the door where the closing arm mounts to it. Many of these brackets have several sets of holes to allow for this. If you move the arm to a hole farther away from the closer, you should get enough force to close and latch the door. If your bracket doesn't have a series of holes for these types of adjustments, you will need to move the bracket slightly farther out away from the closer.
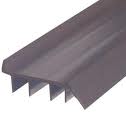
 If you look at a set of double doors, you will see a piece of molding right in the middle of them. This molding is called a T-astragal and attaches to the stationary door. It acts as a strike jamb for the swinging door to close into. On interior door sets, there is no weatherstripping, but on exterior doors, there is a groove in the T-astragal for weatherstripping to seal out the elements.
In my handyman experience, it is the interior door sets that have the T-astragal damage. Interior T-astragals are typically made of wood and someone will impact it and cause it to chip or split.
There are many types of T-astragals. Some doors need to be rabbeted to accept the T-astragal, but most modern doors do not. They can be pried off and replaced with a new one. They typically have to be ordered and once they arrive, they can be cut to length. Once the length is right, they can be glued and nailed to the edge of the door and painted.
The body of the T-astragal is fairly thick, so it can be mortised for the door latch. Since the T-astragal is mounted on the stationary door, the door knob and latch on the swinging door need somewhere to latch into. Once the astragal is mortised, a strike plate is secured to it and the doors will then close and latch together.
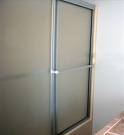
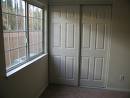 Many homes have sliding doors in closets, or a laundry room. These are commonly called bypass doors and it's something a handyman consistently works on. The doors will either slide along a track secured to the floor, or will hang from a header and ride in a track from above.
On the doors that hang from above, there is a divider mounted to the floor that keeps the doors separated and prevents the doors from swinging in-and-out. We see this commonly when homeowners will have the flooring changed, such a having the carpet replaced, and the installers won't re-install the divider. That leaves the doors to swing in-and-out, and the divider piece disappears.
You can buy a new divider and install it simply enough. If there is so much space between the top of the plastic divider and the bottom of the door (making it so the divider won't even touch the doors), you will have to use a spacer installed underneath the divider. Some dividers come with plastic spacers, but in some cases you may have to fabricate something that is functional and attractive. You can screw the divider into the floor to hold it in place. For carpet laid on top of the slab, you will have to screw the divider into the slab with a small anchor or tapcon screw.
 Many of us have sliding glass doors, and maybe the handle lock has stopped working. Many homeowners will wedge a broomstick or some other piece of wood behind the slider to prohibit it from opening. Well if you are tired of looking at the broomstick, read on. There are many mechanisms to lock your sliding glass door.
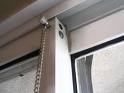
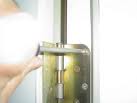
Aside from repairing or replacing your handle lock, you can install a locking mechanism at the base of your sliding door. There are many choices here, but it seems the two most popular are a pin lock or a charley-bar type lock.
A pin lock looks like a long nail that you install in a hole you will have to drill through the frame and track. Basically you will close the door and drill a hole large enough for the pin to slide into. If someone tries to open the door, the pin will stop the door from moving.
A charley bar works the same as a broomstick, but it looks a little nicer. It is a hinged metal bar that telescopes out to snug against the back of the sliding glass door. Here you mount the mechanism to the opposite inside jamb. The bar will swing downward and rest in a bracket you will secure to the back of the sliding door.
Either style of lock works fine and you probably won't need a handyman to install them for you.
There are many styles of sliding glass door locks and they are actually very similar. Each will secure to either the door or the track and have a means to stop the door from traveling.
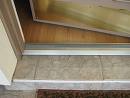 Over time, a threshold can become damaged and need replacement. If you have a gap between the bottom of the door and the threshold, you may be able to avoid replacing the threshold and have your handyman install a new sweep on the bottom of the door instead.
The proceedure is easy: simply slide the sweep along the bottom of the door and secure it. If this doesn't do the trick, then replacing the threshold is the next step.
The threshold is originally installed as a pre-hung door unit along with the jambs and it slides into the framed opening for the door. The threshold is usually nailed or stapled to the side jambs. Usually, adhesive or caulking is laid down under the threshold to keep out the weather and bugs.
To remove the threshold, you will probably need to cut it in the middle and shimmy it out. You can do this with a back saw or a reciprocating saw, and you may need to break the bead of caulking or adhesive to free it up.
Removing it from the side jambs is next, and you may be able to lift up the threshold from the point where you cut it and pivot the end up to pull it away from the side jambs. you can also try moving it in a back-and-forth motion. It's a little like yanking out a tooth, minus the blood. Once the old threshold is out, pull out any remaining nails from the side jambs.
You must buy a threshold of the same style that will fit the opening. I had a customer that had a double door and she bought two smaller thresholds with the idea that she would just butt them together to span the opening-bad move. If you need to special order a size, then do it.
Once you have the correct one, swing the door out of the way or remove it so you can install the new threshold, which will screw into the floor. If you are installing over a wood subfloor, you can screw it into the wood. If you are installing into concrete, lay the threshold into place and mark the spots on the concrete and then you can drill the holes with a masonry bit.
Lay down a couple of thick beads of adhesive caulking so that when you install the threshold there won't be any gaps for insects or breezes. Use Tapcon anchors (about $10 per package) and screw the threshold into place.
Swing the door (or rehang it if you had to remove it) back into place and check the fit. The door should close easily and the sweep on the bottom of the door should just make contact with the top of the threshold. A slight rubbing of the sweep against the top of the threshold is expected. There shouldn't be any gaps under the door whatsoever.
From inside the house with the door closed, look under the door for
daylight. If you see daylight (assuming you are doing this during the daytime) then you need to make some adjustments.
The threshold will have some adjusting screws which are countersunk into the top of it. You can turn the screws clockwise to decrease the rubbing and increase the space between the door and threshold.
By turning the screws counterclockwise, you will close this gap. If you have adjusted the screws as far down as they can go and you still have difficulty closing the door, as a last resort you may have to remove the door and plane off a small amount from the bottom of it.
When you're done, lay a bead of clear silicone along the sides of the threshold where it meets the side jambs of the door. Then you will be ready to start swinging and slamming.
 If you can see daylight from under an exterior door it is costing you money. Sealing the interior from the exterior is important not only for indoor air conditioned comfort, but it's also an easy way to keep bugs from entering your home.
You might have a door sweep or threshold that is adjustable and may be able to adjust the sweep downward or adjust the threshold upward. Door sweeps are attached to the door and make contact with the threshold underneath the door. The door sweep will wear out over time and need to be replaced by yourself or a handyman. There are lots of different styles of sweeps. Some slide in a track, some have barbs and are secured into some grooves in the bottom of the door, etc. If you want to replace the exact weatherstrip or door sweep, you may have to take it to a door shop. Your other option is to buy a universal door sweep.
This slides down the length of the door bottom and gets secured with screws to the inside bottom of the door. These door sweeps have elongated holes so they can be adjusted up or down to close the gap between the door bottom and the threshold and operate smoothly. When the door sweep is adjusted correctly, you should just barely hear a rubbing sound (between the sweep and the threshold), and you shouldn't be able to see any daylight.
 If you're at the point where you have to lift up your sliding tub doors to get into the shower, you need to do a little door repair. It is usually the case that the wheels at the top of the door need to be adjusted.
Sliding tub doors, or sliding shower doors, hang from a rail at the top of the opening. There are wheels at the top of these doors that ride in grooves on the rail. Over the course of time, gravity and water play a role in throwing these doors out of alignment. There are a set of wheels on each side of the door. In many cases, it is only one side or the other that needs to be adjusted, and you can do it with just a screwdriver.
Before you try adjusting the door rollers, make sure that the rollers are in the track. Many times, the rollers have come out of the track and the door gouges the bottom rail. If you see metal shavings and scratches, this is probably what has happened. Once the rollers are back into the track you can decide if they need adjusted.
A phillips head screwdriver is all that is needed to adjust the wheels. You typically have to remove the door out of the top track to gain access to the screw. Lift up the door and swing it out to remove it. If you loosen the screw and move the wheels downward, the door will ride higher, that is to say there will be a larger gap between the bottom rail and the bottom of the door. This is good if your door has been grinding the bottom of the rail. Adjust each wheel assembly until the door is level and can fully close to each side of the tub or shower. This will also help to prevent water from leaking out of the tub/shower enclosure.
If the wheels are damaged or broken, take them with you to get a replacement. When you get them back home, replace and adjust them.
 A friend called with a door problem. His front door was sagging a little bit and he was tired of lifting it up to get it to close and latch. He is no dummy and can generally tinker with something and get it to behave.
He tried to tighten the hinges but the door was still dragging. Over time, this door had been opened and closed hundreds or thousands of times, and gravity had helped to bring the door to its knees. When a door is installed, the typical screws used are only ¾" long. This is fine for the door-to-hinge connection, but for the hinge-to-jamb connection, it is too short, particularly at the top hinge.
There are a thousand things that could go wrong with a door, and one long screw can fix many of them. After I removed one of the short screws, I used a 3-inch screw and screwed it into the top hinge of my friend's door jamb. The length of the screw is important. You want the screw to be long enough to drive through the door jamb and into the rough framing of the house. This will give plenty of force to pull the hinge, and consequently the door, snug against the jamb. Since the screw is sunk into the rough framing, there is little chance of it working its way out. This repair should last a long time.