 If you've ever grouted a floor or wall, you know that grouting is not a difficult job. However, the perimeter of the area can be troublesome if you are not careful.For example, on a ceramic tile floor that meets the baseboard, you can really create a mess if you try to push too much grout into the gap between the edge of the tile and the baseboard, and the grout gets on the baseboard and looks sloppy.
Some people will try to cut the tile right up to the baseboard, but you still are forced to deal with a small gap. The way around that, of course, is to remove all the baseboard, install the tile, and then reinstall the baseboard over the tile. This creates additional work and also raises the baseboard which may cause problems if the room is adjoining and the other room's baseboard isn't being raised up as well.
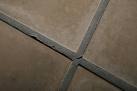
My handyman tip is to use painter's tape. You can use a roll of the painters tape and lay it flat on the ceramic tile after the mortar has cured. By laying the roll flat, you are aligning it flush with the surface of the tile, so that the finished product will be seamless.
So before you start grouting, lay out a strip of the tape (1" or 1 ½" wide works well) around the perimeter of the room. I start a strip on the baseboard and then, laying the roll on the floor, pull the roll out and stick the section to the baseboard. I do about a foot or so at a time until all of the baseboard has tape on it. You don't need to completely cover the baseboard, just at the bottom where the grout could touch it.
Once you grout the gap between the tile and baseboard, you can pull the tape slowly off the baseboard. This will essentially cut the grout perfectly level with the surface of the tile. The trick is to pull it fairly soon after you've grouted the area. If you wait too long and the grout has dried, the tape will rip and not be able to pull through the grout. A few minutes is all you will need after you have grouted the perimeter. When you pull the tape, the grout will crumble off of the tape and you will have a perfect finish right up to the baseboard.
Have you ever walked through a house and marveled at the intricate ceramic tile medallions or borders and wondered how the installers got it so perfect? The answer is they didn't.
You or your handyman can buy beautiful medallions or intricate border pieces that look as if Michelangelo made them. They come in ceramic, marble, travertine, tumbled marble...whatever surface you are working with you can find these fine finishing touches. What you don't see is the netting that these intricate pieces are glued to before they are installed. Buy purchasing them in this "ready to install" fashion makes them virtually as easy to install as regular square tiles. Here is an article on ceramic floor tile installation.
I've also seen people make their own medallions and borders. You can break or cut several styles and colors of tile into random pieces or cut them into uniform pieces. Then buy the netting and glue them into whatever shape or design you want. The spaces in the netting allow the mortar to pass through to the tile and adhere to them like regular tiles.
The medallion is usually installed first and the surrounding field tiles are installed around it. Once the mortar is dry the entire surface is grouted and buffed clean.
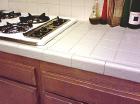 The edge of your kitchen countertop takes a beating. I can't tell you how many houses I've been in where the ceramic edge tiles on a counter are broken or cracked. Either someone drops something on them or hits them from underneath. The result is a sharp edge that needs replacing.
The job gets easy if you have a replacement tile. You can find several colors of white and off-white at home centers, as well as different colors of grout. You will be looking for a V-Cap edge tile. This tile is pre-molded with a round over built in, so instead of creating a corner with 2 tiles, this one tile is shaped like the letter "L".
1. Remove The Rest Of The Broken Tile
You can remove the grout from around the tile you are replacing with a grout grabber tool or a Dremel tool. Once the grout has been cleared, pry up the broken tile with a screwdriver or pry bar.
2. Remove The Old Mortar
Use a flat blade or a scraper and get rid of the old mortar so that you have a nice smooth surface to work with, then vacuum up the debris.
3. Mix Up A Batch Of Thin-Set Mortar
Mix up a small amount of thin-set and let it slake per the manufacturer's specifications (usually around 10 minutes). Use the suggested notched trowel and apply the mortar.
4. Install The Tile
Cut (if necessary) and install the new tile and use blue painters tape to hold it in place. The last thing you want is for the tile to move slightly causing you to do the job all over again. The tape can easily be removed when the mortar hardens.
5. Grout And Clean
Finally, mix up some grout and fill the voids. After that it's a matter of sponging off the excess grout and buffing the tiles with a clean cloth. For more information, read my article on ceramic tile replacement.