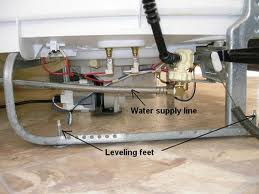
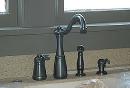
 I had a frantic call from a homeowner today about her dishwasher. She needed to pull the dishwasher out of the cabinet and couldn’t get it out. She said the ceramic tile was blocking her from pulling it out. Apparently, she had some tile installed and the raised lip on it was blocking the feet on the dishwasher from moving.
I was able to talk her through it without too much trouble. She didn’t realize that the dishwasher was screwed into the cabinet underneath the counter.. After she opened the dishwasher door, I had her look up and remove the screws. This helped out quite a bit.
The next step was to create a little space in the opening. Somehow the feet needed to clear the extra height of the ceramic tile. Easy enough, just raise the feet. Actually, it’s more like lowering the dishwasher.
The front feet can be adjusted up or down so that the dishwasher fits uniformly into the opening. So my lowering the feet, you create space at the top of the dishwasher underneath the cabinet. This will allow you to lift the dishwasher up and over the lip of the tile and you can easily pull it out of the opening. Simply turn the feet clockwise (like you are tightening a screw).
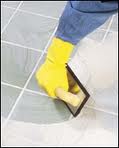 When you are done laying ceramic tile, the grout pulls everything together. You apply the grout with a grout float. I like the flexible floats rather than the rubbery firmer floats. I think the flexibility allows you to not only push the grout into the lines, but it also makes it easier to clean the excess grout from the top of the tiles.
After you mix up the grout and let it slake, mix it again and get some on the float and push it into the grout lines. There are two schools of thought on this. One is to dump an amount of grout on the tiles and move it around with the float into the voids. The other is to use a smaller amount on the float and place it more specifically into the voids. I think the first method creates a little more cleanup and so I prefer the 2nd method.
With grout on the float, pull the float diagonally across the grout lines. Fill the voids and then make a couple of diagonal passes with the float. This serves 2 purposes. First, it will give the grout line a smooth finished appearance, and second, it will help to wipe up any excess grout from the tiles.
If you have a tile that is slightly taller then the one next to it, make sure you pull the float towards the tile that is taller than the surrounding tiles. This will allow the grout to flow from the low tile to the tall tile and help hide the height difference.
 Ceramic tile can crack or break. You might drop something on a tile and chip the tile or break it. Before you replace it, you have to remove the old one.
When ceramic tile breaks, the pieces can be as sharp as glass. You must protect yourself with eye protection and gloves at a minimum.
Start by removing the grout at the perimeter of the tile. You can use a grout removing tool for this. Removing the grout will make installation of the new tile much easier and give you a little wiggle room. You may be able to lift a broken piece of tile out and tap out the rest of the tile with a hammer and chisel, putty knife, or screwdriver. Be careful as these pieces are very sharp.
Once you have the tile removed, you will have some floor mortar to remove. You can use a floor scraper, although the area will be fairly small. You can also try remove the old mortar with the hammer and chisel method or even use a grinder to get rid of it, although this will be messy. The goal here is to get down to the slab and remove the mortar so that the new tile won’t sit taller than the surrounding tiles.
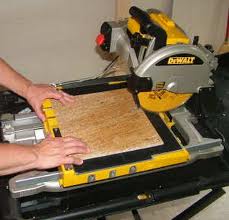 When you are laying ceramic tile, you will invariably run into a situation where you need to cut a notch out of a tile. If you are tiling a portion of a wall, you find this when you encounter an electical outlet. For this application, the cut doesn't have to be perfect as the outlet cover will hide any flaws.
To make the cut, a tile saw is the easist method. Depending on the type of saw you have, you may be able to turn the tile over and push the tile into the saw blade. If the tile is too large, you can lift the tile up into the saw blade. This will give you the outermost cuts. Now you have to remove the material in between the cuts.
High end saws have a plunge feature that will allow you to connect the 2 previous cuts by turning the tile over and cutting from behind with the plunge feature. For the rest of us that don't have a plunge feature on their tile saws, you can nibble out that materal with the saw.
You can make successive parallel cuts with the 2 cuts you have already made until you have a line of cuts. Then you can push the tile perpendicular to the blade so that the spinning blade erodes the skinny strips of tile. Just be careful and wear proper protection. What you will end up with is a notch in your ceramic tile.
 Ceramic tile gives you a lot of choices: Size of tiles finishes, colors, and designs. The backsplash can complement or contrast the countertop. The choice is yours.
Installing a backsplash is very similar to installing the tiles on the countertop, except that they are vertical instead of laying down. Butter up the back of the tiles any lay them across the back of the wall. When you are installing tile on the wall, it’s a good idea to use painters tape to hold them in place until the mortar dries. If you are doing several courses of tile up the wall, for example from the countertop to the bottom of the wall cabinets, the tape and tile spacers help to hold everything in place as one unit.
If you are tiling the entire space between the countertop and the bottom of the wall cabinets, you can grout after the mortar dries. If you are only installing one row of tile as the backsplash, try to find round over tiles for this. This is a tile with one edge that is rounded over instead of cut square. The rounded edge gives a nice finished appearance. If you can’t find a round over tile, you can use a square cut tile and add grout at an angle for the finished look.
Once the row of tiles has dried and you are ready to grout, lay a line of painters tape about ¼ inch above the top of the entire row of tiles. Make sure the lower edge of the tape is perfectly level without any rips as this dictates the finished look. Once the tape is up you can grout. Push the grout along the top edge of the tile enough just to cover the bottom edge of the tape. Now the timing begins. You want to pull the tape off the wall once the grout has had time to set, but not so long that it gets too hard and rips the tape. After about 15 minutes, peel up a corner of the tape and gently pull. It should remove the very top of the grout causing it to crumble away leaving a perfect line.
 Installing ceramic tile can be challenging. For a novice, spacing the tiles can be difficult, but of course there are tools to help with this. You can buy plastic tile spacers that cover the gambit from very small spacing to very large. The choice is yours but there are issues to note.
First off, if you are installing typical 4 ¼” square countertop or shower wall tiles, they have built-in lugs so that the spacing is pre-set. There is no guessing on this one…you just butt the tiles until the lugs touch and you have the correct spacing. But what about if you are using tiles without built-in lugs? Then you get to make choices.
Floor tiles come in lots of different sizes and it really comes down to what look you prefer. Large tiles can certainly accommodate large grout lines without looking like the spacing is too large. You wouldn’t want to install 6” floor tiles with ½” grout lines as the grout line spacing would really dominate the appearance. Plus, wider grout lines have a tendency to crack, but they also give you a little more wiggle room when laying the tile. You could choose to use large tiles with very small grout lines. This is a great look and makes the floor look more continuous instead of broken up by grout lines.
I would suggest laying out a handful of tiles on the floor and then adjusting the spacing until you find the look that you like.
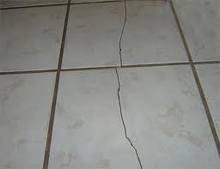
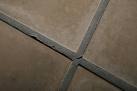 If you have a crack in your ceramic tile grout line and it bothers you enough to fix it, I hope you have some matching grout laying around. It makes life much easier. If you have to go hunt for a match, you might get lucky and find one or you may consider re-grouting the entire floor, or staining the grout to match. You also may have an underlying problem with the base that the tile is laying on.
The quick cosmetic fix is to dig out the area you want to repair. There are a variety of tools to remove grout, from motorized Dremel-type tools to hand tools that dig and gouge out the old grout. By the way, this is the worst part of the job. I like the grout grabber which looks like a screwdriver with a triangular carbide head on it. Scrape the old grout with it and it carves a groove ready to re-grout.
Mix up some grout according to the manufacturer’s instructions and let it slake for about 10 minutes. Stir it again and use a float to stuff it in the grooves. Wipe it off in a diagonal motion and again let it rest for a few minutes. Use a damp sponge (ring it out) and wipe away the excess grout. You can make the grout lines appear however you want. Some people like to leave more grout in and some people like to have the edges of the tile stand out a little. The choice is yours.
Keep wiping and dunking the sponge in clean water to remove excess grout. You will want to change water frequently. When the dampness on the floor dries, a haze will appear. Use a white cloth and buff off the haze for a beautiful finish.
For countertops with ceramic tile, you have probably noticed that the corners can get beat up. When I say beat up, I mean they get chipped, cracked, or broken right off. Replacing them is a matter of finding a good match, securing them and grouting.
The key to a good finished product is to find the right color and style of tile. These corner tiles are called “V-Cap” tiles and are rounded over so you don’t have to cut two pieces to form the 90-degree corner. You must, however, make sure the surface of the new tiles matches the old tiles. The thickness should also be the same or you may find yourself grinding off some of the counter’s sub-top or adding mortar the get the height just right.
When you are ready to secure the tiles, you can use either thin set mortar or mastic. Use a notched trowel and lay down the mortar or mastic and set the tile in it. You should feel it smoosh in to the mortar or mastic. Make sure you get the height and spacing right. Some tiles have built-in lugs to keep the spacing uniform, and others you will need to use plastic spacers.
After the tiles are set and the mortar or mastic is dry, you can mix up the grout. Use a float and push it diagonally into the grooves and wipe it off with the float. Let this sit and then use a damp sponge to clean off the rest of the grout and dress the grout lines. Finally, wait until a haze builds on the tiles and use a clean white cloth to buff the haze off of the tiles.
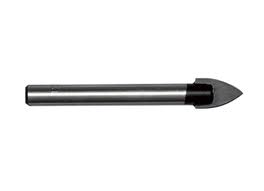 There may come a day when you need to cut a hole in ceramic tile. If you install shower doors in a tub enclosure, or want to install a shower grab bar, or even some decorative item, like a hand towel holder, you’ll need to drill a hole into the tile to mount it to the wall. Drilling through grout is a lot easier than ceramic tile.
Ceramic tile has a glaze on it that makes it difficult to get a drill bit to bite in. In some cases you can attempt to break through the glazing by tapping something hard and sharp into it, but that is risky. You could crack the tile and then your quick weekend job just got much longer. Once the glazing is penetrated, you could use a masonry bit to chew through the tile.
There is, however, an easier way. The right tool makes the job much easier. Use a glass and tile cutting bit chucked into your drill. The bit is shaped like the tip of a spear and cuts wonderfully. The tip bites into the glazing and keeps going through the tile. The sharp tip makes it so that the bit doesn’t wander all over the surface of the tile, but instead stays in place and just plows a hole.
Once the hole is drilled you can mount whatever it is you have to the surface and into the wall stud, or you can use a wall anchor.
 At one time or another, we will all want to replace our flooring. If your current flooring is ceramic tile and you want to replace it, you've got a lot of work to do. This is hard, messy work and you're going to be sore for awhile.
You could take the slow way and use a hammer and chisel, or even a 6-foot breaker bar, but for the money and speed, I would rent an electric hand jackhammer. This is the mini version of a traditional jackhammer. Before you fire it up, you need to prepare for it.
You must wear eye protection, hearing protection, breathing protection, knee pads, and gloves. This little jackhammer will spit shards of tile everywhere. Remove the furniture from the area and drape heavy drop cloths along the base of the walls.
It may make sense to start in the middle of the room and work towards the walls or start at the entryway and work your way in, it's your choice. You will find yourself breaking up tile and then using a wheelbarrow to haul it out of the house. You might also think about protecting the floor where you will be running the wheelbarrow as it will tend to leave a track of dirt from it's tire.
The trick is to try to lift the tile with the blade of the jackhammer. So you will want to keep the jackhammer at a low angle and attack the edge of the tile in hopes that the blade separates it from the sub-floor it is attached to. Otherwise it will shatter the tile and you just have more pieces to sweep up.
Realize that the jackhammer won't remove every piece of mortar from the floor. For this you can use a floor scraper. This is a large steel blade attached to a long wood handle. Once you've got everything cleaned up, you can start thinking of installing your new floor.