 Installing an attic ladder can be intimidating. From where to locate the door (where to cut the hole), to manhandling the door unit…it’s not a relaxing job. People think this has to be a two person job, but it isn’t so long as you are smart about it.
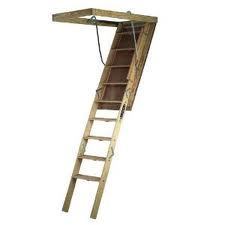
The key to making it a one-person job is to use a ledger board to support the door unit. You can cut the hole and push the unit into the attic through the hole. The tricky part is installing the door securely and then being able to climb out of the attic. You will typically cut a hole 54”x22.5”. You will frame a box at the short ends with the same dimensional lumber that is at the joists. At the short sides of the rectangle you will screw a ledger board (use a 1”x4”) so that only ¾” of it extends into the opening. You will do this from below to create a lip that the unit rests upon as it is installed. If you extend more of the boards into the opening, then the door won’t be able to open from above and you will make this a two-person job because someone will have to remove the ledger boards from below.
Once you have the ledger boards in place, set the attic ladder unit onto them. These will be the only things supporting the ladder until you secure it into the framing. There are recommended locations on the ladder to drive nails or screws into the ladder and the surrounding framing. Once it is secured, you should be able to push the ladder open and climb down.
 You don’t need to be a handyman to see that some plants in your landscaping may be dying. I was walking up to a customer’s house and noticed that a large plant was turning yellowish brown. It obviously had been healthy at some point because it was large and robust like the other plants surrounding it. Turning on the water told the story.
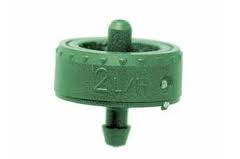
The plant was dry and digging around the base I found two drip emitters that were not emitting water. By the way, it is a great idea to install more than one emitter per plant just in the event one of them fails. At least the other emitter will keep the plant alive. I guess it was just bad luck that both emitters were not working here.
In this case you can either clean the emitters up and test that they are working properly, or just replace them with new ones. They are held in place by barb fittings (there is no glue used here), and they just pull off of the tube and push back on. If you want to take apart the drip emitters, the flag emitters are really not made to be taken apart, but the button drippers can be unscrewed and cleaned up.
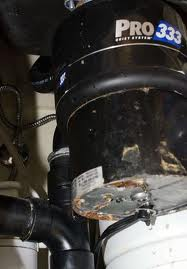 If your garbage disposal is leaking, the question of whether it needs to be replaced depends on where it is leaking. You will need to turn on the water and look under the sink. The leak will usually be coming from one of several places.
The Collar
If the leak is coming from the collar area, the fix may be as easy as tightening the collar where the disposal meets the underside of the sink. There are screws that pull the sink flange down to squeeze out the plumbers putty and prevent leaks. There is a mounting ring that you twist to lock on the disposal. Check this area.
The Drain
The drain areas are a common leak area as well. There are two outlets at the side of the disposal. The larger bottom outlet is the drain connection that the drain piping attaches to and runs to the wall piping. The smaller inlet on top of it is for the dishwasher air gap to connect to. This is held on with a hose clamp. If you have a leak here, either tighten the clamp, or you may have a tear in the hose.
The Housing
Finally, if you have water dripping from the bottom of the unit and there are no obvious signs from a connection, you likely need a new disposal.
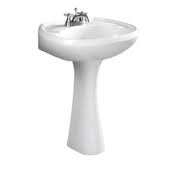 Removing a pedestal sink is normally pretty easy…unless someone has used construction adhesive or adhesive caulking to make sure it doesn’t move. Then it becomes challenging. This is one of those cases where you hope for the best, but expect the worst.
A pedestal sink sits on a base. Under the sink you will see a couple of holes that allow the installer to secure fasteners into the wall. In most cases, the sink is held to the wall at these locations and then caulked around the perimeter.
When someone has used adhesive, the sink is very difficult to remove without damaging the drywall. So expect it. You can try using a long blade to cut through the adhesive around the perimeter. What you will find is that the adhesive will be extremely hard and difficult to cut through. If you are lucky enough to be able to cut through it, cut the bottom of the sink first and then cut through the top as you support the weight of the sink. You want to avoid having the sink pull the paper from the drywall and peel away the texture. Even if you are able to cut through the adhesive, you will have a hard bead of adhesive still stuck to the wall. You can use a sharp putty knife to remove most of it from the wall, but you will be faced with either repairing the drywall or using a larger sink to cover the damage.
In some cases, I have hit the sink to break it apart…I don’t recommend it, but as a last resort you may be faced with it. Regardless of how the sink comes off of the wall, be prepared for some drywall repair.
 As a handyman, I have hung hundreds of very heavy items on walls. Sometimes I’ll use fasteners you would get at the store, and other times I use a French cleat. The French cleat is actually very simple. You can use whatever dimension of lumber is appropriate for the piece you are hanging, but you cut it at an angle along its cross-section. A table saw is perfect for this as you can tilt the blade and cut the angle.
You can cut the angle at 45-degrees on the table saw, and what you will be left with is a 45-degree cut on both pieces of wood. You can cut the length of the cleat first and then cut it on the table saw to make it more manageable.
You can hang a variety of things this way, from cabinets to shelves to fireplace mantles. You can use lag bolts into the wall studs for heavier items. The thing to remember is that with the cleat that is mounted to the wall, the lowest end of the cut gets mounted to the wall, and the highest end of the cut is furthest from the wall. This produces downward angle that supports the weight. The opposite is true for the object you are hanging. When you set the object on the wall, the top cleat rests on the cleat affixed to the wall and the angles of the mating cleats support the weight.
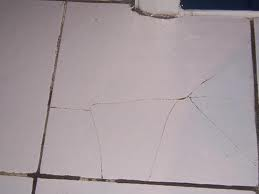 It is common that you will have a ceramic tile with a crack in it, in a sea of perfectly unbroken tiles. If you are lucky you will have a replacement laying around you can remove the old tile and reinstall the new one. The trick is to get the old tile out without damaging the surrounding tiles.
Use a grout removing tool to remove the grout around the entire perimeter of the tile. There are a myriad of tools designed for this job, which include grout saws, carbide tipped tools, and a grout removing bit that works in a Dremel tool. Grout comes out quickly, just get down to the subfloor.
Now it’s time to remove the tile. As the tile is cracked, it may be loose enough to tap it out. You can use a chisel and a hammer and try to lift an edge of the tile. Be careful not to hit the surrounding tiles or they may break as well. You can also hit the tile with a hammer. Obviously, protect yourself with gloves, long sleeves, and protective glasses. The tile may shatter or you may dig a small hole with the business end of the hammer. In this case, use the hammer and chisel to remove the rest of the tile by leaning the chisel at approximately 45-degrees and striking the chisel until the tile pops out. Once the tile has been removed, clean up the old mortar by scraping the floor with a stiff blade. Then you can install the new tile.
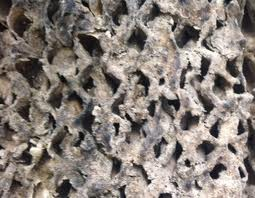 If your swamp cooler is looking like it is being taken over by mineral deposits, well…that’s because it probably is. Swamp coolers aren’t something you can just plug in and forget about until the winter. Rather, you will need to do some periodic maintenance.
Hard water certainly isn’t pleasant for swamp coolers. In fact, I know plenty of people who pipe soft water into their cooler. Really though, the cooler works off of evaporation, and what is left in the cooler is lots of salts. You can do several things to keep the environment inside the cooler operating as well as possible.
Most pumps have a bleed function that purges old water from the reservoir and pumps it out of the drain tube to the exterior of the unit. This will keep fresh water entering the unit at a low volume while getting rid of old water high in salts. You can run the tube outside, maybe to a garden, or somewhere you won’t just be wasting the water.
You can also buy water conditioning products which will help to keep the scale low. Most are blocks that you just set in the reservoir and it will slowly erode away.
If your pump does not have a bleed-off function, you can just periodically (every few days) empty the reservoir and refill it.
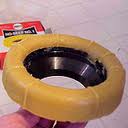 Underneath your toilet is a wax ring that compresses to keep the waste from leaking out. The wax compresses against the underside of the toilet and the flange that the toilet bolts to. I get homeowners that ask “how often should I replace the wax ring?”
It’s not a difficult job, but if you’ve never done it before, you might want to get some light instruction first. My answer is you shouldn’t replace the wax ring unless you are removing or replacing the toilet or if you have a leak or suspect a leak from the toilet area.
The wax shouldn’t degrade and should therefore keep a tight seal. The thing to watch out for is movement where the bowl meets the floor. If you get any movement of the bowl, the seal is breached and you can get leaking when you flush the toilet. Sometimes the toilet bolts will corrode and lose their ability to hold the toilet to the floor and the toilet can move. Also if the toilet holes weren’t directly over the flange holes, the bolts may be at a slight angle, which can allow some movement. Unless you see a leak issue at the toilet, I wouldn’t replace the wax ring.
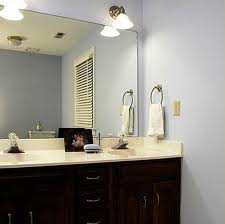 This is a handyman tip that works well with large wall mirrors. These mirrors generally span a good sized area, like over two sinks and sits in a channel at the bottom. It is common that if the mirror will get loose, it will likely happen at one of the top corners.
Mirror mastic is applied to the back of the mirror and then pushed against the wall, but this gets difficult if the mirror is already against the wall. You can probably take your finger and pull the mirror out from the wall only a fraction of an inch. So you can adapt a tube of mastic to fit your needs. You can buy a tube of mastic that fits in a caulking gun and snip the tip off. The tip is far too stiff to work into the small area behind the mirror. Buy some small lengths of hose (doesn’t matter what kind just so long as they are flexible) to put over the end of the tip of the tube. I’ve seen people use duct tape to hold on a flexible tube. It’s not pretty, but the goal here is to get the mastic out of the tube and into the small area between the mirror and the wall. You can buy several small lengths of hoses with different diameters so that the outside diameter of the small hose fits the inside diameter of the larger hose. In this way, one pushes into the other and can be held together with small hose clamps or even duct tape.
Squeeze the mastic out of the tube and into the hoses and point the flexible contraption where you want the mastic to go. When you’ve got a good glob of it back there, you can screw in a couple of mirror clips and be done with it.
 A kitchen faucet gets a lot of use and over time it may get difficult to swivel from side-to-side. This may also be accompanied by a leak at the base of the spout. You can remedy both of these problems at the same time.
You will need to remove the handle from the faucet. It may be held in place with a setscrew or you may have to remove a cap on top of the faucet to access a small screw underneath it.
With the handle off, you can grab the spout with one hand on the spout and the other hand where it encircles the faucet body. Lift up as you move the spout slightly back-and-forth.
Clean up this area with paper towels and cleaner. Also clean the inside of the spout’s housing (the part that sits over the faucet body). You will also want to replace the o-rings at the top and bottom of the faucet body. You can pry them off with a sharp blade. You want to get new o-rings and plumbing grease.
Replace the o-rings carefully making sure they don’t twist as you install them. Use the plumbing grease to lubricate them as you install them. You can also use a thin film on the surrounding area.
Gently reinstall the spout and handle and the spout should freely swivel from side-to-side.