 Installing a drain pan underneath your water heater is a good idea. You typically don’t just decide to install one, rather when your water heater gets replaced, it’s a good idea to add a pan if you don’t already have one.
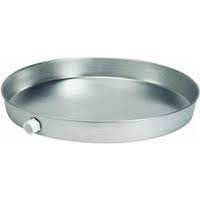
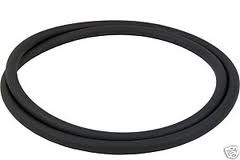
The water heater pan has a hole in the side wall so that you can run a drain line from the pan. It does no good to install a pan and not run a drain line from it. It simply postpones the eventual leak by about 2 minutes.
When you buy the pan, the drain fitting for the sidewall should be included. This is a threaded fitting with a washer on the inside of the pan and is secured by a fitting on the outside of the pan. From there the drain is run.
Typically, the drain is run to the floor and it is gravity-fed. On the bottom of the drain line you can install an elbow to direct the water away from the water heater stand.
When the water heater leaks, it will drip into the pan. When the water in the pan rises high enough to enter the drain fitting, it will finally run down the drain line and out. Naturally, if you see water in the pan or on the floor, you have a problem.
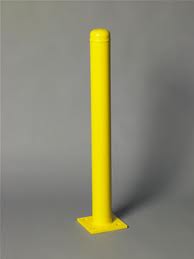 For many people who have their water heater in the garage, you likely have a bollard protecting it from your car. A bollard is a steel pole attached to the slab and its job is to sacrifice itself to protect the water heater.
There are times when the bollard will get bumped with the car. It usually won’t get damaged because it is filled with concrete. It will however get scraped up and for that you can just paint the pole. If you want to get fancy, you can install a bollard cover to dress it up.
Bollard covers are basically plastic sleeves that fit over the pole. They come in a variety of colors and can have a rounded or square top. You can also buy them with an architectural styling, which would include ridges and textures other than just a flat surface.
These install fairly quickly. The surface should be clean and free of dirt and oils. They come with adhesive strips that you wrap around the pole in several different locations. There is a lip and the strip that is angled downward. This allows you to push the bollard cover over the bollard, but it makes it difficult to remove.
 Cabinets these days are built fast and cheap. If you are lucky, solid wood will be used for the door frames, but he cabinet body will be a particle board material or other relatively inexpensive material. The backs of the cabinet will be ultra-thin, so thin that if you tried to install a screw through it, it would probably tear and the cabinet would fall. For this reason, cabinet manufacturers put a thicker piece of wood at the top and bottom rear of the cabinet. This is so you can screw them to the wall and they will stay.
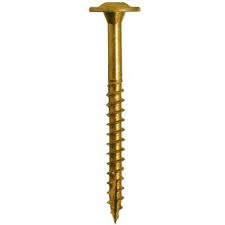
Use cabinet screws to hold them in place. These have a larger head for more bearing pressure. If you are installing a row of wall cabinets, it's easy to get them aligned if you first screw a 2"x4" to the wall where the bottom of the cabinets will sit. This way, you can sit the cabinet on the board and screw it to the wall. They will all be neatly aligned. Once the cabinets are on the wall, you can install a screw through the frames to hold them all as one unit. You will need to pre-drill the holes and then screw the frames together.
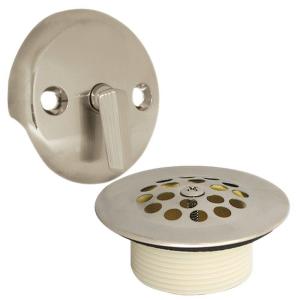 You may be looking to replace a bathtub drain flange because it is unsightly, or maybe it is leaking. You may get lucky and the drain flange may unscrew easily. In many cases though, it isn't that easy.
You can try using a strainer wrench. This is a great tool when the inside supports are still in place. This allows the wrench something to hold on to while unscrewing the flange. In some cases the flange is just corroded and won't budge.
You can use a hacksaw and cut 2 slots in opposing sides of the flange. You may want to hold 2 hacksaw blades together to cut the slots thicker. Use a chisel and hold it at an angle so that when you hit the chisel it will cause the flange to move in a counter-clockwise direction. Use a hammer and tap the chisel to move the flange. You might try alternating the chisel from one slot to the next to get the flange to move. Once it starts to budge, you can use a couple of screwdrivers and place them in the slots to unscrew the flange. It's one of those things that you use whatever is at hand to get the job done.
Once the old flange is out, clean up the threads and install a new one.
 A handyman doesn’t often work on pool equipment, but when you do, you don’t want to get any air into the system. Assuming the equipment is in good shape, you need to pay attention to the o-rings. You will find them where two parts (halves) of the equipment meet. You will see them where the top and bottom of the filter meet, and where the top of the pot joins the bottom. You probably won’t be getting into the valves, but if you do, there will be one there as well.
When you have the equipment apart, the o-ring will sit in a groove. Use a cloth or towel and clean out the groove where the two halves meet. It will be somewhat greasy which will attract and hold small amounts of debris. Clean out this debris as this can allow air into the system.
Use a product specifically designed for pool o-rings and gaskets. You can buy a tube at any pool store. Squirt some product in the palm of your hand and place the gasket or o-ring in your hand. Use your other hand to pull the o-ring through the palm of your hand. You want to squeeze your lubricated hand around the o-ring as it passes. This will lubricate the o-ring as it passes through your hand and clean the debris off of it as well.
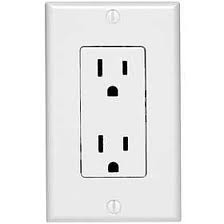 Replacing electric switches and outlets can really update the look of a home.
I see people spending money on improving their home, but they often miss the small details. One of our customers spent several thousand dollars on a custom-paint job with multiple colors and sheens. The paint scheme was beautiful, but then they put the same drab ivory-colored 20-year old light switches and covers back on the wall. The duty is in the detail.
Replacing the switches with rocker-style switches is easy and will make a dramatic change. In addition to the switches and cover plates, you must also replace the outlets to match. They come in various colors to blend in or contrast with your wall.
When you go to the home center, you will be inundated with choices, but the style will come down to either a standard outlet or a decorative outlet, also known as a decora. The decora outlet is rectangular and has a flat face, whereas the standard outlet has two octagonal faces.
Replacing the switches and outlet is really a wire-for-wire exchange. Make sure you turn off the power at the main panel before you start work and then unscrew the cover plate.
For most switches, you will have only two wires attached to the screws. You will also have three-way or four-way switches that will operate a single light fixture. These will be found in hallways or in larger rooms. These can be tricky, so make sure you draw a diagram or mark the wires with tape so that you replace the wires in the correct positions on the rocker switch.
You can take the switch with you to buy a replacement with the same configuration.
Replacing the outlets is just as easy. Some outlets will have only one cable entering the box and some will have two. It’s the same deal: replace with wires in the same location on the new outlet as you found them on the old. The black hot wires are secured to the brass screw terminal, the white neutral wires connect to the silver screw terminal, and the green or bare wires connect to the ground screw terminal.
You will likely run into an outlet that is upside down. This is a “half-hot” and unique to other outlets. It is the same type of outlet, but the top of the outlet will be controlled by a wall switch, while the bottom will be hot all the time.
Take note of how the wires run and you will notice that there is a breakaway tab on the back of the outlet. This tab (all outlets have this tab) extends power from the top plug to the bottom (and vice versa). On a half-hot outlet, this tab is removed between the top and bottom plugs so that each half operates independently of the other. You can just grab the tab with pliers and twist it out.
Once everything is back in place with cover plates on, turn the power back on and enjoy your updated look.
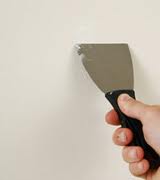 We get called to do plenty of drywall repair jobs. A common occurrence is when someone will be moving furniture (or something heavy) and it will gouge the wall. It typically digs into the drywall and removes the paint and texture as well. Fixing it is pretty simple, if you have the right paint match.
Fill the gouge will drywall mud and get it level with the surface. This step doesn’t have to be perfect as you may have to add some more anyway. Let this dry. Some people use sandpaper to level it, but I like a damp sponge. Get the sponge wet, wring it out, and wipe away the excess drywall using a swirling motion. This will also clean out the mud from the textured area surrounding the gouge. This will help the repair blend in by minimizing the repair area.
When the area is dry, spray some texture on it and make sure the splatter size is consistent with the surrounding texture. If the height of the new texture is somewhat taller than the surrounding texture, use a sanding block and take one swipe of it using a fine grit sandpaper. When the texture looks right, you can paint the patch and be done with it.
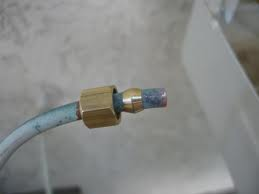 For a swamp cooler to cool the air, it needs water. You can run water from a hose faucet (hose bib) to the cooler very easily. You can run either a copper water supply line or plastic and all the parts are readily available during the warm months.
You will need to buy a hose faucet with a swamp cooler adapter built into it. This is simply a threaded hole in the side of it so you can screw in a valve. So all that is left to do is to connect the water line from the hose bib to the swamp cooler.
Lay out the supply line (either copper or plastic) and connect one side to the hose bib valve. You will place the nut on first, and then a ferrule. Push those back enough so that you can insert a sleeve into the end of the line. Mate the insert up to the male end of the valve, push the ferrule up and tighten the nut. This will keep everything leak-free. If you do happen to see a drip, give the nut a quarter turn. Make the same connection at the swamp cooler. Turn the water on and you will hear the reservoir of the swamp cooler start to fill.
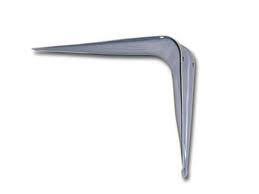 Some shelving is built on site by a handyman, and some is purchased at a store and brought home for assembly. The store bought shelves are certainly faster, but typically don’t support as much weight as the site-built shelves. The biggest challenge is supporting the weight, and that falls to the brackets.
You really have to consider how much weight you are placing on the shelving, as well as how large the shelving will be. If you are building wood shelves, use plywood rather than particle board. Particle board will sag. For the supports, some people use metal “L” brackets which are fine so long as they are not overloaded. If you use metal, make sure the top leg extends to the edge of the shelf. In other words, don’t use a 4 inch bracket for a 12 inch shelf; use a bracket that will support both the shelf and its weight.
Other folks use wood supports. You can make your own in the shape of a triangle with the hypotenuse at a 45-degree angle. This would span from the front edge of the shelf to the wall at that angle. You can also screw a 2”x4” to the wall and use it as a ledger. The rear of the shelf would sit on this ledge but the front would need to be supported with a piece of wood at a 45-degree angle.
 If you have had your handyman work on your shower valve, chances are he had to enlarge the working space somewhat. In the process, the area can get damaged. This is the area right behind the shower handles and if you have tile walls, these can chip or crack. At that point you will be faced with either replacing the damaged tiles, or you may be able to cover them up. A decorative cover, which is also known as a beauty bar, can cover up this area. It basically functions as a large escutcheon plate. You can buy them in whatever finish your handles are in so that they match.
To install it, you will need to remove the handles. The cover will have the holes drilled into it and you can simply push the cover over the stems sticking out of the wall. You can apply some caulking on the back to hold it in place until you get everything situated. On older faucets, you can remove the decorative stem covers, install the beauty bar, reinstall the stem covers and finally reinstall the handles. When everything is back in place, run a bead of caulking around the perimeter of the beauty bar to keep the water out.