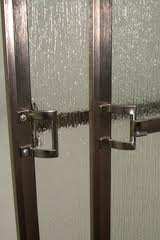
 Shower door handles can receive a lot of abuse. Not only do they get pulled and pushed, but they also have to survive in wet, humid conditions. Occasionally they become loose or break.
Whether your door handle is on a swinging or sliding door, they will be held to the door frame by screws on the frame of the shower door or the glass itself if frameless. In most cases, the handle will become loose and you can simply tighten it with a screwdriver.
Door handles on a swinging door are small and typically have 2 screws holding it on, while sliding shower doors have a longer handle that spans the width of the door. There will be a handle on each door, with the outside handle doubling as a towel bar.
Handles don't usually break, but rather just need to be tightened when you first notice them becoming loose. In many cases, once the handle becomes neglected, the screws will corrode and break rather than the handle breaking. So you can replace the screw and be done with it.
If the handle does actually break, you will likely need to order a new one from a plumbing supplier. Big box stores don't usually carry them because they don't usually break. Bring in the broken handle and order the right one, and then it is a simple matter of just screwing it in.
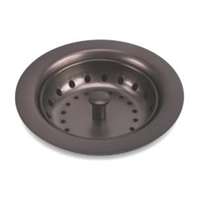 If you have a kitchen sink strainer that moves, you will need to tighten it from underneath the kitchen sink. This isn't a difficult job, but you may need to remove it first. Plus, the strainer will tend to spin as you tighten the nut underneath it.
I would try to just tighten it from below first, and then run some water to see if it leaks. To stop the strainer from spinning, take a pair of pliers and turn them so that the handles of the pliers will fit down into the holes of the strainer. Then you can place a screwdriver or pipe in the jaws of the pliers to hold it still. This will allow you to hold onto the pliers from above the sink as you tighten the nut from below.
If after running water you find a leak, I would remove the strainer completely and reinstall some plumbers putty under the lip of the strainer then reinstall it. A lot of times if a strainer becomes loose, it will lose the seal created by the putty. So you may have to install new putty and retighten.
Scoop out some plumbers putty and roll it between your hands until the "snake" is about the diameter of a pencil. Push this under the lip of the strainer and retighten. You should see the putty squeeze out from under the entire lip of the strainer as you tighten.
 How are you supposed to know when a shower cartridge is broken? When the shower’s water flow doesn’t operate like you want it to.
A shower cartridge sits in the valve behind the wall. Think of it as the maestro during an orchestra. It controls the flow of both hot and cold to give you the temperature you are looking for.
Many people think that if the hot and cold water is reversed in the shower, that either the plumbing is backwards or that the cartridge is bad. It usually is the result of the cartridge either being installed incorrectly, or that the stem just needs to be rotated 180-degrees.
So to answer the question more specifically, the cartridge is broken if you turn the water off and it continues to run or drip. That is a broad brush stroke, so let me say this: your cartridge may also be considered broken if when you turn it to “hot” and the water pressure slows down to a drip. That is very common with a Moen Positemp cartridge. You can replace the cartridge or just clean it up. You can pull it apart and clean out all the deposits in it. Generally, if you can shake the positemp cartridge and it rattles, you are good to reinstall it.
If you are in the middle of replacing your water heater, take a close look at other plumbing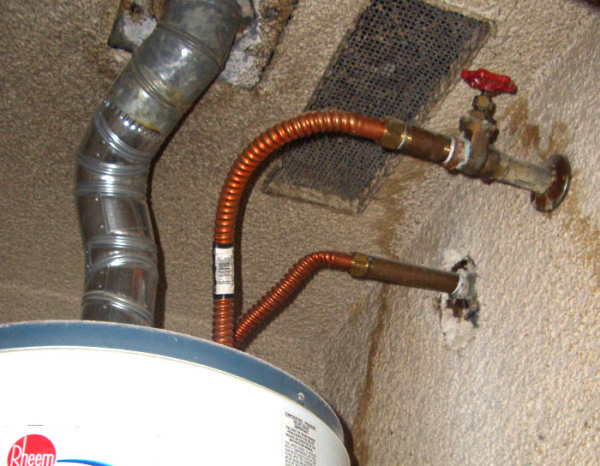 connections connecting to the appliance. In many cases as you are attempting to shut off the water at the supply valve near the top of the tank, it may not shut off at all. Particularly if the valve is a gate valve, the shaft will corrode and shear off leaving you unable to turn the control the flow of water.
The supply valve connects to a flex line that finally connects to the water heater. If I see a gate valve, I don’t touch it. Instead I will turn the water off to the entire house before starting work on the water heater. While you are replacing the heater, it is a perfect time to replace the water supply valve. If you have a ball valve there (it has a lever rather than a round knob), you can be confident it will work and you shouldn’t be fearful that it will break.
Also pay attention to the areas where the valves connect to the flex lines. You may see some corrosion at these points, and if you are uncomfortable, you can replace them. I generally won’t replace them unless I see some significant problems, but at the least you can replace the rubber washers in the ends where they connect to the water heater’s nipples.
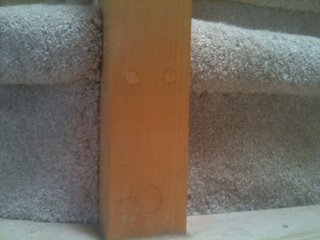 Installing a newel post can be a challenging carpentry job. A newel post is main support of a handrail for stairs or a landing. They have to be anchored at the bottom where they attach to the stair or wall (or other structural support).
You can use a countersinking bit to bore out the holes in the base of the post for the lag bolts. You will need a drilled through the base of the post for the shank, and a larger hole big enough that he lag bolt’s head will fit into. The head will stop at the depth the larger diameter stops. You will thread the lag bolt through the appropriate washer. You should have at least two lag bolts installed through the base, one high and one low. This will prevent movement as these posts can be under considerable force. You can see in the picture there are three lag bolts installed in the post’s base.
To cover up the holes, you can use plugs. You can buy generic plugs or you can buy a plug cutting bit and cut your own. If you cut your own plugs, try to orient the grain so that it matches with the surrounding wood so that the plugs virtually disappear.
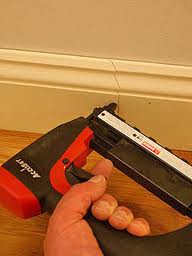 Installing long runs of baseboard saves time. You can buy lengths of baseboard 20 feet long, and you will fewer cuts. However, there is the problem of getting them to your house…either you have to have them delivered or you have to cut them just to get them into a manageable length.
On long walls, the chances are good that you will need two pieces of baseboard to span the distance. You certainly want the area where these pieces meet to be as inconspicuous as possible. If you use a butt joint, you will see it. A butt joint is when you cut two pieces square and just butt them together. You will see a vertical line in the baseboard.
Instead of a butt joint, you can miter the mating ends at a 45-degree angle and lay one piece over the other. It is called a scarf joint and it isn’t a perfect joint, but it isn’t as noticeable as a butt joint. You will cut the pieces on the miter saw at the same angle so that the finished piece basically lays over the raw end of the baseboard. You can use a nail gun and, while pushing the joint closes, nail at an angle to close the joint and hold it in place. It is a good idea to hit a few nails into the surrounding baseboard to prevent any movement.
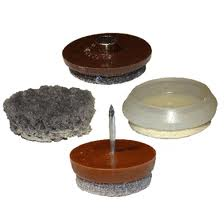 Here is an easy handyman tip to prevent scratches caused by furniture on your beautiful wood floor. Furniture has a way of moving around somewhat, especially if it gets bumped around. Things like a desk or a dresser that has drawers will move slightly when you open and close them. Hard surface floors like wood or laminate are smooth, and depending on how much force is exerted in the opening and closing action, you may get scratches on the floor
You can prevent this by padding the feet of the furniture. You can buy small padded rests for the desk or piece of furniture. Depending on what type of wood the furniture is made of, it may be easy or tough to get the feet in. Most of these will have a spike coming from the center that enters the leg or base of the furniture. I wouldn’t tip the furniture over to install these, rather enlist some help from someone to lift one side of the furniture so you can tap the foot into place. Most furniture is made of particle board and so you can probably get the point of the spike into the piece and let the weight of the furniture sink it in. These feet are small and shouldn’t be very noticeable.
If the leg of the furniture is solid wood, I wouldn’t chance hitting the entire length of the spike into it, for fear it may split the wood. Instead, you can grind the spike down to a length where it just enters the wood and holds.
 It isn’t a common handyman job, but gas lamps occasionally need servicing. Just like in a camping lantern, the mantles will eventually get jostled around to the point that they get damaged and need replacing. Vibrations and bumps can cause the mantels to break as they are very fragile.
On permanent gas lamps, there will be a gas line run underground that supplies the fixture. Somewhere on the post will be the valve that stops the flow of gas to the fixture (typically inside the post behind a door that removes). You will need to turn off the gas valve to stop the flow of gas to the head.
Let the fixture cool down and then remove the glass pieces (now is a good time to clean them). You can remove the mantels by slightly turning the ring and pulling it down (fixtures can have either one or two mantles). Install the new mantles in the reverse order of removing them.
You can replace all the pieces of glass except one which you will leave open for access to the mantles. With the gas still off, light the mantles and let them burn until they turn to ash. They will be very fragile at this point. Wait a few minutes and then turn the gas on. Hold a match to the mantles and they will ignite and glow. They will also fill to their normal shape. Replace the last piece of glass back into the head and you are done.
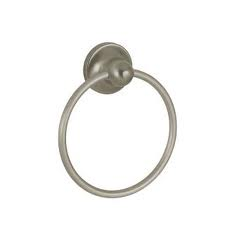 Installing a towel ring is a handyman job that is almost identical to installing a towel bar. Obviously the big difference is that there is only one mounting point rather than two.
If you can install the towel ring directly into a wall stud, you will have great holding power. However, it is usually my luck that there isn’t a stud where I need one, so that leaves me with installing the ring into the drywall.
You can use a toggle bolt or an EZ Toggle to secure the bracket to the wall. If the bracket that comes with the ring has several holes in it that would allow you to use 2 toggle bolts, then use two of them. You can use 2 small toggle bolts and that will minimize movement of the ring. The towel ring will have to support the weight of the towel, as well as pulling action by people using the towel.
Hold the bracket to the wall and make some marks where you need the holes drilled. If you are using an EZ toggle, they have a point that will bore into the drywall by itself. If you are using toggles, you will have to pre-drill the hole for them.
If you are using the EZ toggle, once you have screwed it into the wall, place the screw throught the bracket and tighten it into the piece in the wall.
For regular toggle bolts, thread the screw through the bracket and twist on the toggle on the end. Squeeze the toggle closed and push it through the hole until you hear it snap open. As you tighten it, pull the screw head away from the wall and it will draw the bracket to the wall. Then just place the towel ring onto the bracket and tighten the set screw.
 Make no mistake, this handyman job is hard work. The end result will be an attractive functional area. Whether you are going to do a patio or a walkway, the process is the same.
Use washed sand and build a base of several inches. Level the sand with a screed and then you can start setting the pavers. Planning plays a big role here. If you are using pavers that are uniform in size, it is easier that if you are using various sized stone pavers. You will need to use some type of edging to hold everything together if the space is not confined to a specific area.
Set the pavers into the sand with a slight twisting motion. You can have uniform spaces in between each paver or different spacing if the pavers are different sizes. You can run a vibrating tamper over the pavers to seat them and remove any small voids.
Once the pavers are set you can fill in the areas between the pavers with washed sand. There’s nothing scientific here…just dump some sand on the pavers and use a push broom and push it around filling in the spaces. You can run the tamper over the area again and sprinkle some water over it to remove any small spaces and to get the sand to compact better. You can do this a few times.
This will turn into a maintenance project every so often as well. Especially if you have children…they love to dig into the sand.