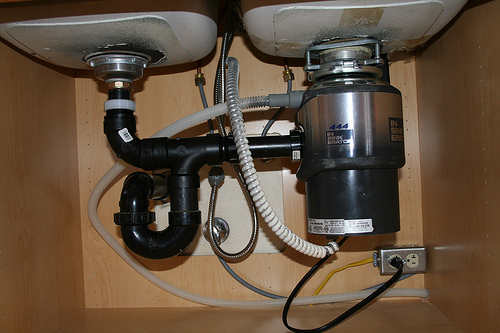
 Troubleshooting a plumbing leak requires some patience. The key is to isolate the problem. In the case of a dishwasher leaking under the cabinet, clear out the cabinet and make sure there isn’t an active leak and then start the dishwasher.
There are plenty of possibilities here, from the water supply to the draining of the dishwasher. Grab a flashlight and watch…and wait. If it is leaking under the sink cabinet, it really is isolated to either the water supply to the DW, or the draining action of the DW. If the dishwasher itself were leaking, you would notice water coming from under the unit itself, rather than in the sink cabinet.
Start at the wall valve and look for leaks. Follow the water supply line from the valve to where it exits the cabinet. No leaks? Then wait for the drain cycle. When the dishwasher drains, it sends water up the drain hose to the air gap (on top of your sink) and down to the inlet of the garbage disposal. Watch for leaks. It will likely be coming from either the air gap or the disposal. If you have a damaged hose, replace it and re-secure the hose clamps. You may have water coming from the air gap on top of the sink and some of it finds its way into the cabinet. If that is the case, clean out the hose from the air gap to the disposal so that the blockage doesn’t force water out of the air gap. You might also find that the disposal itself is leaking (it should also leak when you run water down that side of the sink from the faucet). If that happens, you need a new disposal. The leak could be from something not discussed here.
 We had a service call from a customer who was upset with another plumber because he charged lots of money and didn’t fix the problem. The original situation was that if someone turned on a faucet when the customer was showering, the water would just trickle out of the shower head. The other plumber replaced lots of valves and parts and charged them plenty of money…and still didn’t fix the problem. He failed to check the most basic of items, as the problem was not one of water pressure, but water volume. We checked the most basic starting point (the main shut-off valve) and found it to be only partially open. After opening it fully, we solved the problem.
You may have a similar issue, but if you are noticing it only in the bathroom, you might check the fixtures and diagnose them one by one.
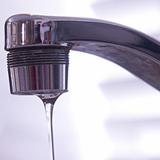
A faucet with low water flow can usually be attributed to a clogged aerator or a partially closed shut-off valve. Use a pair of pliers and unscrew the aerator (wrap the aerator with a rag so you don’t scratch it). The aerator is simply the screen at the end of the faucet with introduces air into the stream of water. Over time, this screen will get clogged with sediment and reduce the flow of water. You can replace it for under $5.00 or just clean it out.
If the problem is not with the aerator, go under the sink and turn the shut-off valves counter-clockwise to make sure they are wide open. If they are and the water flow is still poor, turn off the valves and disconnect the water supply lines from the faucet. Point the lines into a bucket and turn the water back on to see if there is a good flow of water into the bucket.
If the flow of water is poor, replace one or both of the valves. If the water flow is strong, I would replace the cartridge in the faucet or the faucet itself.
For the bathtub/shower, the problem will be with the valve in the wall. I get several calls per week saying that there is no hot water coming out of the shower. Usually, the problem involves a single handle that controls both the hot and cold water. Replacing the cartridge inside this valve will solve the problem. This part will cost under $50 and will take under an hour to replace. If you have separate handles for the hot and cold valves, you can replace one or both of those depending on how poor the flow is in each valve.
If you are seeing poor water flow throughout you house and you have a water softener or a whole-house water filter, you should investigate them. People often neglect replacing the filters in their system and they get clogged up. For the softener, if you remove an aerator and you find a small, bead-like material plugging up your fixtures, it may be that the softener tank ruptured and sent resin beads flowing down to your fixtures. This will require disassembling the affected fixtures and removing the beads.
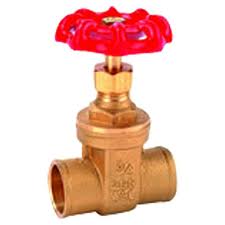 As far as plumbing valves go, I really dislike gate valves. They are very common however, because they are a few dollars less than a superior ball valve. Gate valves have a round handle that, as you turn it, lifts or lowers a gate that either stops the flow of water, or allows it to flow, depending upon which way you turn the handle.
The problem is that the handle will shear away from the gate which makes the valve useless. The gate may stay in the up position (allowing water to flow), or it may drop down and stop the flow of water (big problem if you need water). The answer is to replace the gate valve with a ball valve. However, you can restore the flow of water without replacing the valve.
Use opposing wrenches and remove the top of the valve. You should hold the bottom half of the valve still with one wrench, while applying the other wrench to the top half of the valve. Unscrew the top of the valve and remove it. Reach down inside the valve body and remove the broken gate (it will look like a piece of rounded metal sitting in a groove). You can screw the top back on to the valve and turn the water back on. This will allow you to have running water, but you won’t be able to shut it off from this valve. The best choice is to replace the gate valve with a ball valve.
 To remove a soldered plumbing fitting, you need heat. That isn't to say you can't cut the fitting out with a pipe cutting tool...that will work, but you won't be able to just replace the fitting. Rather, you will have to re-work the area to compensate for the parts you removed.
When you unsweat a fitting, you should be able to replace that fitting with an identical one.
You will need to drain the copper piping so that the pipes and fittings can get hot enough so that the solder turns molten and the piping can be pulled apart.
Fire up the torch and apply the tip of the blue cone to the fitting. Move the tip back and forth to distribute the heat. You will probably have to do this to each side of the fitting, heating it up and then pulling one side out at a time.
Be very careful as the fitting and piping will be extremely hot. Use large channel locks or water pump pliers and touch the fitting/piping quickly. Heat travels up metal tools quickly and you will learn fast if you leave the tool on the hot fitting for too long. So grab, pull, and let go quickly. If the fitting won't come apart, keep the heat on until the solder turns to liquid. The other possibility is that there is still some water left in the pipe. You may see steam coming from the pipe if this is the case.
 Plumbing water to an icemaker is very straightforward. It’s hard to say what situation you will be dealing with. You may already have a valve behind the refrigerator, or you may have a copper line stubbed off.
The refrigerator/freezer will usually come with an installation kit which will include a water line and sometimes a filter. The issue though is getting the water from the wall to the icemaker.
If you have a copper line coming from the wall, you can use a plumbing valve with a compression fitting on either side of it. You will need to remove the cap on the copper line and slide the nut from the valve over it. Then slide the ferrule onto the end of the copper line. Push the copper line into the valve and tighten the nut over the ferrule so that the ferrule compresses between the two. Repeat the same procedure on the other side of the valve connecting the water supply up to the icemaker. Tighten all fittings snugly and then turn on the water.
If you are using a filter, run a couple of gallons through the filter to wash out any debris before you connect it to the icemaker. This is easy if you are able to get water from the door, but if not, point the line into a bucket and flush it out.
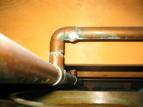 Copper plumbing is great to work with…clean the fittings, flux and heat them up to solder them in place. But what about removing a copper fitting?
There really aren’t many surprises here. It is a matter of heating up the fitting to remove it.
Turn off the water and drain the area so that the piping and fitting do not have water in them. If there is water in them, the fitting will not get hot enough to turn the solder back into molten liquid which will allow you to pull it off. Instead, the water will turn to steam. Once the water has been drained from the pipes, get ready to fire up the torch.
Have a bucket of water nearby in case things go badly. It’s also a good idea to use a fire cloth to protect the area just beyond where you will be applying the torch. Apply the torch to the fitting and move the tip of the blue flame back-and-forth over the surface so that the entire fitting gets hot. Use large channel locks, pliers, etc, to periodically pull on the fitting. As soon as the fitting is hot enough the solder will liquefy and you can pull the fitting off and turn off the torch.
Remember that heat transfers through metal very quickly. Don’t hold onto the hot pipe or fitting for too long with a metal tool or you will feel the heat in your hand. Once the fitting and the piping has cooled you can make your repair.
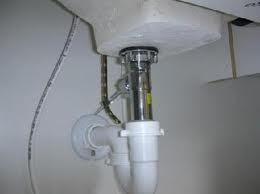 When you open your vanity cabinet, do you see a small puddle of water beneath the plumbing trap? You might have a leak underneath the sink trap. Fortunately, the fix is pretty easy.
If the leak is at the trap, the leak will only occur when the water is running down the drain (assuming the trap itself isn’t cracked). The most obvious places to check are the connections leading to and from the trap.
The sink’s tailpiece (the straight vertical drain pipe) will connect to the trap via slip nuts. The tailpiece slips inside the trap. A slip washer is pushed on to the tailpiece and seals the gap between the tailpiece and the trap. The slip nut then screws onto the trap until secure. Leaks occur here for a few reasons. Since the connections are all plastic, it is easy to cross thread the connection. Unscrew the nut and carefully screw it back down onto the threads. You should feel it grab and then slowly pull the two together. Tighten these until snug but don’t over tighten the fitting. It’s pretty easy to damage them because they are plastic.
Also, check the slip washer. If the leak is small, it may be that there is a small crack in the washer which will allow water to pass and drip off of the bottom of the trap. Look closely as the crack can be small. You can simply push a new washer onto the end of the tailpiece and screw it all together. No glue required.
A friend called me last night saying he had turned off a gate valve and when he turned it back on it didn’t work. This was the gate valve to the water heater and now the handle just spun around and he didn’t have hot water anywhere. Hint: it’s probably not a good idea to start a plumbing job 8pm if you can get away with it.
So he is panicky and doesn’t have any hot water. This is a classic reason to use a ball valve rather than a gate valve. These valves don’t get touched for years and when you finally need to work on a plumbing issue, you touch it and the gate shears off of the handle’s shaft. The gate won’t lift out and the water is blocked from flowing.
There is a way to get the water flowing again without replacing the valve. With the water off to the entire house, remove the top of the gate valve. This is often easier said than done, as the valve can get awfully crusty. Use a couple of large wrenches and while holding the bottom of the valve still, remove the top half of the valve. Once you have the top removed, reach in and remove the broken gate. Then reassemble the valve and turn the water back on.
The good news is that your water will start flowing again. The bad news is that if you need to do plumbing work at this location again, you will need to turn the water off to the entire house rather than at the isolation valve.
 If you have ever had a plumbing issue where you have had to open the wall to gain access to the problem, you know that the size and scope of the job can grow. If you are lucky enough to open the wall in an area that is not noticeable, you might consider installing a plumbing access panel.
The benefit of an access panel is two-fold. First, you don’t have to worry about replacing the drywall perfectly…getting a perfect match on the texture and the paint. Not to mention that if the paint doesn’t exactly match, you may end up painting the entire wall from side-to-side and top-to-bottom. Secondly, because of the access panel, you will always have quick access to the problem area without the need to re-open the wall.
Access panels are good for things like a shower valve buried inside a wall, and the back of the wall is, for example, in a closet. The access hole you would have to make would likely be covered by clothes anyway, and so an access panel would make sense here.
If you have to cut a hole in a very conspicuous area though, I would forego that panel and do a good drywall patch. Even if that means painting the entire wall.
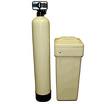 If you are removing a water softener permanently, you must reconnect the plumbing loop. The “loop” is the plumbing supply lines that go into the softener and exit the softener to the rest of the house. By removing the softener, there will be a gap in the piping left that must be closed for the water to flow to the house. Otherwise, when the water is turned back on, the water will flood the area of the pipe gap.
Reconnecting the plumbing is not difficult. You will need to determine the diameter of the pipe and then decide what to use to close the gap. Many loops are copper, and so you can sweat on some male adapters and then screw on a new flex line. You could also sweat on some fittings and some piping. You could also use compression fittings and close the gap.
The loop may be made of CPVC. For this you will need glue specifically for CPVC. Glue on some fittings and then close the gap with a new piece of piping.
There are many different methods to repair this, and some you don’t even need a torch for. My preference is to use copper (although it is expensive) and sweat the connections together.