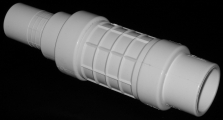
 If you have a PVC plumbing pipe break there are several options to fix it. One of the coolest is the telescoping fitting. A telescoping fitting does just what its name implies...it telescopes out to repair the pipe.
When you have a crack in a PVC pipe, such as a sprinkler pipe, you can cut the damaged section out of the pipe. You will need to cut out an area large enough to get the fitting in. The fitting is somewhat large. It will be larger in diameter than the pipe and it will be fairly long, which allows it to telescope. Most of these fittings will telescope out 3-4 inches, so you have a good amount of play with errors. The fitting itself will be 4 inches or so depending on the repair.
With the section of the pipe cut out squarly, remove the burrs from the ends of each pipe. Collapse the fitting and glue it to one side of the pipe. Loosen the nut in the middle of the fitting and pull the other side of the fitting out to mate with the other end of the broken pipe. Use primer and PVC glue for each side. Tightening the nut in the middle of the fitting will compress a rubber O-ring and seal out any leaks.
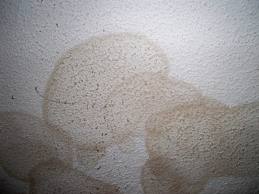 You see a stain on your downstairs ceiling, you know, right below your upstairs shower plumbing. That’s trouble. It could be the drain, the pressurized water supply plumbing, or a host of other items. Here is a step-by-step method to troubleshooting where the leak is coming from.
The first thing to do is to remove the shower head and cap the arm. Then turn on the shower valve. This will pressurize the incoming water supply piping and isolate this as a potential cause. It is a good idea to turn on the hot and cold handles separately to isolate each of those as well. If you have a single handle shower valve, you can turn it to full hot or full cold for this. Remove the escutcheon plate covering the shower valve and look inside for a leak. You will also want to go downstairs and listen for dripping during these steps.
If you can’t find a leak, remove the cap on the shower arm and attach a garden hose to it. You will have to screw on an adapter for the hose to thread on to it. Run the hose directly into the drain opening. This will isolate the drain as a potential cause. Run the water and listen for drips.
Still no leak? Plug up the shower drain and fill the pan with water. You can use a tennis ball or other object. Let this sit overnight to see if you get a drop in the water level and drips on the ceiling.
If everything has checked out so far, check for gaps in the caulking and the grout, if you have tile in the shower. You might be looking at a maintenance issue that has been overlooked. You can reinstall the shower head and start in one corner and start spraying the shower to look and listen for leaks.
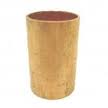 Repairing a crack in your plumbing is not a difficult thing, but getting access to it might be. Copper piping is tough. Usually, when you get a crack in a length of it, mother nature has had something to do with it, such as freezing pipes.
To repair a crack in a copper pipe, you will need to cut out the damaged area. You may not need to cut it completely out if the pipe is still perfectly round, but this is seldom the case. When water freezes, it will expand against the pipe walls and the pipe will not be round where the break occurred. So you will likely have to cut out the damaged section, which will amount to a few inches.
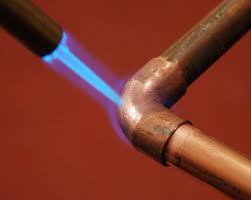
You will be left with a gap in the piping. You can repair this gap using a repair coupling. The repair coupling comes in different lengths to accommodate different sized areas of damage. You will need to clean and flux each mating surface before you apply the torch to heat it up. Here is an article on how to solder copper pipes.
You will clean the outside of the copper pipe’s ends that you previously cut, as well as the inside ends of the repair coupling. Use emory cloth for the outside of the pipe and a wire brush for the inside. You want the cleaned surfaces to shine line a new penny. Then you can flux and solder the repair.
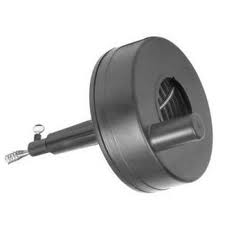 A hand held auger can be a great plumbing tool. It is cheap, small, and comes is either a 15 foot or 25 foot length. It can save you money by being able to clear a clogged drain by yourself, rather than calling a plumber to do it for you. It doesn’t work in all applications, but if it works just once, you have made money on the deal.
These types of tools are good for unclogging sinks. It is too small for main lines, but for small drains you will find good success with them.
Go under the sink and disconnect the trap and dump out the water. Loosen the screw that holds the snake in the housing and start feeding the snake into the wall. Keep pushing until you feel resistance. The resistance will be either the clog or a bend in the pipe. Tighten the screw which holds the cable to the housing. Now you can rotate the handle clockwise, which in turn rotates the cable in the same direction. Push as you rotate the handle. You will either break through the resistance or the cable may start to kink and wind up upon itself. If this happens, reverse the direction and work out the kinks.
You might try to retrieve the cable and see if it has grabbed the obstruction. If not you can snake the drain out again. You will either grab the obstruction, push it further down the drain, or run out of cable to continue the job. When you have reached one of these, reconnect the trap and run some water to see if the drain has cleared.
 Clearing plumbing drains can be a foul business. If you have a drain that is blocked, you can try a water bladder to push it out. There are good and bad points with this tool.
A water bladder is a rubbery expandable bag that you attach to your garden hose. You place the bag into the drain or cleanout and turn on the water. As the water fills the bag, it pushes against the inside of the pipe sealing it off. The bag will then start pulsing water into the pipe in hopes of pushing the blockage out.
The good thing about these is that they are inexpensive and easy to use. Basically, you attach it to your hose, stick it in the pipe, and cross your fingers.
The bad thing (and there are several) is that they don’t always work, they may burst and cause some water damage. When you are using this tool, you want to keep checking other drains and toilets to see if any water is backing up in those locations. Also, if there is a vent in between the blockage and the bag, the pulsing may cause the water to back up into the vent and out onto your roof. Try to find the closest drain to the clog and insert the bag there.
Additionally, there is a risk of the increased pressure causing drain joints to separate, which can lead to water damage. These joints are not under pressure, except for the weight of draining water, and it can happen that adding pressure may cause a weak joint to leak or separate.
When you clear the drain or give up, turn off the water and allow the bag to shrink back to its contracted size and then remove it from the pipe.
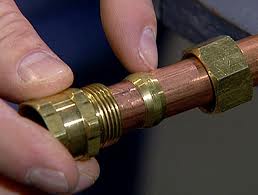 I love compression fittings for plumbing work. They are fast and easy, and all you need are tools that are probably laying around in your garage. Compression fittings are commonly seen on plumbing fixtures such as toilet supply valves, hose bibs, and really any place where a bare copper pipe needs to connect to a valve.
Installing a compression fitting or valve is easy. Slip the compression nut over the bare copper pipe. Then slide the soft ferrule over the pipe so that it is totally on the pipe with about ¼” of the pipe sticking out of it. You will have to fidget with the ferrule as there is no play between the ferrule and the pipe.
Once the cap and ferrule are on the copper pipe, place the valve onto the end of the pipe. The small amount of pipe sticking out of the ferrule ought to be just right to insert into the valve. The valve will have threads on it that will reach the nut.
So the soft ferrule is basically sandwiched between the nut and the valve. Once you start to tighten the nut, the ferrule will compress to fill any voids between the cap and valve. One everything is tight, turn the water on and check for leaks. If you have a leak, it can usually be stopped by simply giving the nut another quarter turn.
 If you are going to solder copper plumbing pipes, there are steps that must be taken to guarantee a leak-free joint. When soldering copper (also called “sweating”), you first need to clean the surfaces to be joined.
If you have any leaks, they will usually be located where a fitting meets a pipe. If you take the necessary steps, you can avoid these problems. Start by cleaning the surfaces to be joined. Use sand cloth and hold it to the end of the pipe with your thumb and forefinger. Rotate them around the end of the pipe until the copper looks like a shiny new penny. Next you want to clean the inside of the fitting. You can do this with a wire brush, sized for the diameter of pipe you are using. Place it in the fitting and rotate it to get the inside of the fitting shiny. Do not touch the areas you have just cleaned! Oils from your fingers can impede the flow of solder and flux and give you leaks.
Now comes the flux. Flux is an acidic etching paste that etches the surfaces of the copper. Flux removes oxides and allows the solder to flow. You can use a flux brush and wipe on an even amount on both the outside of the pipe and the inside of the fitting. Push the pipe into the fitting until seated and wipe off any excess flux.
Here are some details on soldering copper pipe.
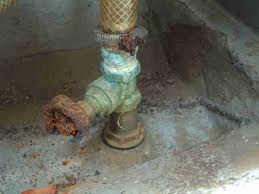 Plumbing valves get old. When they get old, they tend not to want to operate like they once did. If I see an old crusty valve, rather than turn it off, I will shut off the entire house to avoid that old valve.
If plumbing valves are used regularly I doubt they would fail as often as they do. Gate valves are notorious for this. They sit in water their entire lives and 10 years later when you need to shut off the water to whatever plumbing fixture you are working on, the valve's gate shears off from the shaft. If this valve breaks, the gate may stay up and allow water to pass. At this point you will have to shut off the water to the house to service the plumbing fixture, which will probably cause the gate to fall into place and stop the water.
Your choices to get the water flowing to the fixture again are limited. Once you turn the water back on the house, since the gate is in the down positon, the water will not flow to the fixture. You might be able to remove the top of the valve and manually remove the broken gate. This will allow the water to flow again, but the valve will be useless...you will only be able to control the water to the fixture by turning on or off the main shutoff.
Ball valves don't fail nearly as often as gate valves since the shut-off mechanism is directly controlled by the lever. If the lever is parallel to the pipe, the valve is open and will allow water to pass. If the lever is perpendicular to the pipe, then the water will remain off.
If you are considering shutting off an old plumbing valve, you might consider turning off the main water supply to the house if the job will be reasonably fast.
 Plumbing Leaks can sometimes be fixed with common sense. Plumbing valves often need to be replaced, but occasionally you can tighten some parts and get it to quit leaking. Here are some ideas to try before you end up replacing the valve.
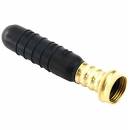
In the case of a hose bib, such as for a washing machine or a hose faucet, try to tighten the cap ¼ turn. This might work and your problems are over. If this doesn’t work, remove the cap and add some packing to the assembly. Packing looks like a thick piece of dental floss. It is made of various materials for different applications but generally it is made of Teflon and can be wrapped around whatever it is that is leaking. Adding packing is part art and part science. The correct amount to add is however much it takes to stop the leak.
With the case of the hose bib, you can add packing around the stem and tighten the cap nut. If it still leaks, add a little more. Realize, that you may ultimately end up replacing the hose bib, but that would be as a last resort. Make sure after you add packing to the plumbing fixture, you tighten the cap nut back down enough. You wouldn’t want to have a leak simply because you didn’t adequately tighten the nut back down.
 Sometimes a handyman has to be innovative. When working under a kitchen sink, there are specialty plumbing angle valves you can use rather than using a saddle valve. If you are installing an icemaker line to the refrigerator, or adding a reverse-osmosis water system, you need to supply water to these items. Many people will use a saddle valve, which pierces an existing water line. These valves are prone to leaking and I really dislike them because of that. However, you can buy specialty valves that will allow you to supply water to various areas and be able to stop the flow of water with a handle.
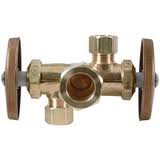
If you have a standard cold water angle valve with one outlet under the sink, you can replace this with a three-way valve or even a dual-handle three way angle valve. These are unique and will give you the ability to stop water to one fixture while keeping it on at others.
A three way angle valve has one handle and two outlets. The handle can stop and start the flow of water at both outlets simultaneously. To get even more control over the flow of water, you can replace the valve with a dual handle-three way angle valve. With this type of valve, you can not only supply water to two separate fixtures, but you can start and stop the flow of water independently of the other. It has two outlets and two handles to control the flow of water.