 Homeowners that entertain frequently often have a separate icemaker machine that needs to be connected to the plumbing. These units resemble a small portable refrigerator or wine cooler. The only requirement is for the unit to have a water supply.
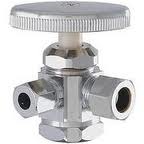
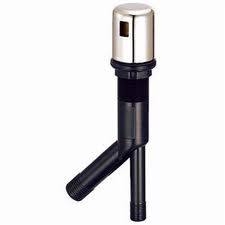
The water connection is a pretty straightforward job. You will likely have to choose between a saddle valve and replacing your single outlet faucet angle valve, with a two-outlet angle valve. I really don’t like saddle valves, so if I had a choice I would replace the angle valve. By the way, replace the cold water valve, not the hot one…you don’t want to feed your new icemaker hot water.
You will need to turn the water off to the house to replace the valve. It is likely a compression fitting, so you can remove the existing water supply line and loosen the nut on the back of the valve. Pull the old valve off and slip the new dual-outlet valve on. Don’t worry about replacing the nut with a new one. I just reuse the nut and tighten it onto the new valve.
Reinstall the faucet’s water supply line and then screw on the icemaker’s water supply line onto the empty outlet. Tighten it snuggly and turn the water back on to test for leaks.
 If you have a plumbing clog in a drain, I like to do the easiest fixes first as most people do. For toilets, a plunger or a closet auger works well. For sink drains, cleaning out the trap takes care of many issues. For larger drains like showers, you can clear the trap easily enough, and then try a snake to reach the blockage if it is within the reach of the snake. But what if it’s not?
You can try a drain bladder. This is a rubber bag that expands once you pressurize it. There are different sizes made for different pipe diameters, but basically, you attach a hose to the end of the bag and place it at the opening of the pipe. It will also come with fittings to connect it to an indoor faucet.
Turn the water on and as the bag begins to fill with water, it compresses against the interior walls of the pipe. Water then begins to pulse out of a small hole at the other end of the bag.
The idea is that the pressure will push the clog out of the drain and into a larger pipe where it is free to tour the city via the sewer.
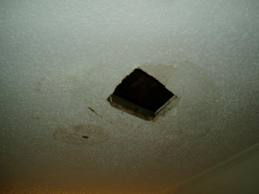 It’s a scary thing to look at your ceiling and know that you have a pluming leak from upstairs. The bathroom is right above the stained ceiling and so it’s a safe bet that the cause is up there somewhere. But how do you find it?
The obvious answer is to cut a hole in the ceiling and look around, but then you just added to the job because now you have to repair the ceiling, texture and paint (you likely have to do this anyway if you see a stain there). But before you start cutting, there are a couple things to look for first. Can you hear water dripping on the ceiling at any particular time? Maybe when you flush the toilet, or run water in the sink or shower? This might help to give you a clue as to the cause.
It’s almost impossible to guess where the leak is coming from, but it’s common that a wax ring from a toilet is to blame. So you might check the toilet and replace the wax ring and bolts, especially if the bowl is loose at the floor.
Chances are, if you can hear the dripping on to the ceiling, it is a drain line and you will have to cut open the ceiling. Don’t think though, that just because the stain is right above your head that the leaking drain pipe is too. It may be several feet away and the water (polite way to say “waste”) is just running down other pipes or lumber and finally dropping off in that location. Be prepared for anything when you cut the ceiling open.
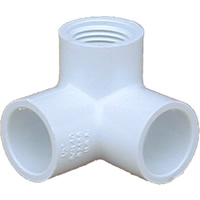 There is a process to gluing PVC piping and plumbing fittings together. PVC piping is very common in landscaping and so you will likely be working with it outdoors. Whether you are adding a valve or additional sprinklers, or maybe you have an underground leak, look for the PVC.
When you are connecting PVC to a fitting, cut the pipe squarely. Cutting the pipe squarely will make it so that the entire circumference of the pipe bottoms out against the fitting’s internal stop.
Prime both the outside of the pipe and the inside of the fitting and let that dry. Purple primer makes it so that you can easily see when it has dried. It dries very quickly and is flammable so be careful with it and the glue. When the primer has dried, apply glue to the exterior of the pipe and the interior of the fitting. Push the two together until they bottom out, and give a slight turn. Make sure that the fitting is oriented where you want it because you will not be able to get the two apart. The glue locks the pieces together, and after a few seconds you won’t be able to pull them apart. Read the label on the glue for the length of time you must wait before you can turn the water back on.
 I had a customer call me asking about an air gap that leaks. He was trying to diagnose the problem and was haphazardly checking under the sink every now-and-then. So he called to learn a little about his dilemma.
The air gap sits on top of your countertop. Underneath the counter is where the magic happens. It has two outlets on it…one is smaller than the other. The smaller outlet is connected to the dishwasher drain hose and the larger outlet is connected to the garbage disposal inlet (if you don’t have a disposal, it will be connected to a nipple on the tailpiece. So the answer to the question is that if the air gap will leak, it will leak when the dishwasher goes into its drain cycle. This is the only time there will be water passing through the hose and the air gap.
If you find the air gap leaking under the sink, check the connections where the hoses attach to the air gap and the connection where the air gap drain hose connects to the garbage disposal. These are usually connected by hose clamps, which are very reliable, but they may need to be tightened. Another common culprit is the garbage disposal itself, so be detailed and check that too.
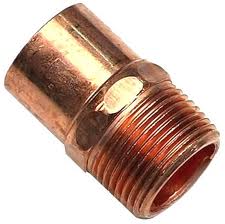
 If you are working with copper plumbing lines and will be soldering, there are steps to follow to get a leak free joint. Copper will last a long time, and so if you get a leak, it will usually be at a joint of a fitting.
The first step in soldering a fitting is to clean it. I don’t mean with soap and water, I mean to get the surface down to clean untouched copper. Basically, you will be abrading the surface of the copper with a tool or with emory cloth. Emory cloth is like a thick flexible sandpaper that scratches the end of the copper pipe. In a pinch, you can use steel wool.
Tear off a piece of emory cloth and wrap it around the end of the copper pipe. Hold the strip around the end of the pipe and move it back-and-forth. This will remove any corrosion from the pipe and scratch it up so that the flux can flow into the joint once it is heated. You want the cleaned surface to look like a shiny new penny when done. You can also use copper cleaning tools that have openings with stiff wire bristles around them. They perform the same function.
To clean the interior of fittings, you can use a wire brush specifically for that purpose. They come in diameters that correspond to the fitting’s size. Once everything is shiny and clean, you are ready to flux the joint and apply the torch. By the way, once you have cleaned the copper, don’t touch it with your fingers. The oils from your fingertips could interfere with the flux and solder flowing.
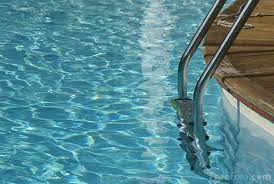 I’m not sure you can call this a plumbing job, but for swimming pool owners, draining your pool is a chore that has to be done every couple of years, or when your water gets so nasty that it just won’t balance anymore.
How often you have to replace the water in your pool varies, but generally speaking, probably every 2-3 years or so. Once the water can no longer hold chemicals, or if your total dissolved solids (TDS) readings are too high, it’s time to change them. You can take a sample of your water to a pool store and they will give you some advice on your water as well.
When it’s time to replace the water, you will need a submersible pump and enough hose to reach your cleanout. Place the pump into the deepest part of the pool (near the drain) and run the hose to the cleanout. You will probably need to hunt for your cleanout. It should be in the ground with a plastic or rubber cap covering it. Many times the cleanout line is run in the same trough as the main water line. Look at the meter and follow a line up to your house. It may be covered with dirt, landscape rocks, etc. Anyway, you may have to spend some time looking for it.
If you have a spa, drain run the spa drain only to drain the spa into the pool. This will make it so you only have to drain the pool and not the spa in addition to the pool. Turn the pool equipment off and turn on the submersible. You will want to keep an eye on it to make sure it doesn’t overflow your cleanout, and also that you shut it off when it is done. The pump will get hot if it continues to run while the pool is drained.
By the way, while you are draining the pool, it’s a great time to clean the filters and generally perform any maintenance on the pool or equipment.
 Plumbing water to a refrigerator can be trying if you have a lot of obstacles to overcome. Certainly, connecting water to the icemaker is easy if there is already a water valve installed behind it, but this isn’t always the case. Ideally, the nook for the refrigerator will be next to the cabinets with no break in the base cabinets at all. So long as there isn’t a doorway running in between the refrigerator nook and the kitchen sink, the installation should be straightforward.
You will need to replace the cold water angle stop beneath the sink with one that has two outlets (conversely you could use a saddle valve, but I hate these). Replace the angle valve and connect the water supply line to it. You will have to drill small holes through the side wall of the base cabinets and feed the line through it. Locate the hole as far back and down as you can so that the line doesn’t get pinched or damaged. If you come to a corner, you can turn the corner the same way as drilling through a straight row of cabinets, you just may need a longer drill bit to reach.
Once you reach the refrigerator nook, you can connect the water line with a compression fitting. You will be able to control the water to the refrigerator by the valve under the kitchen sink.
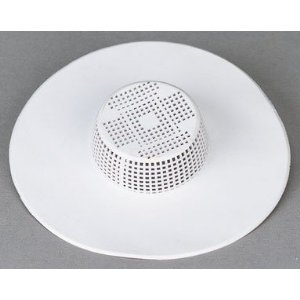 Plumbing drain clogs can be lessened by using a screen across the drain. This might sound somewhat strange, but they are made and are readily available at a home center or a pet store.
The idea of catching hair before it reaches the drain pipe is smart. People with long hair can clog a shower drain with no problem. Giving the dog a bath can do the same. Products like the “hair snare” work well in some situations.
A hair snare type product simply sits on top of the drain opening. You simply open the package and set it over the drain. They have a raised center section that allows room for a pop-up drain, but I don’t like the design. A pop-up in a sink sits too close for the screen to work. You could cut the product to fit, but it would really need to be a perfect cut to catch any hair.
The product would work well in a shower or utility sink (like a garage slop sink) where the drains sit in the center of the basin and the walls won’t interfere with its placement.
Still, since the product has a lip, you will be left with either a small amount of water around the lip of the drain where hair can concentrate.
 Copper plumbing sometimes needs some work. It is high quality but occasionally it will spring a leak. Removing a copper fitting can be done in several ways.
A torch will make quick work or removing a copper fitting. You will obviously need to turn the water off and drain the water from the piping to allow the pipe to get hot enough to melt the solder. If you don’t drain the system, the water will boil and turn to steam, and will absorb the heat that is necessary to turn the solder to liquid so you can pull it from the pipe.
Make sure you have a bucket of water nearby and a flame cloth to protect the surrounding area. Heat up the fitting by touching the tip of the blue cone (the end of the torch’s flame) to the fitting. Move the torch over the fitting to make sure the entire fitting is hot enough to pull away from the piping that is connected to it. Use long handled pliers or channel locks to quickly grab and release the fitting. Heat will travel quickly down a metal tool, so protect your hands and don’t hold onto the hot surface for too long.
Instead of the torch, you can also use a pipe cutting tool. This is fast, but you will be shortening the pipe rather than just removing the fitting. So, if you are replacing the exact fitting, you will have to make up the distance that you cut out.
Place the jaws of the pipe cutter around the pipe and tighten gradually as you encircle the pipe with the tool. You will notice that it first will score the pipe and then it will stay in the groove. As you gradually tighten it, it will cut a deeper groove until it eventually cuts through the thickness of the pipe’s wall.