 I frequently get calls that there is poor water plumbing pressure in a bathroom, or another specific area of the house. Most homeowners believe that there must be a blockage in a water line, but in my experience, it is a matter of several causes occurring simultaneously.
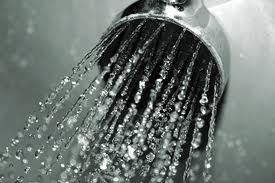
The key here is to isolate the problem. Is the pressure isolated to a particular fixture or the all the fixtures in the room? Is the problem just with the hot or cold, or is it both? What I find is that the house will have a single handle shower valve (that controls both the hot and cold water) and this can be attributed to a shower cartridge. By the way, a Moen positemp cartridge commonly fails to the hot side, so if you are experiencing low or no hot water in the shower, replace the cartridge and that should fix it.
For the sink faucet, the problem is usually with the aerator at the end of the faucet. This will affect both the hot and cold pressure (actually water volume) so that either will come out poorly. The aerator will get clogged with debris and scale and will need to be cleaned out. They just unscrew from the end of the faucet. There certainly may be bigger problems, but these are typical of what I see.
 If your pool’s plumbing is making noises, chances are you have air in the system. A couple of things to look for are air bubbles. Do you see air bubbles coming up from the jets? Can you see bubbles in the top of the pot where your basket is? When you turn on the motor, do you hear a rumbling noise?
One of my neighbors turns on his pool motor at 6:50 am. I know this because I can hear the gurgling of his piping as the system purges all the air that got into it since it was shut off. Air may be getting in the system from different sources. It may be as simple as filling the pool. If your water level is low, the skimmer will draw air into it as well as water. You will hear the motor run dry until the suction is built up enough to draw water in and then the cycle repeats itself.
Other areas to concentrate on are the lid for the pot basket and the filter. Both of these areas have a thick gasket that gets compressed to eliminate air leaks. You won’t be able to see an air leak at the filter, but you may be able to see air bubbles getting in at the pot, due to the clear plastic. Remove the top and inspect the gasket for damage. If it is damaged replace it. Clean off the surfaces between top and bottom and lubricate the gasket. The lube will attract debris on the surfaces, so wipe the surfaces clean and reinstall the freshly lubricated gasket.
Not so obvious is a crack in the piping or fittings that would allow air into the system. These repairs are likely outside the skills of a typical homeowner, and may take a professional.
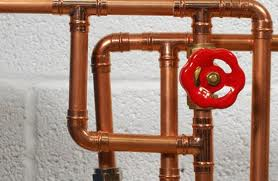
 A crack in copper plumbing needs to be repaired quickly. The water is under constant pressure in the supply lines and will spray water out and can cause damage.
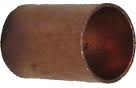
There are copper repair couplings (also called sleeves) that can be used once the crack is cut out of the pipe. Use a pipe cutting tool (not a hacksaw) and cut out the area of the crack. This is going to leave a void in the pipe that you will fill in with a repair coupling. When you buy a repair coupling, make sure it is longer than the area that you removed from the pipe. Some couplings have internal stops inside that won’t allow the pipe to go beyond that point. Don’t buy that type. Instead, buy the coupling without stops so that you can slide it wherever you want it to go.
You will use the same procedure to solder it on, just as with any soldering job. Clean the ends of the pipes, flux the mating surfaces, and apply the heat. You will have to slide the repair coupling somewhat beyond its final resting point so that you can place it onto the pipe on the other end of the void. Here is an article on how to solder copper plumbing.
 A customer sent me an email about a plumbing question. He said he was under his kitchen sink and saw a water line with some type of a clamp holding to a pipe. He didn’t know what it was.
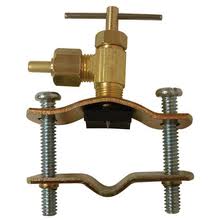
This sounds like a saddle valve and they tap into a water line to supply water to a particular device, such as an icemaker or a reverse osmosis system. You might also find a clamp around a pipe holding a drain line from a reverse osmosis system. When the r/o drains, it drains into the drain pipe from the sink and the clamp holds it in place.
The saddle valve is held in place by a clamp that bolts around the pipe. The pipe is pierced by a needle that twists into the pipe and starts the flow of water. From the valve you can attach a hose or other supply line to the threaded fitting and run the water to wherever you need it. These valves are under pressure and so be very detailed when you install it. The saddle that holds the drain line for a reverse osmosis is not under pressure and so is somewhat more forgiving, but you have to check the valve as the reverse osmosis is draining to verify the installation is tight.
 If you are doing a plumbing job with copper piping and are uncomfortable using a torch to solder the fittings, you can try a copper adhesive. They come under various brand names, but they all do the same thing; connect copper piping and fittings together.
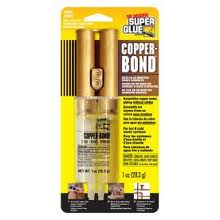
You will still need to prepare the fittings and the ends of the pipes, by cleaning them with either a brush or emory cloth. This will make the inside of the fittings and the outside ends of the pipes as shiny as a new penny. From there you will need to apply the adhesive.
The copper adhesive will come in a two-chambered syringe that allows you to dispense equal amounts of the product. Each chamber is filled with a different compound and when mixed make the adhesive. Depress the plunger until the product is at the tip of the syringe (you want to get out any air bubbles at the end here). Push out equal amounts of the products on a scrap surface (the product packaging works well here). Mix the two together with a wood stir stick vigorously until well mixed. Use the stick and apply a thin layer of the adhesive to the outside of the pipe and the inside of the fitting. Push the pipe into the fitting with a slight twist and wait until it takes hold.
The package will say how long to wait until you can turn the water back on, but it is usually within 30 minutes. It’s not for all applications, and I would rather solder a fitting, but in some situations it is a good fit.
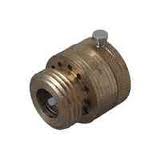 A vacuum breaker is an important plumbing device to protect your water supply. You will commonly find them on your irrigation system and hose bibs to prevent possibly contaminated water from backing up into your potable water. These devices are generically known as anti-siphon, backflow, or pressure vacuum breakers, and they prevent water from the garden hose or sprinkler system from backing up into your home's water.
On a hose bib, the device will simply screw onto the end of the faucet. Once they are snug, there is a small screw with a hex head that is tightened against the threads to make sure it won’t move.
Remove the old device by loosening the screw first, and then unscrewing the device. On the new device, make sure there is a rubber washer seated in place and then gradually start screwing it onto the hose bib. Once it is tight, you can tighten the screw that holds it in place.
You may find that the old screw has damaged the threads of the hose bib. Once you get the new device on, check to see if it leaks from this area. If it does, you may find yourself replacing the hose bib first, and then you can install the new vacuum breaker onto it.
 Many people have thought that their plumbing is backwards, meaning that the hot and cold water lines have been reversed. This is seldom the case.
In most cases the problem lies with how the fixture or fixtures were installed. A common location for the reversed water temperatures is at the shower, and involve a single handle that controls both the hot and cold water. In this case, the cartridge is reversed and needs to be rotated 180 degrees.
It’s the same solution for really any single handle fixture with the hot and cold reversed. A kitchen faucet is the same fix as the shower faucet. Remove the cover on the handle, unscrew the screw that holds the handle, and remove the handle. Rotate the stem 180 degrees and reassemble the handle. It should work fine.
If the kitchen faucet has two separate handles (one for cold and one for hot) and the temperatures are reversed, it is likely that the hot water supply line is connected to the cold side of the faucet and vise-versa. This is pretty hard to do as the hot is on the left and the cold is on the right. It is almost as if someone intentionally hooked up the water supply to the wrong sides.
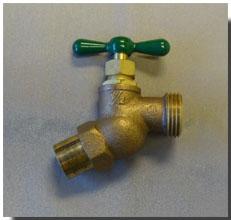 So why would someone want to add a plumbing hose bib to their soft water conditioner line? That’s easy…a spot-free car. When I was little, I always wondered why the neighbor was washing his car with a hose coming from the garage. He was washing his car with soft water for a professional finish.
You want to install the hose bib on the outgoing line of your water softener. If you look behind your water softener, you will see two water lines going into the unit. The water flows into the unit, gets softened, then exits the unit. There should be an arrow on the bypass valve showing the direction of flow.
It’s not rocket science, but you will have to figure out the fittings necessary to make put the whole thing together. You will at least need a tee and the hose bib, but you may need some additional fittings depending on how your lines are configured.
You will need to turn the water off and cut the outgoing line. Use a pipe cutter instead of a hacksaw. Dry fit the fittings and then you can sweat them all together. You will need to clean, flux, and then apply the heat and solder. Here is an article on how to sweat copper.
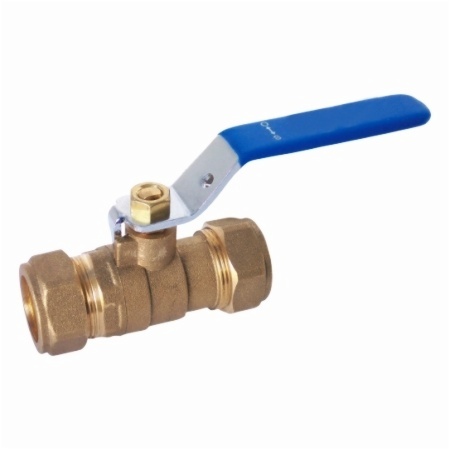 Installing a plumbing compression ball valve shouldn’t be intimidating. You really only need a few wrenches and a little elbow grease.
Turn the water off before you start working on this. If you are replacing an existing compression ball valve, it is your choice to replace the nut and ferrule on the pipe. The valve will be threaded and will slide onto the bare copper pipe where it will contact the ferrule and nut. The nut screws onto the valve and compresses the ferrule in between to seal out any leaks. If it is a new installation, you slide the nut on first, then the ferrule, and finally the valve. However, I usually leave the old nut and ferrule on the pipe and reuse them. You can certainly remove them but it can be difficult and time-consuming. The nut will just slide off once you get the ferrule off, but that is the tough part. Since the ferrule is soft and has been compressed, it really grabs the pipe well. You can use a large wrench and grab it. Rotate it up-and-down while forcing it toward the end of the pipe. From there you can slide the old nut off and replace them with the new parts.
Use a wrench to hold the valve in an upright position while you use a 2nd wrench to tighten the nut. Turn the water back on, check for leaks, and tighten a little more if you see a drip.
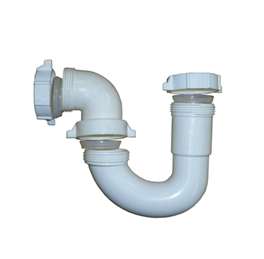 One of the first places I look when you have a plumbing leak under a sink is at the P-trap. This is the “P” or “U” shaped drain pipe under a sink. The trap inlet receives water vertically from the sink drain and moves it horizontally out the wall to the house’s drain system. Modern homes use plastic traps, and they get bumped by people moving things in and out of the cabinet.
It is usually not the case that the trap is cracked, although that can happen, rather that the connection between the trap and the other piping is at fault. Run the water and keep an eye out for the leak.
When you find a leak at the connection, you may be able to simply tighten it, or you may want to disassemble it and investigate the source of the leak. Unscrew the slip nut and check that it isn’t cross-threaded. Also, check the slip washer for a crack. If it is cracked it will allow water to pass and drip out of the top of the slip nut. A crack in the washer is hard to see so run your fingernail across it and listen for a “click” sound.
These parts are cheap to replace and take only a few minutes to assemble. Just make sure you seat the washer correctly and don’t cross-thread the nut.