If you have had it with your sliding screen door don’t lose hope. 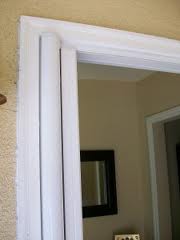 These are found on your sliding glass door or on French doors in particular. The neat thing about these screen doors is that when you don’t want to open the doors to ventilate the room, they retract into a jamb and disappear. This makes it so your view out of the window is not obscured by the mesh of the screen. When you want to engage the screen, you simply pull it out of the special jamb where it resides. It’s almost like a window blind that operates horizontally rather than vertically.
You can buy these at most home centers and they are straightforward to install. The jamb (its like a tube) sits vertically on one side of the door opening. You must mount this tube so that it is plumb on the side of the door jamb. This is held in place with a series of screws.
At the top and bottom of the opening, you will install the rails that will act as guides for the screen as you pull it out. You have to install these perpendicular to the tube so that the screen pulls out and retracts easily.
These types of screens work great on French doors where you can’t have a frames sliding screen door. With a disappearing screen door, you can pull it out and open both sides of the French doors. When you want to close the doors, you can retract the screen to preserve your view.
 When you install a pre-hung door in an opening, you are going to have some nasty looking gaps and cuts. The gaps will be between the drywall and the perimeter of the door frame. This area is used to shim the door to make sure it is plumb and square. This helps the door to operate correctly.
Over these gaps is placed door trim or casing. It installs easily with a nail gun and a compressor, but you can certainly use the old hammer and 4d finish nails. The key is to have a reveal.
For door casing, a reveal is the small area that stands proud of the casing. It basically is the corner of the door frame as it is revealed from the edge of the casing. As you lay out the casing keep the reveal at a uniform 3/16ths of an inch all around the opening. It will give the installation a more attractive appearance. You can use an adjustable square and set it for this distance and then just mark a pencil line around the perimter of the jamb. This line is where the edge of you casing will stop.
Use a level and secure one side of the vertical jamb with 2 finish nails (the nail gun is perfect for this job-very quick and accurate), after cutting a 45-degree miter at the corner. I like to start on one side, cut the miters, and then continue across the top and down the other side. Once the door casing has been installed, you can install the baseboard square to the casing, or you can miter cut both pieces to make everything flow without any breaking points.
Once everything is installed, you can fill the holes, sand, and paint.
 A door can give you problems if it not closing or opening easily. If you have tried adjusting it and still have not met with success, you might have to resort to planing the door.
Generally, I use planing as a last resort, but a hand plane does come in handy in certain situations. For example, if you have already adjusted a door and have a sliver of wood to remove to get the door to open and close, a plane is the ticket.
Use a well-tuned plane and plane from the edge inward. If, for example, the top edge of your door is hitting the jamb when you try to close it, plane from the edge toward the middle of the door. You will likely have to remove the door for good control of the plane. Adjust the plane so that it takes slivers of wood with each pass. Place the plane squarely on the edge of the door and push it gently and evenly along the edge of the door. It's a good idea to use a piece of scrap wood to guage the thickness of the shavings to make sure you have the thickness right.
When the thickness is thin enough, then you can apply uniform pressure with both hands in removing the small amount of wood. You can actually get a shaving of wood thin enough where you can hold it up to a newspaper and read the printing through it.
After you have removed the shavings, you can paint the exposed surface to blend in with the rest of the door.
 As a handyman I get asked a lot of questions. This time I had a customer who was asking about doorstops. She had very nice base molding that is stained and finished, and I didn't blame her for not wanting to screw a doorstop through it, even though you can get some pretty fancy doorstops. Failing to install doorstops will likely lead to a drywall repair when someone swings the door open a little too aggressively, and the door knob pokes a hole through the drywall. So what is the answer?
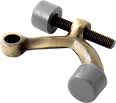
You can install a hinge pin door stop. These mount in the hinges of the door and have little padded arms that push against the door itself and the door's frame (or trim). You can adjust these by turning a set screw to open or close the distance of where the resistance begins.
These types of doorstops are best for hollow core interior doors as they are lightweight, however they are so lightweight that this type of doorstop can punch a hole in them if too much force is used. For heavier doors you may need to install a door stop on each hinge pin and adjust them so that they give uniform resistance.
Installing them is easy. Just tap out the hinge pin and insert it through the doorstop. Then tap the hinge pin back into the hinge and adjust it.
 If you are planning on replacing a door with a pre-hung door (meaning the door and it's frame together), you're going to have to do some cutting. This isn't major surgery, but it's a job of finesse.
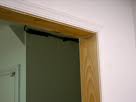
You are going to need to first pry off the trim molding around the perimeter of the door. Use a utility knife and cut through the caulking. If you plan on reusing the trim, be very gentle with it as you don't want to break it. The trim will be held in place with nails. Goose the trim up carefully with either a standard screwdriver or a putty knife. Start at the bottom and gradually move up until the entire piece of trim is free. Do this for all of the trim on both sides of the door.
With the trim removed, you will probably be able to see daylight between the door jambs and the door framing, with the wood shims nailed in place. Use a reciprocating saw with a demolition blade in it and run the blade around the perimeter of the door in between the door jamb and the house framing. The demolition blade will cut though the nails and shims without any trouble. Once the old door and frame has been removed, it's time for the new door installation.
 As a handyman, I've worked in some rough areas before...areas with lots of chain link fencing. Besides chain link, these areas all have security bars on the windows and doors. You may not live in a rough area, but you can take a lesson here, many residences have security doors on them to avoid a break-in.
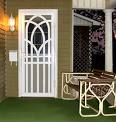
It used to be that a security door was plain ugly...just bars and maybe some mesh on them. Very seldom was there any type of decorative features. You can get designs that make these much more attractive than in the past.
If you want to install a security door, there are fairly straightforward. You need to determine how you want the door to swing, either right-hand or left-hand hinge.
If you install the hinge on the same side as the door it is protecting, the door handles will hit when you close the security door. The nice thing about this configuration is that you it is easy ingress and egress without having to fight the doors. If you install the security door so that the hinge is opposite the home's door, the handles won't hit but it is strange and somewhat backwards to go from side to side to get into your house. Plus, when the wind is blowing just right, you will get bumped around fighting with the security door to get your main door open.
For me, I would rather have both doors hinged on the same side, and just reverse the lockset and knob on the security door.
 I was at a house yesterday and the door knob was literally falling off of the door. It was very loose lacked any kind of handyman maintenance for years. Door knobs are a fickle group. Some are well made and last for a long time. Others get neglected. With just a little TLC, a door knob will last for a very long time.
A door knob is installed after the latch assembly gets placed into the edge of the door. The latch is held in place with 2 small wood screws. Then the exterior side of the door knob is installed through the latch assembly. This is a good time to lubricate the hardware because you can turn the handle and see the mechanics of the latch move. Spray lubrication works great. Spray a light coat on the moving parts and rotate the handle to make sure the lubrication works its way into all the moving parts.
Mate the interior side of the door knob to the exterior side and tighten the two screws that hold it all together. There is a certain tightness that requires a little "feel" to it. If you over tighten the screws, the knob and/or latch tend to stick. If you under tighten, there is will be too much play and the knob won't operate well. Tighten it snugly but so that it operates correctly.
 A customer called and said someone told her to buy a pre-hung door, but she didn't know what that was. There are different doors for different situations. When you are installing a door, there are basically 2 styles; either a pre-hung door or a slab door.
A slab door is just the door itself. Imagine if you unscrewed the hinges from the door and removed the door. That's what you get...no hardware, just the door. You can get slab doors that are flat or paneled, for the interior or exterior.
A pre-hung door is a slab door and the door frame, hinges included. It is a swinging door ready to be installed (excluding the handle/lockset). When you buy an exterior pre-hung door, you will also get the threshold already attached. An interior pre-hung door does not have a threshold.
A slab door is good for a direct replacement of an interior door. For example, if you have a standard size interior door that has been damaged, you can replace it with a slab door. You will have to mortise the hinges and maybe trim it for width, but it should swing well without making too many adjustments.
A pre-hung door is good for installing a door into a rough opening. A common use here is when you have a master bedroom and bathroom adjoining, but there is no door in the opening...just drywall. A pre-hung door will fit nicely, and you will just have to trim it and paint. The nice thing about a pre-hung door is that if you install it correctly, it will swing beautifully from the start. Here are some instructions on how to install a pre-hung door.