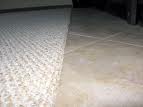
 Lots of us consider playing handyman for the weekend. If you are looking to replace your carpeting with a different flooring material, for example, ceramic tile, vinyl, etc. you are first going to have to remove the carpet. Here’s how to do it.
I generally start at a corner of the room and pull up the corner of the carpet. It will lift easily from the tack strip. Continue lifting the carpet around the perimeter of the room until you get to an obstacle (like a door). If the hallway, for example, will remain carpeted, use a utility knife and cut the carpet inside the room you are removing. It is imperative that you leave enough carpet to make repairs to the threshold. Don’t cut right up to the threshold, instead leave 6-8 inches to play with. Once you have the problem areas cut and the perimeter lifted, you can fold the carpet over and cut the backing. This will cut easily and allow you to roll it up and remove it from the room.
The carpet pad is next to go. This is usually glued down to the wood sub floor or concrete pad and will easily lift off. Once you remove that from the room, you will need to get rid of the tack strip. Use heavy gloves and eye protection and slide a pry bar under the nail heads. Hit the pry bar with a hammer and lift the tack strip from the floor. It tends to break into many pieces so be careful. You will need to go around the room and remove nail heads from the floor that you missed. When everything has been removed, scrape, sweep and vacuum up the debris to leave a clean surface for your new floor installation.
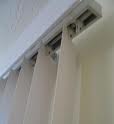 The more your window coverings get operated, the more likely the plastic parts will wear out, and you will need a vertical blind repair. Vertical blinds hang from a head rail and all of the weight is hanging from this rail. However, vertical blinds also have the added bonus of the vanes breaking. The vanes, or slats, are connected to the head rail by a small plastic clip. This clip holds just the very end of the vane and supports the entire weight of the vane. Consequently, it is this tiny piece of the vane that breaks off and requires repair or replacement. You probably don't need a handyman to fix this for you.
You can buy reinforcement clips for the top of the vanes or replace the damaged vanes.
To repair the vanes, you can install the reinforcement clips. You will need to cut out the damaged area on top of the vane so that the finished area is the shape of a rectangle. The repair clip slides over the top of the vane and creates a new pocket so that the vane can be remounted to the head rail.
The other option is to buy a new vane. Stores typically sell replacement vanes in the most popular colors and materials. You can generally find the popular ones at a home center and they would just slide into the head rail clip.
 In my job as a handyman, I often have to move items to get access to a repair. These items can be small or large. Commonly, moving furniture away from the walls toward the center of the room is necessary for painting the room...and moving the furniture was a 2 man job. Not anymore. If the room is carpeted it is now a 1 man job.
There are products out there that slide under the feet of the furniture to make this a very quick job. They go by the names "furniture feet", EZ movers, etc. You can buy some brands at home centers, and other brands you have to order online. But basically, they slide under the feet of your furniture and make it easy to slide the pieces across the carpeting easily.
The discs are made of hard plastic with a soft foam to hold the furniture foot. The hard plastic is curved slightly to that it will glide over the carpeting.
The riskiest part is tipping the piece of furniture up (or back) high enough so that you can slide one of these discs underneath each foot. When each foot has a disc under it, you can push the piece of furniture to wherever you want it...by yourself.
 When you change the flooring in a room, you will have to deal with the transition between that room and, for example, the hallway leading to that room. There are transition pieces for virtually all flooring types. Some look very unattractive though as they are bulky and don't match either of the flooring surfaces.
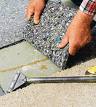
For a transition where carpet meets ceramic tile, this handyman prefers to use a transition piece that is hidden under the carpet. The finished product looks like the carpet just butts up against the tile and has a very clean appearance. This is done with a metal "S" channel and lies under the edge of the carpet. The carpet gets cut and tucked under the lip of the channel.
The channel doesn't look like much. You will need to remove 2-3 inches of carpet padding along the transition area. The open side of the channel is spaced about ½" from the edge of the tile and secured to the concrete pad or wood sub floor. The carpet must be cut about ¾" long and is folded around the channel in the space between the channel and the edge of the tile. Once the carpet edge has been uniformly placed in the groove, the metal channel is hammered downward which pinches the carpet tightly to the edge of the ceramic tile. It has a very clean appearance.
 There are times when you need a long straight line and they just don't make a straightedge long enough. This is where a chalk line comes in handy. As a handyman, I use a chalk line when laying out a cut on a large piece of lumber, or laying out straight lines for landscaping projects, etc.
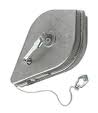
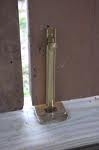
A chalk line is simply a piece of string that is wound up inside a housing. In this housing is also colored powdered chalk. The end of the string has a small hook on it that allows the user to attach it to, for example, the edge of a piece of plywood. Once the string is stretched taut, the user picks up the string and lifts it a few inches above the surface and lets it go. The chalked-up piece of string snaps a straight line on the surface and you now have an accurate line to work from. You can use whatever color chalk suits you, and there is a sliding door to fill the dispenser with the chalk.
Once the user has snapped a chalk line, there is a handle that is used to retrieve the string back into the housing. This also recoats the string with additional chalk.
 Granite makes a dramatic difference in a kitchen. I had some customers that decided not only to install granite countertops, but also to run the granite up the wall to the underside of the wall cabinets, in place of a traditional backsplash. What an incredible difference that made. Everything in the kitchen seemed to magically come together for a jaw-dropping appearance. The only problem they had though, was that the electrical outlets and switches on the wall suddenly were recessed due to the thickness of the granite on the wall. That's when they called their handyman.
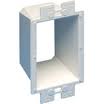
The answer to their problem is a box extender. A box extender is made just for these situations. There is no way you could mount an outlet cover over an outlet that now resides almost an inch in the wall. A box extender solves this by extending the junction box out to be flush with the surface...in this case the surface of the granite. It looks like a sleeve that pushes over the existing box, so there is no need to remove the existing box.
You will need to remove the outlet or switch, gently pull it outward, and slide the extender over it. The outlet or switch gets secured to the front of the box extender which gets secured to the front of the old junction box via longer screws. Then an outlet cover or switch cover will easily cover the extender and look perfectly normal as it will sit flush with the granite surface.
 A home inspector completed an inspection of a resale home on behalf of the new buyers and found a problem with a double door lock. He suggested the buyers contact a handyman to repair it. On a set of exterior double doors, you will have a stationary door that secures to the top jamb and the threshold with a set of sliding bolts or pins that sink into the opening preventing the door from operating. The swinging door latches into the stationary door and locks into it. If the stationary door has problems with the bolts that secure it to the frame, then the swinging door has little chance of locking and securing the opening.
Many of these problems deal with the fact that the sliding bolts may not be fully engaged into the holes that receive them. This may be for many reasons but repairing them shouldn't be very difficult. Sometimes the hardware will be loose and it is a matter of tightening up the sliding bolts and making it so that the bolts actually go into the holes again. In other cases the easiest thing to do is to ream out the holes slightly larger so that the bolts can engage the holes and securely lock the door. You can also clean the hardware and lubricate it so that it slides easily.
 Some people really like to the look of laminate...countertops, desks, filing cabinets, and dressers. Laminate is very durable, cleans easily, and is pretty easy to install. They even make good surfaces for a workbench for your handyman.
If you have a surface, like particle board or medium-density fiberboard, you can spruce it up with laminate. You want to trim it with a minimum of overhang so you won't have much to trim after it is glued to the surface. Use contact cement and a thin-napped roller and roll on a coat of the contact cement on each surface...cover both the particle board and the laminate surface you are gluing. Let that coat dry and roll another coat on each surface again and let that coat dry. I suppose you could use contact cement in a spray can, but I like the heavy coat of rolling it on.
The dried surfaces will be slightly tacky but don't touch them together until you are sure they are properly lined up. Once these surfaces touch, they won't easily let go. It is a good idea to use something to keep the surfaces apart until you are sure they are lined up and ready to touch. I like dowels for this. You can lay a couple of wood dowels across the particle board and then lay the glued laminate on top of the dowels. Once they are lined up, just remove one dowel at a time and push the surfaces together. You can use a rolling pin to roll the surfaces together.
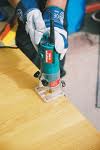
Once the surfaces are glued together, you can use a router with a laminate cutting straight bit in it and go around the perimeter of the surface. When two laminated surfaces meet, you can use a laminate cutting angled bit to give a decorative finish.
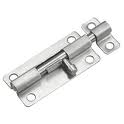 Installing a barrel bolt lock is quick and easy for any handyman. This type of lock is simply a metal shaft that is secured to the door. It slides in-and-out of a guide and, depending on how the door frame sits, can either be slid into a stationery receiving piece, or directly into the door jamb or frame itself.
These types of locks don't provide a lot of protection from an intruder, but they will make it so the door won't open. By the way, they are great for kids that are adept at opening a doorknob from going outside.
You can mount these anywhere you feel comfortable, but just make sure it is level. I like mounting the movable bolt on the door first. They usually take four screws, so use the appropriate screws for the type of door you are mounting it to. Also make sure that the bolt extends far enough into the catch or the door jamb so that it will reach and lock properly.
Once the bolt is installed you can mount the catch in the corresponding point. If you are mounting the catch to the frame or jamb, extend the bolt fully and mark the holes, where the catch will sit. Pre-drill the holes and screw it down. If the bolt will extend into the frame or jamb, put some lipstick or crayon on the end of the bolt and push it out until it hits the bolt. This will leave a mark on the jamb so that you will know where to drill the hole to receive the bolt which will lock the door.
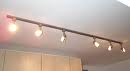 Homeowners ask their handyman to install a variety of light fixtures. Flush mounted, hanging, recessed, and track lighting fixtures. They all install very similarly, with each type of fixture fitting a different need. The benefit of track lighting is that you can have a multitude of lights on a single fixture and can direct the lighting to wherever you want.
Since track lighting fixtures mount on the surface, it makes for a very easy installation. In many ways, installing a track lighting fixture is like any flush mounted fixture installation, except that you have a larger fixture and more lights.
Generally, you start by installing the fixture to the junction box and making the wiring connections. Here is an article on installing a light fixture and a discussion on wiring. Once the connections are made, the track is run and mounted into the ceiling. It's always best to install the track into the ceiling joists if possible, but if not, the fixture will come with drywall anchors to support it.
Some track lights use standard light bulbs and others use small halogen bulbs with a transformer. The individual fixtures are placed in the track and typically make electrical contact by turning the fixtures until they are seated in the track. Once that is done, adjust the lights to wherever you want to direct the light.