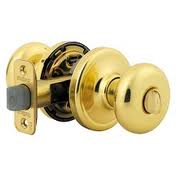
 A door latch takes a lot of abuse and occasionally needs some easy maintenance. There are times when a door latch will get so gummed up with dirt and the parts get worn that it is very difficult to get it to move in-and-out like it should. Instead, it will hit the door strike plate and just stop. The noise is loud and the door doesn’t latch.
If the tolerance between the door and the jamb is extremely close, the latch may hit on a flat part near the door (instead of the angled latch) and fail to engage. For this you can remove the strike plate, slightly mortise it, and reinstall it. For the most part though, a simple cleaning and lubricating will do the trick.
Remove the handles so that the latch mechanism is exposed. You can use a spray lubricant on the mechanism. Spray it on and wipe off any dust and grime from the mechanism. Move the latch in and out to work the parts. You can also push the latch in and spray into the surrounding area. You can use a rag to wipe off the parts, and when the rag comes out clean, give them a final shot of lubricant. Reassemble everything and the latch and knob should work much better.
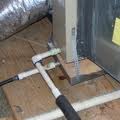 Naturally when it gets hot outside you turn on the air conditioner. When it is humid outside, a byproduct of cooling the air is condensation. The more humid it is, the more condensation will be produced. The condensation drips off of the coil and into a condensation pan underneath the unit. The condensation is then carried out of the pan by a drain line to the exterior of the house. So what a homeowner will occasionally see is water dripping from a small PVC elbow coming out of the house.
A common call I get is about this very issue. People will call and say they have a plumbing problem because water is coming from a pipe that normally doesn’t have water coming out of it. Yes, that is by design. I try to tell people that this is exactly what should be happening when you are running the air conditioner and it is very humid outside.
What you may notice is the condensation pan will leak and you will develop a stain on your ceiling. This of course is not normal and needs attention. This will lead not only to a repair of some type on the pan or unit, but also a repair on your ceiling to make the stain go away.
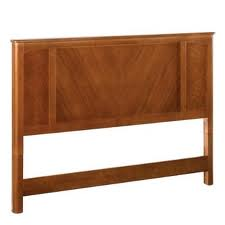 Repairing a bed is not a very common handyman repair. Beds are personal and people generally don’t want a handyman with dirty hands going near them…except when they are ready to collapse.
Most of the issues lie with where the horizontal mattress support rails meet the legs. There is often a poor connection here and it leads to a good amount of wobble.
If the bed is metal, there will me two bolts and washers at each leg. I’m guessing these are loose. Go to each leg and tighten everything up. It is a 10 minute job and that will likely make the bed much more solid.
If the bed is wood, things get a little trickier. The horizontal mattress support has two downward-facing hooks that stick out of each end that mate with each leg. The leg pieces have a mortised area and a metal face that supports the weight of the mattress as the hooks rest upon them. These are usually very solid because of the way they are designed. If they are loose, you will need to disassemble the bed to get access to these parts. Each male and female part is mortised and screwed into the end of the rail and the side of the leg. Once you have them apart, see what became loose. It may be a matter of simply tightening the screws or using slightly larger screws.
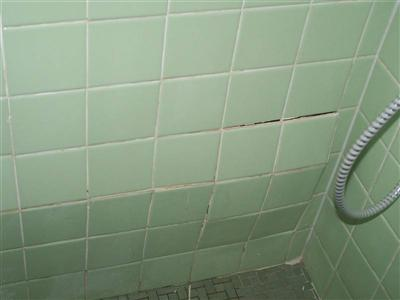 Shower tiles feeling soft or spongy, or even falling off of the wall can mean big problems. Why are they falling from the wall? Most likely, water has found its way behind the wall and is causing the tile to come off of the wall.
You frequently see the damage starting at the bottom of the shower and moving upwards. In many cases, it is simply a maintenance issue that has caused the damage. Simply paying attention to the caulking and grout can save a lot of headaches. By the time you notice the damage it is too late. The wall may appear bloated or it may cave inward, and you may even be able to move the wet portion of the wall by simply pushing on it.
Typically you want to get back to dry solid material. That means removing tiles and green board, and even insulation if on an exterior wall. If you run into mold, I would suggest you have it investigated by a professional in the field.
Once you get to dry solid surfaces, you can replace the damaged green board and reinstall the tiles and grout. The last step is to caulk the shower, and as we’ve seen, it is probably the most important step.
 You can buy a small floor safe at a home center for a few hundred dollars. Although they look small, they are very heavy and can hold plenty of your valuables. However, the size of the safe could potentially allow it to be carried away, so the safe thing is to secure it to the floor.
You can install the safe through a variety of flooring materials. Move the safe into the position you want it to rest. You will need to open the door and find the holes on the bottom of the safe. Use a marker or pencil and run it around the interior of the holes (there will be four). Once you have the holes marked, move the safe out of the way. If you have a wood subfloor you can predrill holes for the lag bolts (the instructions will suggest the correct size).
For concrete slabs, use a hammer drill and drill the holes to the correct size. Push the safe back into position and the holes in the bottom of the safe should be directly over the holes you just drilled. Now you can install the lag bolts for wood subfloors, or install the washers and nuts for the concrete anchors.
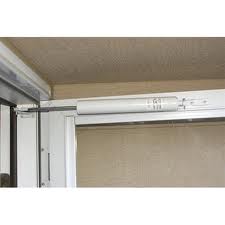 It’s nice to leave the door open when the weather permits. It’s even nicer to have to door close behind you when you leave. This is all done with a pneumatic closer and it takes just a few minutes to install one.
Most screen doors will come with a closer, but you have to install it. Fortunately, it is easy and the door should come with simple instructions. Basically, you will install a bracket on the jamb side of the door (where the hinges are). Locate the closer at the top of the opening and mount the jamb bracket to the jamb. There will be a gap between the bracket and the edge of the jamb whose size depends on the thickness of the door. The instructions will tell you the correct size gap.
There is a hold-open clip that has to be positioned at the body of the closer so that it opens and closes. You may need to orient it to do this correctly. One end of the closer mounts in the jamb bracket and is held in place with a pin. The other end of the closer secures to the door bracket. You can attach the door bracket to the end of the closer (if it doesn’t already come like that) and mark the position on the door. You can screw the bracket to the door to hold it in place, but you may need to remove it from the closer first. You can adjust the tension with a screwdriver by turning the screw at the end of the closer.
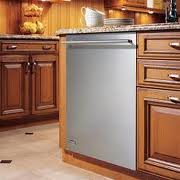 A plumbing leak at a dishwasher line is just like any other water supply line to a fixture…it’s just typically a longer line because if goes from under your sink all the way to the dishwasher.
You will find these water supply lines in a variety of materials from plastic to copper to braided lines. Braided lines have female threads on them and they simply screw on to the angle valve under the sink. For the lower cost options, they use compression fittings to attach.
Slide a nut onto the line, then push on a ferrule. Mate the line into the end of the angle valve opening and seat the ferrule at the opening angle valve. Thread the nut onto the angle valve and tighten it until snug. The nut will compress the ferrule and seal out any leaks.
Finding a leak is really about running the water and looking around. A leak will typically be located at a connection where a water supply line meets a valve or the machine itself, but this is a general statement. There is also a possibility that the line itself is damaged or even the dishwasher may be leaking. You really have to troubleshoot it and not assume it can only be one problem.
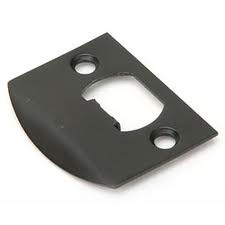 If you have a door problem the troubleshooting should be pretty clear. In this case, the door was hitting the strike plate when it closed. This is an easy fix assuming that only the very leading edge is a little too snug. In many cases when the strike plate is installed, it is just surface-mounted to the door jamb. It should be mortised into the jamb so that the entire surface of the strike plate is flush with the surface of the jamb.
If the door otherwise latches properly, the positioning of the strike plate is fine. Draw a fine line around the plate with a sharp pencil and then unscrew the strike plate. Use a sharp chisel and a hammer to remove enough wood so the strike plate sits into the mortise. Lay the chisel back at between 30-45 degrees and start tapping. It’s probably best to tap some vertical lines around the perimeter and then remove wood up to that point. Dry fit the strike plate often to make sure you have removed enough wood so that it sits flush. Be consistent with the angle of the chisel and the force of the hammer blows to get a consistent depth of the cut. Then just screw the strike plate back in.
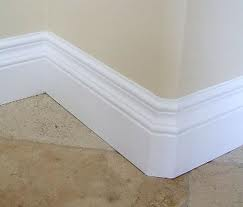 Installing baseboard is an easy job that gives you a lot of bang for the buck. You can go from boring to breathtaking in an afternoon.
To change the baseboards and door casings, first remove the old ones without damaging the walls. You can do this by placing a scrap block behind a hammer or pry bar and slowly pry off the old baseboards and casings. Before you pry off the old stuff though, score the top of the baseboards (or side of the casings) with a utility knife, where they met the wall. This will prevent tear-out of the texture and paint where caulking is used to fill the gap.
The cost for new baseboard and door molding varies depending upon type and style. Most trim is made of MDF (medium density fiberboard) covered with a thin veneer. You can also buy trim made from various types of plastic, but I personally don’t like the appearance.
Trim is sold by the linear foot and varies from around .50 cents for the cheap stuff past $6.00 per linear foot for solid wood. You can use a combination of moldings (base shoe, baseboard, base cap) to get custom profiles, but this is up to your taste and budget.
Installing the door casing comes first. Take a pencil and combination square and draw a light line 3/16 of an inch from the edge of the doorjamb. This will be the reveal line, with which the front edge of the trim is aligned. Measure the lengths of the pieces you will need to surround the door and add a little for the mitered corners.
By the way, I would highly recommend that you finish (stain, varnish or paint) the casing and baseboard before you nail it to the wall. It is much easier to stain wood while standing up in your garage that it is to do lying down on your floor.
Once the finish is dry, you will need to miter the corners (cut the corners at 45 degrees). You can cut scrap wood pieces and hold them up to the corners. Although the corners should be a perfect 90 degrees, they often are not. Adjust the saw and cut both pieces at the correct angle.
After the pieces are cut, secure them to the jamb using 4d nails. If you are using hardwood trim, make sure you predrill the holes for the nails. If not, your trim will split and your vocabulary will grow. Sink the head of the nail below the surface of the trim with a nail set and fill the holes with wood putty. You will have to touch up the finish wherever you filled in a nail hole.
Start the baseboards by cutting the length for the longest wall first. If your baseboard won’t completely cover the entire length of the wall, you can splice two pieces together by cutting the adjoining pieces at a 45 degree angle and sliding them together.
There are two ways to get a great looking inside corner. You can miter the corner (as you did with the door casing), or you can cope the inside corner. Coping is cutting the profile of the baseboard into the end of the piece that intersects it.
To cope an inside corner, cut one end at a 45-degree angle, as if you were cutting an inside miter. Then, use a coping saw to cut along the profile left by the miter. You can make a flawless fit by using a wood file to smooth out any rough spots. Continue mitering and/or coping around the room, pre-drill, and nail it up using 6d nails.
 It is concerning to think you have a water heater problem. For the most part, a water heater is an expensive proposition, no matter if it is a repair or replacement. I had a customer call to ask about a problem he was having with the water coming from the hot side of all faucets in the house. The water coming from the hot side of each faucet was cloudy or milky. Naturally, since the problem is occurring at all faucets, you would consider the water heater to be the problem.
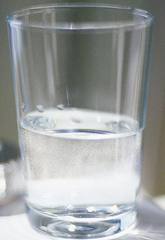
As it turns out, lots of people have milky or cloudy hot water. Water is under pressure which causes any air in the water to dissolve until the pressure is released at the faucet. Air is introduced in the system in a variety of ways from groundwater to the distribution system. If you have a lot of dissolved air in the system when the pressure is released at the faucet, you will get a milky appearance in the water. But watch it closely…the cloudiness will disappear as the air escapes. You will see the water clear in a few minutes from the bottom of the glass first (since the air rises). This is harmless and isn’t a health concern.