 Some carpentry jobs are easier for a handyman than others. For example, replacing toe kick on your cabinets. Toe kick is the piece of decorative trim at the base of your cabinets. At the base of your sink cabinet is an indentation which makes it more comfortable to stand and, for example, wash dishes. Without this indentation you would be forced to stand further away from the sink and stretch your arms out or stoop to reach the sink. Covering this indentation is the toe kick. It's called toe kick because you can kick this board with your toes as you approach it.
Toe kick on modern production cabinets is a thin decorative piece of wood that spans the base cabinets for a finished look. Behind the toe kick is either a support piece or just the edges of each individual cabinet. Without the support, this thin wood will easily break if impacted by a foot. Water damage is also a popular cause of replacement.
You can pry off the old toe kick with a pry bar or get it started with a standard screwdriver. The trick is to find the same, or close material to replace it with. Since it is recessed in the indentation, you are not likely to pick up as many differences in the appearance as it will be partially shaded by the overhang anyway.
You can buy several styles and colors at a home center or you may have to go to a cabinet manufacturer or specialty lumberyard. You may even have to stain and finish it to approximately match the surrounding cabinets. Most home center product is already finished, so that's a good place to start.
Once you cut the toe kick to length, you can glue or use finish nails to keep it in place. You can cover the corners with decorative trim pieces, which makes mitering unnecessary.
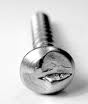 If you've ever wanted to replace a security door or gate, you know that the major roadblock are the one-way screws. They are not meant to be removed and therefore don't have the complete slot in the screw head. The slot in the screw head is cut in such a way as to only allow tightening of the screw, not loosening of it. So if you want to remove this type of screw or bolt, how would a handyman do it?
There are special tools you can buy specifically for this purpose or you can manipulate the screw head to reverse it. The tool you can buy chucks in your drill and you slowly back the screw out.
If you don't want to buy the tool, you can use any one of these methods...try holding 2 hacksaw blades together and cut a new slot in the screw head. This will allow you to get a standard screwdriver in the slot and allow you to unscrew it (a grinder would also work well here). You can also use the grinder to clean up the existing slot so that you cut a shoulder in the head to unscrew it. Or, use the grinder to cut a new slot perpendicular to the existing slot.
Finally, you can use the grinder or a file and cut the sides off of the screw head so that the 2 sides are parallel. This will allow you to use a wrench and unscrew it like the head of a bolt.
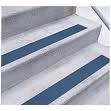 Stairs can be dangerous to climb, especially when they are smooth with little texture for a shoe to push against. In a home, stairs are usually carpeted with makes for easy traction for a foot or shoe. However, in a commercial building or even outside, you see the potential for slips.
An easy carpentry job is to make these types of stairs safer. Most stairs will have an edge where you place your foot called a stair nose. This is at the tread and will sometimes be made of a different material than the stair tread and can have texture on it for traction. For concrete stairs it is a good idea to install some grip tape or non-skid strip. This is available at most home centers and is typically a peel-and-stick product.
The non-skid strip looks and feels like a large grit sandpaper. Clean the surface of the stair nose and peel the backing off of the strip. Placement is important here. You want to install the strip along the top front edge of the stair tread, as this is where people place their foot when climbing stairs. Placing the strip at the rear of the step next to the riser will not do much good since the foot will not be as likely to contact it.
Smooth exterior stairs and stairwells would benefit most from this treatment.
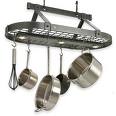 Hanging a pot rack can be easy or tough for any handyman. It all depends on the where the lumber is above you and the configuration of the pot rack. Some pot racks are meaty...thick gauge steel and heavy chains to hang it from. They will hang from several lag bolts to balance their weight.
Most people want the pot rack centered over kitchen island, cooking area, or preparation area. If you have a single story house, this is fine so long as the ceiling joists above the area are located where you need them to be. Much of this job is measuring.
Manufacturers typically spell out the distances for the mounting points of the pot rack You will need to use a stud finder and mark out the locations of the joists. You get a nice surprise if the joist is not where you need it to be. If this is the case, you have a choice of either moving the pot rack over to accommodate the joists, or going into the attic to add some lumber in the aforementioned location.
If your choice is to add lumber, use the same dimension size so that it secures easily to the surrounding joists. Use 16d nails and framing anchors for a rock-solid installation. Once the lumber is in place you can pre-drill the holes for the lag bolts, through the ceiling and into the joists. After the lag bolts are installed it is a matter of hanging the pot rack and balancing it.
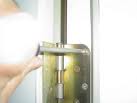 A friend called with a door problem. His front door was sagging a little bit and he was tired of lifting it up to get it to close and latch. He is no dummy and can generally tinker with something and get it to behave.
He tried to tighten the hinges but the door was still dragging. Over time, this door had been opened and closed hundreds or thousands of times, and gravity had helped to bring the door to its knees. When a door is installed, the typical screws used are only ¾" long. This is fine for the door-to-hinge connection, but for the hinge-to-jamb connection, it is too short, particularly at the top hinge.
There are a thousand things that could go wrong with a door, and one long screw can fix many of them. After I removed one of the short screws, I used a 3-inch screw and screwed it into the top hinge of my friend's door jamb. The length of the screw is important. You want the screw to be long enough to drive through the door jamb and into the rough framing of the house. This will give plenty of force to pull the hinge, and consequently the door, snug against the jamb. Since the screw is sunk into the rough framing, there is little chance of it working its way out. This repair should last a long time.
 What do you do when you discover a cabinet shelf is sagging? Well to start, it's probably a good idea to remove some or all of the weight off of it. The chances are good that it started sagging due to poor quality of the shelf material, and maybe that the shelf got wet and the weight on it started the sagging process. We see this a lot underneath kitchen sinks...a leak will develop and won't be discovered until it's too late. By that time, the water has saturated the shelf, and the weight of detergent, trash can, water filtration tanks, etc. will cause the sagging.
You can always build a stronger shelf out of ¾" plywood and put a solid edge on it. The edge acts as a brace to stiffen up the shelf. The edge can be made of 1"x2" solid wood and can be painted or stained to match the existing shelves.
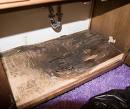
When replacing the base of a kitchen cabinet, you really have to plan on the cabinet base getting wet. At some point, there will be a leak and the floorboard will likely be exposed to water for a period of time.
Melamine is a good product to use. It is basically particle board covered by a water-resistant plastic. If water leaks into the cabinet, the wood won't be exposed to the water and won't become damaged. The challenge is that the size of the cabinet floor is fairly large. You can't get a replacement board in there without either cutting it in half or by removing the cabinet support, installing the replacement floor, and then reinstalling the support.
Sometimes the support is held in place with a plastic bracket which can be removed. The other option is to cut the support with a hand saw, install the board, and resecure the support.
Cabinet drawers can also suffer from abuse. Here is some information on cabinet drawer repair.
 Making your own picture frame is an easy carpentry job. You will need a few specialized tools or you can get creative.
As is frequently the case, the level of difficulty depends on the look you're creating. You can use moldings for the frame and generally these are finished by either painting or staining and varnishing. As far as the molding material, you can choose regular base molding or crown molding. The latter will give the picture some depth.
The size of the picture will dictate the frame's dimensions. For example, if you have a 5"x7" picture, you don't want a frame that is 6 inches wide, as it would look disproportionate and overwhelm the image. Choose a width and style that will accent the picture, but not steal its thunder.
You will also need some specialized tools. A router, for example, will cut a groove in the back of the frame to accept the glass, matting and picture. A bisquit jointer will cut a slot in the mitered corners to lock them together, and special clamps will hold the frame together until it dries.
When you choose the frame's material, but a single length of molding. This is important if you will be staining the frame to accent the grain of the wood. When you cut the mitered corners, you will start at one end of the molding and cut along the length of the piece, following the grain around the frame so that it looks like the grain is one continuous segment of wood.
Before you cut the corners, grab the router and cut a rabbet (a groove) using a rabbet bit with a pilot bearing. The rabbet will hold the glass and picture and make it so that it is recessed into the back side of the frame.
Run the router from left to right on the inside edge of the molding. Make sure the molding is clamped to your work surface and slowly move the router.
Wear eye, ear, and breathing protection as you use the machine. You can rent a router for less than $20, or you can buy one for about $60.
Now you can cut the mitered corners. You will have four lengths of molding with a 45-degree cut on each end. Make sure you measure correctly.
Then, using a miter saw, cut the angles to length. Dry-fit everything together and make sure your corners contain no gaps.
To connect the mitered corners to each other, I prefer a biscuit jointer, as it cuts a slot in each edge of the miter. You will slather a football-shaped "biscuit" with glue and it will sit in the slot.
Mark the midpoint of the edge and cut the slot on each miter. There are different sized biscuits, but use the smallest one necessary. cover the biscuit with yellow carpenter's glue as well as adding glue inside the slots.
Place the biscuit inside the slot and bring in the other side of the molding to form the corner. The biscuit will slightly expand as the glue dries, helping produce a rock-solid joint.
As the glue is drying, you will need to clamp everything together to keep it nice an square. There are clamps made specifically for picture frames that use rods you can adjust to square up the frame.
You can also use corner spring clamps, or a band clamp and cinch the frame tightly. Wait at least 24 hours before you remove the clamps.
After everything has dried, you can install a piece of glass, the matting and the picture. Then just install a picture hanging bracket on the back of the frame, and you are ready to start admiring your work.
By the way, if you are looking to add a dramatic look to the room, I can send you my old high school picture. It's as dramatic as they come, especially when you see my hairstyle.
 At a customer's house, she pointed out that the end of her kitchen cabinet was water-stained. Apparently, the dishwasher had leaked in the past and stained the end panel of the cabinet. She wanted to know what could be done about it.
The end panel was stained pretty badly and the chance of sanding, staining, and finishing it to look like it never happened was slim. A better idea was to re-skin the end of the cabinet. Basically, you buy a new piece of one-eighth inch veneer and stick it over the damaged piece. This isn't as hard as it sounds. They key is matching the species, color, and finish of the wood.
If you have the manufacturer (look inside the cabinets for a sticker or tag), you can remove a door or drawer and take it to them so they can determine the correct color. If you don't have the manufacturer, take a cabinet door with you on your hunt. You can buy pre-finished panels, or you can take it to a cabinet shop and have someone make it for you. You can also buy unfinished panels from some home centers, that you will have to stain and finish to match.
Once you have the correct panel, you can cut it to fit and glue it in. Some cabinets have corner pieces you can remove, install the new end panel, then re-install the corner pieces. This will cover any unsightly edges.
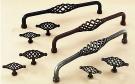 If you have some builder-grade cabinets, here is a way you can dress them up and make them look not-so-cheap. Simply add handles and pulls. There really are a myriad of choices.
The finish of your cabinet pulls and handles should match your hinges if they are visible. Otherwise, it might look like an afterthought. So if you really fall in love with a specific handle that doesn't match your hinges, you may be faced with replacing your hinges as well, to which I say...maybe look for different handles. Handle finishes go from gold, chrome, brass, various brushed metal finishes, ceramic, wood...and the list goes on.
For cabinet doors and drawers, you can choose between handles and pulls that have one mounting point or two. This means drilling either one hole or two holes in your door. Naturally, the more holes you have to drill, the longer the installation job is going to take.
With builder-grade cabinets, you typically have a thin panel surrounded by a wood frame. Don't even try to install a handle in this thin material, instead install the handle on the wood frame.
Here is some information on how to install cabinet handles and pulls. You can buy a template or make your own out of scraps. Either will allow you to install the handles and pulls exactly where you want them.
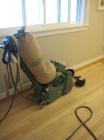 Making your wood floor look fresh again is a big carpentry chore. You're going to need to rent a sanding machine (either a "drum" or a "belt" model), an edger, and a buffing machine.
Before you start chewing away a layer of your floor, though, you should be aware that some floors can only be refinished once or twice. If, for example, you have engineered floors with a thin layer of veneer on top (instead of solid refinishable wood throughout), the risk is that you could sand through the veneer and ruin the appearance. Try investigating this in an inconspicuous area like a closet.
If the veneer checks out, start the job by clearing everything out of the room and sweeping the floor. Make sure you are comfortable with the sanding machines, and cover the doorway with plastic to keep the dust inside. Begin with a low-grit sandpaper medium and work progressively to finer and finer grits to eliminate the scratches from the previous grit.
By the way, maker sure you wear a dust mask because it will get pretty cloudy in there.
Since the floor sander is bulky and you must stand behind it to operate it, you can't start in a corner. Instead begin by sanding from somewhere near the center of the room, but do it at an angle. This will help level the floor as you sand.
Conversely, if you initially sand parallel with the walls, the sander will tend to bounce if it hits an edge of a wood strip that is protruding. This will cause the sander to dig into the floor and create troughs. Sanding at an angle will help cut down on the troughs.
Try 60-grit sandpaper for a test run to see if it produces a level pass. If not, you may try a 40-grit (the lower the number, the larger the abrasive particles on the paper and the more material it will remove). After finding the right grit, you can sand half the room, then turn the machine around and sand to the opposite walls.
After you have completed sanding the floor at an angle, run the sander parallel to the wall with the grain of the floor. This will eliminate the scratches from the previous step. Sweep or vacuum the floor to remove the grit and continue moving up in sanding grits until you reach the suggested grit recommended by the manufacturer (usually 100).
Now comes the perimeter of the room. For this area, use an edger, which is a small sanding machine held with both hands. Move it from side to side with the grain of the wood, starting as close to the wall as you can get. Gradually move the edger away from the wall until you can blend in the sanded areas from the floor sander.
Again, sweep or vacuum after each grit change. After the hand sander, you will still need to do some actual hand-sanding and maybe use a scraper to clean out the corners and other small areas the sander will miss.
Now you can break out the floor buffer and attach both a driving pad and a 100 to 120-grit screen. This will further blend in the sanded areas where the edger meets the floor sander. Start buffing with the grain along one wall with a sweeping motion moving toward the center of the room. Once you get to the center, change the screen and go to the opposite side of the room, again starting along the wall. When you reach the center of the room, you're done.
Depending on the size of the room, you may have to change the screen more frequently. Give the room a thorough vacuuming, preferably with a vacuum equipped with a HEPA filter.
The finish you use will either be oil-based or water-based. There is good and bad with either, but water-based dries faster and it doesn't add color to the floor. Make sure you thoroughly read the manufacturer's instructions.
For water-based finishes, you have to use a compatible sealer. The sealer will protect against stains and not allow the subsequent layers of finish to absorb, allowing a buildup of layers.
The sealer and finish are applied in the same manner. The sealer will be poured along the length of the floor and then spread with a T-bar applicator, which looks like a giant squeegee. The trick is to keep a wet leading edge on the applicator, and to do the entire floor at one time without stopping.
Pour a thin line of sealer along the edge of the wall and use a hand squeegee to feather it out. Continue pouring the sealer and spreading it around with the applicator. Overlap the previous stroke slightly, but don't overwork the sealer or you will get bubbles in it. The sealer will dry fast, so keep moving.
Once the sealer is dry, you will typically have to buff it with a fine buffing screen. This will rough up the surface and promote adhesion of the finish.
The finish is applied the same way. Use a damp T-bar applicator and spread the finish around the floor in straight rows, slightly overlapping each row. When you see the finish start to diminish in front of the applicator, pour a line of finish in front of it. As you approach a wall, use a wide sweeping motion and turn the applicator 180 degrees to change directions. Don't stop in the middle of a pass or it may leave a mark. Once the finish dries, lightly buff it and wipe up the dust with a tack cloth. Then you can start the fun all over again for the next coat.