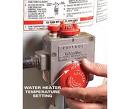
 Most people can can easily turn down the temperature of their water heater. It is safer and more efficient. Most of the time, after you get a new water heater, you never look at it again until you notice water running down the driveway years later.
Turning down the temperature will accomplish several things. First it will lower the risk of scalding, which is a concern with small children in the house. Not only is there a risk of turning on hot water at a faucet, but also when they see a hose faucet attached to the base of the water heater. I've heard stories of kids getting scalded when they open the water heater's hose faucet.
You will also save energy by lowering the temperature. The lower the temp, the less the unit has to run to keep the water heated at the higher temperature.
High temperatures will also cause the tank to fail. High temperatures cause a more rapid accumulation of sediment and they speed up chemical reactions. The rusting reaction is accelerated by heat. Also, when water is heated, it expands slightly which could cause the glass lining to crack and flake.
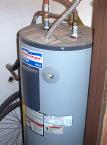
The answer is to simply turn down the thermostat. It is the big dial on the front of water heater near the bottom. You will have settings from "vacation" to "high". Start at the setting just above "vacation" (usually labeled "A") and slowly raise it until it the temperature is sufficient for your needs.
 It's late at night and your water heater tank is leaking. You are mad not only because you have a mess on your hands, but because the water heater is only 3 years old. Shouldn't this be covered under warranty? Probably. You will have to do a little research first.
Generally, the minimum warranty on a water heater has been 6 years. However, builders have been known to install inexpensive units that have lesser warranties. Even homeowners can now buy a water heater at some home centers that carry only a 3 year warranty. They cost less, but I wouldn't want a flood in my garage every 3 years either.
On the side of the water heater is a sticker with the model number and serial number of the unit. You will need this to verify a warranty. As for contacting the manufacturer, you may get lucky and see a phone number on the water heater to verify the warranty. Some manufacturers also can verify a warranty on their website. As a last resort, look in the yellow pages under "water heaters" and you can find companies that service various brands. They may help you out. Generally, you are forced to jump through a few hoops to get a free water heater under a warranty claim. I guess they don't want to make it too easy to stick them for a freebie. It sometimes isn't entirely free either. The distributor for the manufacturer will often charge a "re-stocking fee" or a "service fee" to cover their expenses. This fee usually ranges from $45.00-$85.00.
A distributor will generally have you peel off the sticker on the side of the tank that has the model and serial numbers, and bring that in. For brands that are carried by home centers, you often have to bring the entire water heater into the store.
The warranty will generally not pay for installation of the new water heater. You will have to install it yourself, or hire someone to do it for you.
 Installing a gas water heater requires a high level of attention to detail.
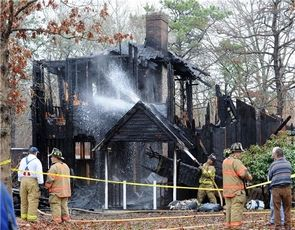
This morning in Cape Cod, MA a house completely burned and the tenant received 2nd degree burns, but is expected to live. Yesterday, a new gas water heater was installed at the property and the tenant noticed a gas smell soon after it was installed. The fire is still under investigation, but the fire department is "looking" at the water heater as the cause. You can read the story here.
As of now, there is no telling if the water heater was defective in some way, or if it was incorrectly installed. This is a good time to revisit the importance of testing the gas connections of the installation.
When you connect gas fittings, you should use yellow gas tape (as opposed to the white teflon tape) and tighten snugly. Test the fittings by applying either soapy water or a specific gas testing solution, which can be purchased at most home centers. It is a little thicker than the water and will allow you to see a slow leak.
You can read the specifics on installing a water heater here.
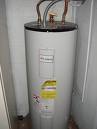
 As the weather gets colder, its probably a good idea to insulate your water heater. This is as easy as buying a water heater jacket and throwing it around the water heater. Most water heaters in Las Vegas are kept in the garage where it is much cooler than the air conditioned house. The outer skin of the water heater transfers the cooler air temperature ultimately to the tank, although there is insulation between the skin and the tank.
So go to the store and buy a jacket for your water heater. Secure it around the tank and keep it warm and snuggly. While you are at it, you can buy some pipe insulation and wrap the pipes at the top of the water heater. One pipe will be the hot water outlet and the other is the cold water inlet. Wrap the pipes, particularly the hot pipe, to slow down the transfer of heat through the copper pipe to the ambient air.
Your water heater should have heat traps built into these pipes or fittings to keep the hot water from creeping up and out of the tank as it becomes more buoyant than the cold incoming water. This can also be accomplished by creating a high loop with the copper flex lines to the point where the pipe rises higher than the point that it enters the wall.
 Many water heaters have been replaced prematurely due to an inexperienced person trying to diagnose and fix the problem. Common sense and isolating the problem would go a long way in determining the problem and ultimately how to fix it. This advice is also good for the problems that we all face in our everyday lives.
So here is what happened...a homeowner reported water heater trouble; he is not getting much hot water. It is not as hot as it once was, nor does it last very long. The homeowner tells me that this has been going on for several weeks and in fact he replaced the water heater just last week and it still is doing the same thing....I'm seeing a pattern here.
I went to the property and sure enough the water heater was brand new. When I looked at it, the burner was firing and didn't stop. I realized what was happening. I asked him about his water bill. Sure enough, his water bill was MUCH higher than normal, as was his gas bill. I went to the street, pulled off the water meter cover and the meter was moving like crazy. I told him he had a slab leak on the hot water line. I turned off the valve supplying water to the water heater and the meter stopped moving.
What was happening was since there was a leak in the hot water line AFTER the water heater, the water was constantly running through the water heater and out of the broken pipe under the slab. The water never stayed in the tank long enough to get warm. This explains the water heater constantly firing and the high gas bill. The high water bill obviously was from the leak in the pipe flowing 24/7.
Had the homeowner isolated the problem and figured out that his high utility bills and water heater were all related, he wouldn't have replaced the water heater and saved some cash.
 It always happens at the worst time possible. There is no hot water and there is a constant stream of water coming from the bottom of the tank. A water heater Las Vegas always seems to last 1 day after the warranty expires.
Start by turning off the gas to the water heater. The valve is located near the wall, usually at the base of the water heater. Turn the knob a quarter of the way (the knob will be at a right angle to the pipe when the gas is off). Next, shut off the water to the unit. This valve is located on the water supply line, which comes out of the wall and goes into the top of the water heater. Turn the knob to stop any more water from entering the tank.
Grab a garden hose and attach it to the drain valve on the bottom of the water heater. Roll out the hose to the street and open the drain valve. Be careful, because this water is hot.
Disconnect the flexible gas line at the gas control valve (the metal box at the bottom front of the water heater that has a temperature dial on the front and a knob on top of the box that controls the gas).
Use a large open-end wrench or a pipe wrench to unscrew the flexible copper connectors at the nipples on top of the water heater. Finally, disconnect the vent pipe from the top of the water heater and push it aside.
Recruit a neighbor to help you lift the old empty water heater down from the stand. A gas water heater must be elevated at least 18 inches to prevent heavy low-lying fumes (gas) from contacting the flame in the water heater.
Water heaters feature a safety device called a temperature and pressure relief valve (TPR), which limits tank temperature and pressure and keeps it from exploding. When you purchase a new water heater, make sure it has the TPR valve in the same general location as your old unit. In other words, if your old water heater had the TPR valve on the side, buy one with the TPR on the side. In doing this, you won't have to extend any drain lines to accommodate the new location of the TPR valve.
Your new water heater will come with a TPR valve, but you may have to install it. Just wrap the threads three times with Teflon tape and screw it in tightly with a pipe wrench.
Buy two dialectric nipples, wrap the threads three times with Teflon tape on both sides, then crank them down snugly. Dialectric nipples are galvanized, but are lined with plastic to slow corrosion between two metals. With some water heaters, you may also have to install the fill tube, which is included in your purchase. Again, wrap the threads with Teflon tape and screw it snugly into the cold water supply hole. This tube pushes the incoming water down to the burner to get hot before it can leave the tank.
Call your neighbor back to help put the new water heater on the stand. Trust me, you'll pay him back when his unit dies.
All that's left is to reconnect the fittings to the cold water supply line, the outgoing hot water line, and the TPR valve. Use a large open-end wrench or pipe wrench to screw them down snugly.
Reconnect the flexible gas line to the gas control valve. Wrap the threads of the gas fitting with gas tape, which is similar to Teflon tape, but its yellow and much thicker. Securely tighten the line to the valve using two wrenches, one to keep the valve from twisting and one to tighten the line.
Check the manufacturer's directions for the proper vent size. Four inches in diameter is typical but it may vary depending upon the heat output of the water heater. Reattach the draft hood and the vent pipe to the top of the water heater. The draft hood will slide into slits and the vent pipe will attach to the draft hood with sheet metal screws (three-eighths inch).
Open the hot water faucet that is nearest to the water heater. Go back to the water heater and open the cold water supply valve at the top of the tank. As water fills the unit, it will push out the air through the faucet that you opened. The hissing sound coming from the faucet will stop when the tank is full and water comes from the faucet. Thoroughly check the fittings for leaks and tighten accordingly.
Turn the gas back on and test for leaks by brushing a 50-50 mixture of dishwashing soap and water over the connections. If you get bubbles, then you have a leak. Tighten or reconnect the leaking joints and retest them.
Light the pilot light according to the manufacturer's directions. Usually, you turn the gas control valve to "pilot" and hold the button down for a minute as you light it. After the pilot has been lit, turn the dial to "on" and then set the dial to the desired heat setting. You'll have hot water in about an hour.
As I pulled into my neighborhood yesterday, one of the neighbors flagged me down to look at his water heater. It was belching water from the tank and so I helped him to turn it off and drain it. But it started me thinking about how we (myself included) neglect the maintenance on these things, and how the anode rod helps it to stay alive. Water heater repair is so fun.
A water heater anode rod is a "sacrificial" rod that corrodes away, sparing the tank the same fate. Although your water heater's tank is glass-lined, there are bare metal areas such as seams and fitting penetrations that are susceptible to corrosion.
Your tank's main defense is the anode rod. In fact, would you like to take a wild guess as to what manufacturers do to increase the warranty from 6 years to 12 years, for example? Among other things, they add a second anode rod.
An anode rod is made from magnesium, aluminum or zinc, wrapped around a steel-support wire. The rod is screwed into the top of the tank, but you may have to do some digging to find it.
It's a good idea to check the rod and replace it if it's damaged. Generally, if you can see 6 inches of the support wire, or if the rod is deeply pitted or split, replace it. You may get it out and discover that there isn't even a rod left. As long as a good amount of the anode remains, the tank should operate well.
The rod is attached either to a hex head or the hot water outlet nipple (called a combination anode). Look at the top of the tank and check for the hex head. If it can't be easily spotted, it may be hidden under a plastic plug or insulation, or under the metal top of the heater. I wouldn't recommend removing the top sheet metal cover as some of these are "foamed" into place with expanding insulation.
Before you start playing with the anode rod, turn off both the heater and the water supply. Open the nearest hot water faucet to relieve the pressure, or drain some water out of the tank from the drain valve.
Inspect the top of the heater for the hex head. If you can't find one, you probably have a combination anode. Disconnect the flex pipe to the hot water nipple.
You will need something stiff and thin like a coat hangar or other piece of wire. Shove it down the hot water outlet nipple. If the wire stops after about 6 inches, you have a combination anode.
Removing the anode is as simple as unscrewing it. Don't think it will be that easy, though. If you water heater is not aging gracefully, you may need some brute force to bully the anode into coming loose.
Once you unscrew the anode, you may have another problem: the overhead clearance may not provide enough room to pull the anode out. You will have to either drain the water heater so you can lean it far enough to pull out the anode rod, or you can bend the rod and pull it out. This means you will have to bend the new rod to get it in (although some rods are made in flexible sections). Bend it in the middle just enough to gain clearance into the hole. Then you can straighten it against the rim of the hole and screw it in.
If you have a hex head-type rod, you can always add a combination anode for more protection. Just wrap the threads with Teflon tape, drop it in the hole, and screw it in. You just may add a few years of life to the water heater.