 A swamp cooler is basically a box with some simple mechanical parts inside. When a part breaks, it is pretty easy to replace it. That’s what makes a swamp cooler so easy on the budget. You don’t have to buy a $1200 compressor…you can buy a $5 pulley instead.
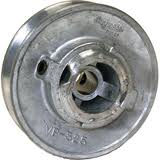
Replacing a pulley is a matter of removing the belt, working the pulley free of the shaft and replacing it.
Unplug the swamp cooler and manually rotate the pulley. As you do, goose the belt off of it. Once you get the belt started, it should easily come off of the pulley as you rotate it around.
The pulley will be held to the shaft by a bolt or setscrew. Loosen this and the pulley should pull off of the shaft. This often isn’t as easy as it sounds. Inside the swamp cooler is a science experiment in corrosion. You will see deposits and probably rust in a variety of places. You may need to tap the pulley a few times to move it to off of the shaft.
Take the pulley with you and get a replacement. You will notice that on the shaft is a flat side. This is where the bolt or setscrew tightens to it. So make sure that when you replace the pulley that the setscrew aligns with the flat side of the shaft and tighten it. Place the pulley on the shaft and make sure it is in the same plane as the mating pulley. One pulley will be on the motor and the other to the squirrel cage (blower). Make sure they are aligned with each other or the belt will have the tendency to jump off of the pulley.
Place the belt on the pulley and rotate the pulley while pushing the belt onto it. You should tension the belt and then turn on the motor and check to make sure the belt doesn’t have any play in it.
 A swamp cooler holds water for the entire time it is in use. If you have a leak, it is time to inspect it. You need to determine where the leak is coming from. A common source of a leak is the drain and overflow kit.
The bottom reservoir in the swamp cooler holds several inches of water. The drain and overflow kit is a small assembly that allows you to drain the water from the bottom of the cooler. It also will drain water if the water level becomes too high. If the leak is coming from this area, pull the tube from the assembly to drain the water and then try to reseat the tube. If that doesn’t stop the leak, it might be time to replace the assembly.
Unscrew the bottom nut from the assembly and the top will lift out. Clean up the area where the drain sits so that good contact is made when you reinstall the new one. Place the rubber washer over the threads and secure it with the nut on the bottom. The drain tube pushes down into the assembly. Refill the reservoir and check it for any leaks.
When you refill the cooler, adjust the float valve so that there is between two and three inches of water in the bottom of it.
 Las Vegas water and swamp coolers often don’t get along very well. If you look inside a swamp cooler, you will see plenty of mineral deposits on virtually every surface that has come into contact with water. Take a look at the float valve. This is where the water enters the swamp cooler. This part usually gets covered with deposits. You can clean it off or replace it if it bothers you. Occasionally, the float will break and you will need to replace it.
Follow the water supply line to the cooler. With the water off, you can cut the line or unscrew the nut that holds the line to the float. The float valve is inside the swamp cooler. It has a plastic float attached to a rod. When the water is low in the reservoir, the float drops and allows water to enter and fill the reservoir. When the reservoir is full the float rises and the water shuts off.
The float valve is held on by a bracket or a hole in the side of the cooler. Remove the nut that holds the float on. The float valve will pull right out. You can install a washer on the new float and push it into the hole or bracket provided for it and then tighten the nut to hold it. Then reconnect the water supply to it.
You will need to adjust the height at which the float valve shuts off the water from entering the reservoir. You can simply bend the rod up or down to accomplish this. Most manufacturers suggest having 2 ½” -3” of water in the reservoir.
 A swamp cooler, aka evaporative cooler, really doesn’t have many parts by comparison, but the parts they do have are important. One of the things that keeps the swamp cooler running is the pump. The pump moves water over the filter media to keep it wet. Over time sediment builds up in the base of the cooler, the water will wash debris from the filter media, and evaporation leaves behind deposits which can clog the pump. The pump screen plays a vital role in stopping the debris from reaching the inlet of the pump. Do you need a pump screen? Absolutely.
The pump screen is simply a plastic basket that the pump sits inside. It has many small openings to allow water in but blocks debris from entering. Occasionally, you might have to clean the debris from the openings in the basket.
You will have to remove the screws that hold the pump in place at the bottom of the cooler and then place the basket below it. On some models, depending where the hose connects from the pump to the spider, you may have to feed the hose through a hole in the basket. The basket usually has a knockout for this reason, but if not you can use a utility knife to make your own hole.
 If you are installing a swamp cooler you will need to connect water to it. Mobile swamp coolers have a hose thread that you simply connect a garden hose to. For larger non-mobile coolers, you will have to run a water line to it.
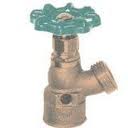
You can buy a valve that screws onto your standard hose faucet. This valve is designed just for this purpose. It has a female threaded fitting built into the side so that you can add a needle valve to supply the water to your swamp cooler. It’s a good idea to have an anti-siphon device connected as well.
Screw on the valve to the hose bib and wrap the threads of the needle valve with Teflon tape. Screw the needle valve into the threaded port until snug. Connect either a copper line or a poly tube to the needle valve using a ¼” nut, ferrule and brass insert. Tighten that until snug. Roll out the water line to the swamp cooler. It’s probably best to keep the line as close to the base of the house as possible.
Run the line into the swamp cooler and connect it to the float valve, again using the insert, ferrule and nut. Turn on the hose faucet to supply water to the swamp cooler valve and then open the needle valve. You should have water flowing to the swamp cooler. Adjust the float in the swamp cooler so that the water is between 2 ½” to 3” deep.
That's right, my ANNUAL power bill. I've been a convert for 2 years now, and I never thought I would say this without feeling like trailer trash, but I love my swamp cooler. Before you get visions of me in a trailer, let me tell you that I was converted by some neighbors. I'm lucky to live in a nice neighborhood with many of my neighbors being self-employed or professionals. Yes, they use swamp coolers too. If it makes you feel better, you may call them evaporative coolers.
As a Las Vegas handyman, I am both blessed and cursed to live in a hot, dry summer climate. This combination of dry heat is perfect for a swamp cooler. For those of us that live in a desert climate, we tend to use the bulk of our annual power during the summer months. So naturally, the summer is target-rich for cutting your power bills.
My power consumption went down so dramatically that the power company paid me an unannounced visit on a holiday Saturday to snoop around and make sure I wasn‘t stealing power from them. I'm not sure if they love me now or hate me.
So, I've established that a swamp cooler will save you money over a traditional air conditioning system, but I will be the first to say that a swamp cooler is not for everyone. It's not the type of thing you plug in and forget about. You will need to replace the cooling pads and keep an eye on it and the weather. Humidity is the arch-nemesis of the swamp cooler, but if the air is dry outside you might want to keep the winter coat handy.
A well-tuned swamp cooler should be able to drop the temperature by 30 degrees, so if it is 100 degrees outside, look for inside temps of 70 degrees.
The biggest challenge for a homeowner is where to install a swamp cooler. Ideally, install it on the north side of the house (where it's shady) through a window that raises up-and-down. If you have to install it where the sun will hit it, arrange something to cast shade upon it. If the sun hits the unit, it will warm the air by a few degrees, which is very important. I like a side-draft unit installed through a ground floor window, but you can certainly cut a hole in your wall to accommodate it. Of course, you need to take precautions so that security in maintained with window locks, etc. should you choose to place it in a window.
Using a swamp cooler takes a different mindset too. Basically, you are pressurizing the house like a balloon. You must exhaust the air so that you get airflow. This is accomplished by slightly opening some windows or by using up-ducts (trademarked as "Up-Dux"), which ventilate air into the attic. You can plan on venting 1-2 square feet of space for every 1000 cfm (cubic feet per minute) of air the swamp cooler produces. If you don't want airflow in a particular room, don't ventilate air in that room (i.e don't open the window or install an up-duct). To determine how much cfm you will need, take the volume of air in your house and divide that number by 2. For example, if you have a 1,400 square foot house with 8 foot ceilings, you would need 5,600 cfm of swamp cooler output (1,400 x 8=11,200. 11,200 /2=5,600).
After I install a swamp cooler, I will level it and fill in any gaps with weatherstripping. If you have a side-closing window you will need to fill in the top portion with a material that makes you comfortable...many people use plywood although this isn't very attractive. I let the unit run and check the wetness of the pads. If the pads are not uniformly wet, you are allowing hot incoming air to mix with the cooler air that the unit has produced, which will raise the temperature of the air entering the home. Every degree counts. If there is a dry area on the pad, I will recheck for level, and if necessary drill more holes in the water supply trough that feeds the pads.
At some point you will have to perform maintenance on the unit. Here is some information on how to replace a swamp cooler pump and how to replace a swamp cooler motor.
There are certainly times during the summer that I have to shut off the swamp cooler and turn on the traditional air conditioning. This lasts for about 3 weeks, from late July to early August, and is due to the "monsoon season" and the high humidity levels.